
按要求完成如下架构:
1、用户能通过域名正常访问到后端服务器网站(jpress),并且配置SSL证书,域名分别为:blog.ops.com
2、nginx负载均衡器要求实现高可用,并可以对后端服务器进行健康状态检查
3、tomcat的session使用redis服务器进行统一管理
4、tomcat的网页数据使用NFS进行统一管理
5、数据库服务器和tomcat业务服务器使用堡垒机统一管理,为了实现资产的分开管理,zhangsan用户可以管理业务服务器,但是无法管理数据库服务器;而lisi用户可以管理数据库服务器,无法管理业务服务器。
6、要求将所有服务器的防火墙开启,将默认规则设置成DROP,并根据各自不同业务按需放行特定端口
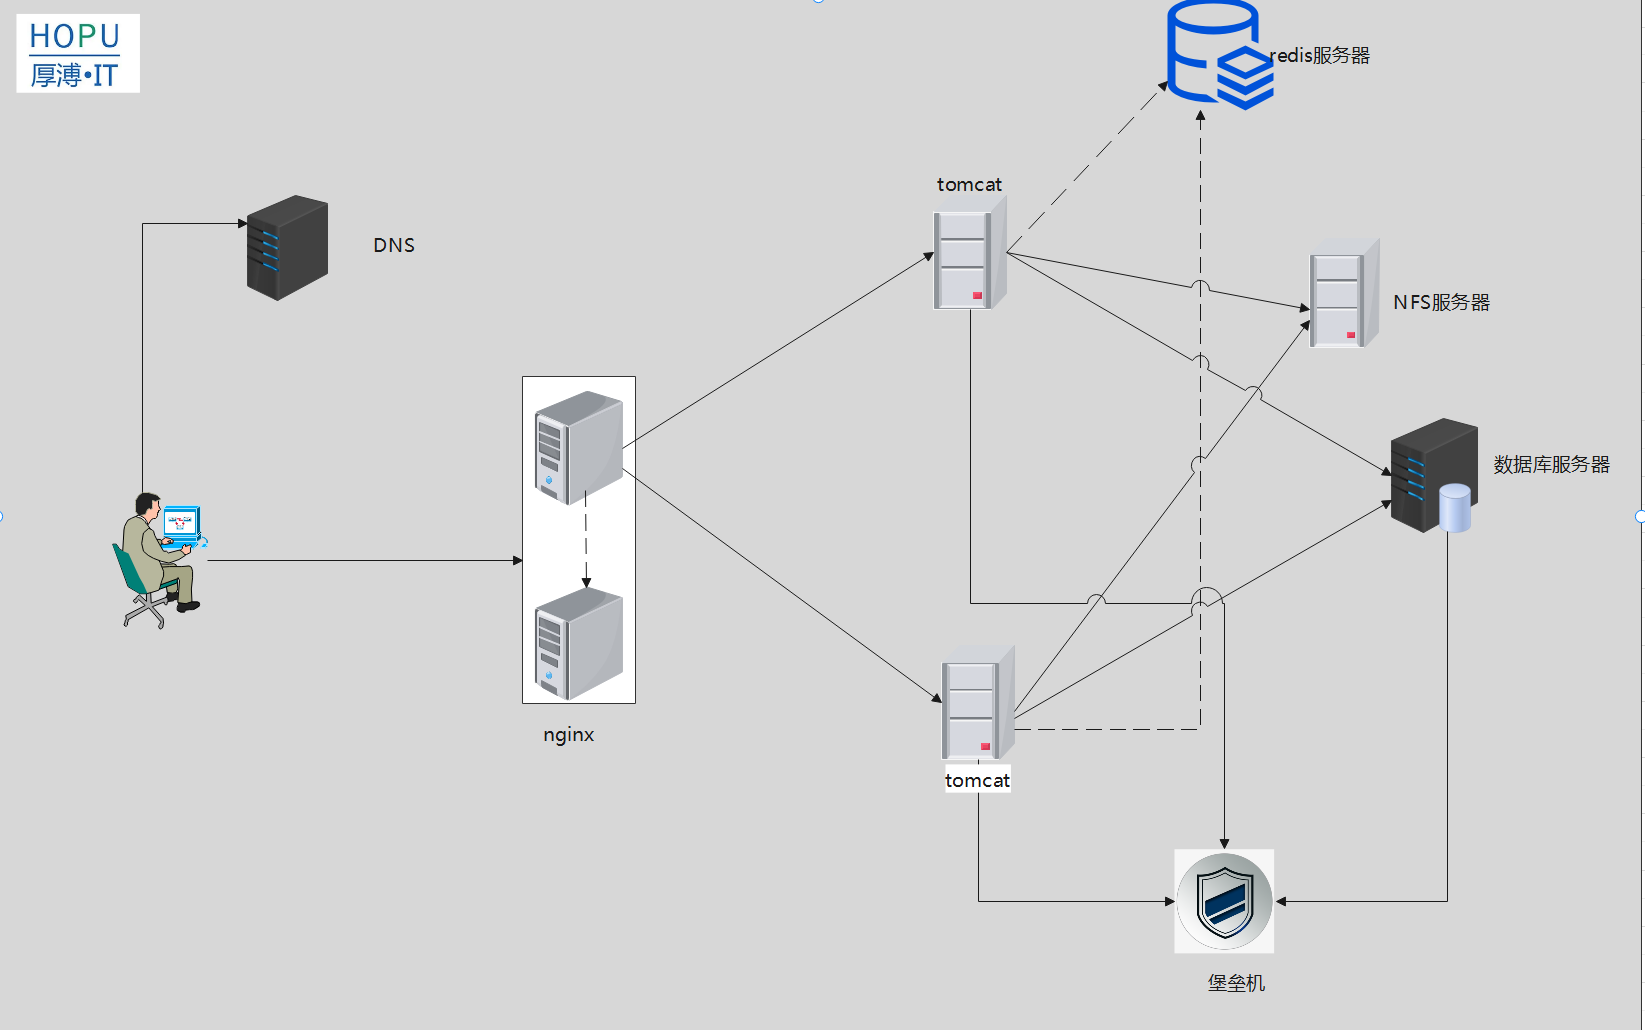
| 服务器 | IP | 作用 |
|---|---|---|
| DNS | 10.0.0.8 | 域名解析 |
| nginx-Master | 10.0.0.9 | 负载均衡 |
| nginx-Backup | 10.0.0.10 | |
| tomcat1 | 10.0.0.11 | Web服务 |
| tomcat2 | 10.0.0.12 | |
| Redis | 10.0.0.13 | 缓存服务 |
| NFS | 10.0.0.14 | 网页文件存放 |
| JumpServer | 10.0.0.15 | 堡垒机 |
| Mysql | 10.0.0.16 | 数据库 |
Mysql 数据库
# 源码编译安装
# 设置数据库密码
alter user root@localhost identified by "123456";

[root@mysql~]$ mysql -uroot -p123456
mysql> grant all privileges on *.* to 'root'@'%' identified by '123456';
Tomcat
[root@tomcat-1~]$ tar xf jdk-8u341-linux-x64.tar.gz -C /usr/local/src/
[root@tomcat-1~]$ vi /etc/profile.d/jdk1.8.0_341.sh
JAVA_HOME=/usr/local/src/jdk1.8.0_341
JAVA_BIN=$JAVA_HOME/bin
JRE_HOME=$JAVA_HOME/jre
JRE_BIN=$JRE_HOME/bin
PATH=$JAVA_BIN:$JRE_BIN:$PATH
CLASSPATH=.:$JAVA_HOME/lib/dt.jar:$JAVA_HOME/lib/tools.jar:$JRE_HOME/lib
export JAVA_HOME JRE_HOME PATH CLASSPATH
[root@tomcat-1~]$ java -version
java version "1.8.0_341"
Java(TM) SE Runtime Environment (build 1.8.0_341-b10)
Java HotSpot(TM) 64-Bit Server VM (build 25.341-b10, mixed mode)
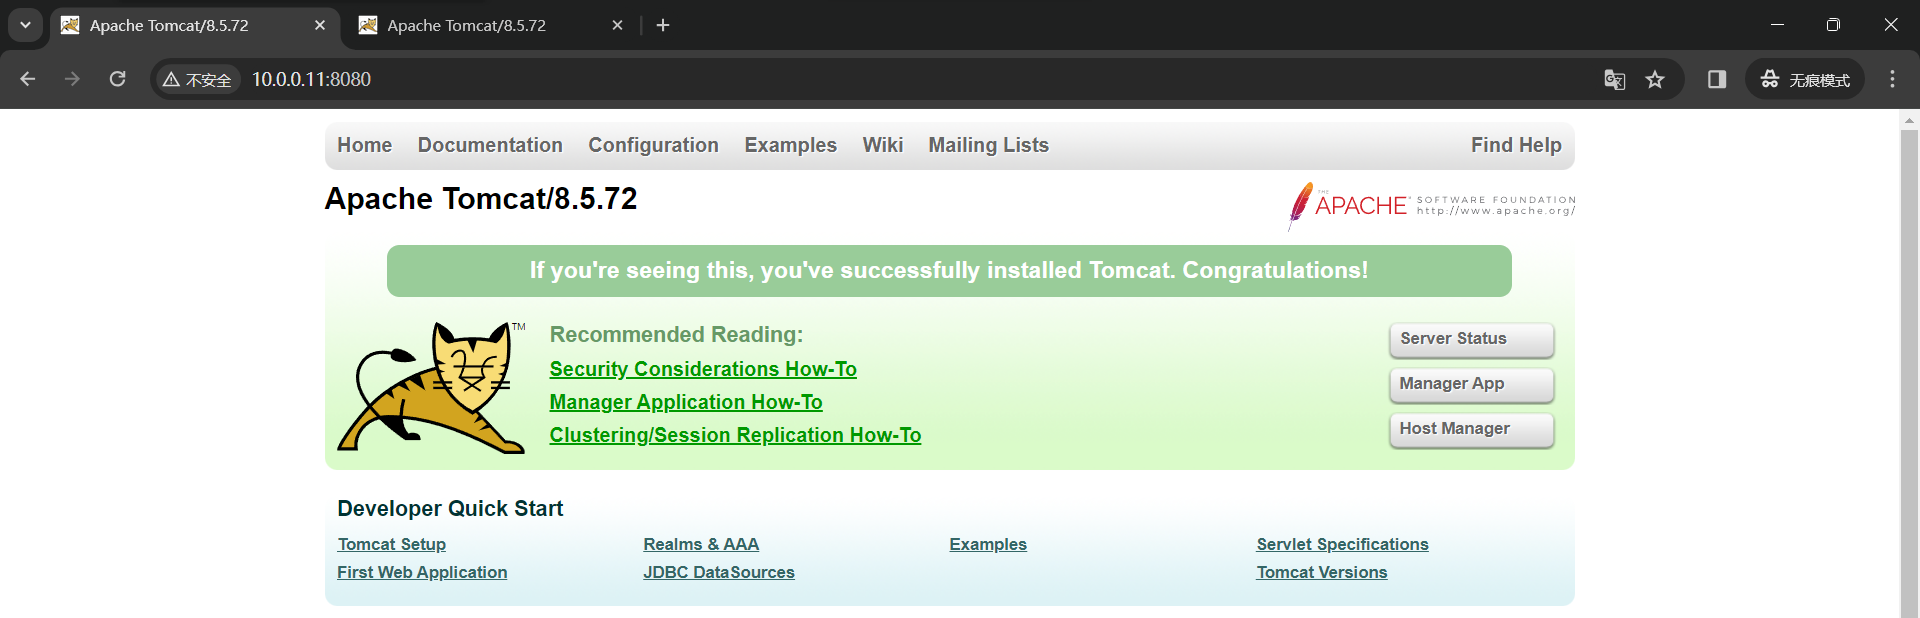
[root@tomcat-1~]$ tar xf apache-tomcat-8.5.72.tar.gz -C /usr/local/
[root@tomcat-1/usr/local/apache-tomcat-8.5.72/bin]$ ./startup.sh
Using CATALINA_BASE: /usr/local/apache-tomcat-8.5.72
Using CATALINA_HOME: /usr/local/apache-tomcat-8.5.72
Using CATALINA_TMPDIR: /usr/local/apache-tomcat-8.5.72/temp
Using JRE_HOME: /usr/local/src/jdk1.8.0_341/jre
Using CLASSPATH: /usr/local/apache-tomcat-8.5.72/bin/bootstrap.jar:/usr/local/apache-tomcat-8.5.72/bin/tomcat-juli.jar
Using CATALINA_OPTS:
Tomcat started.
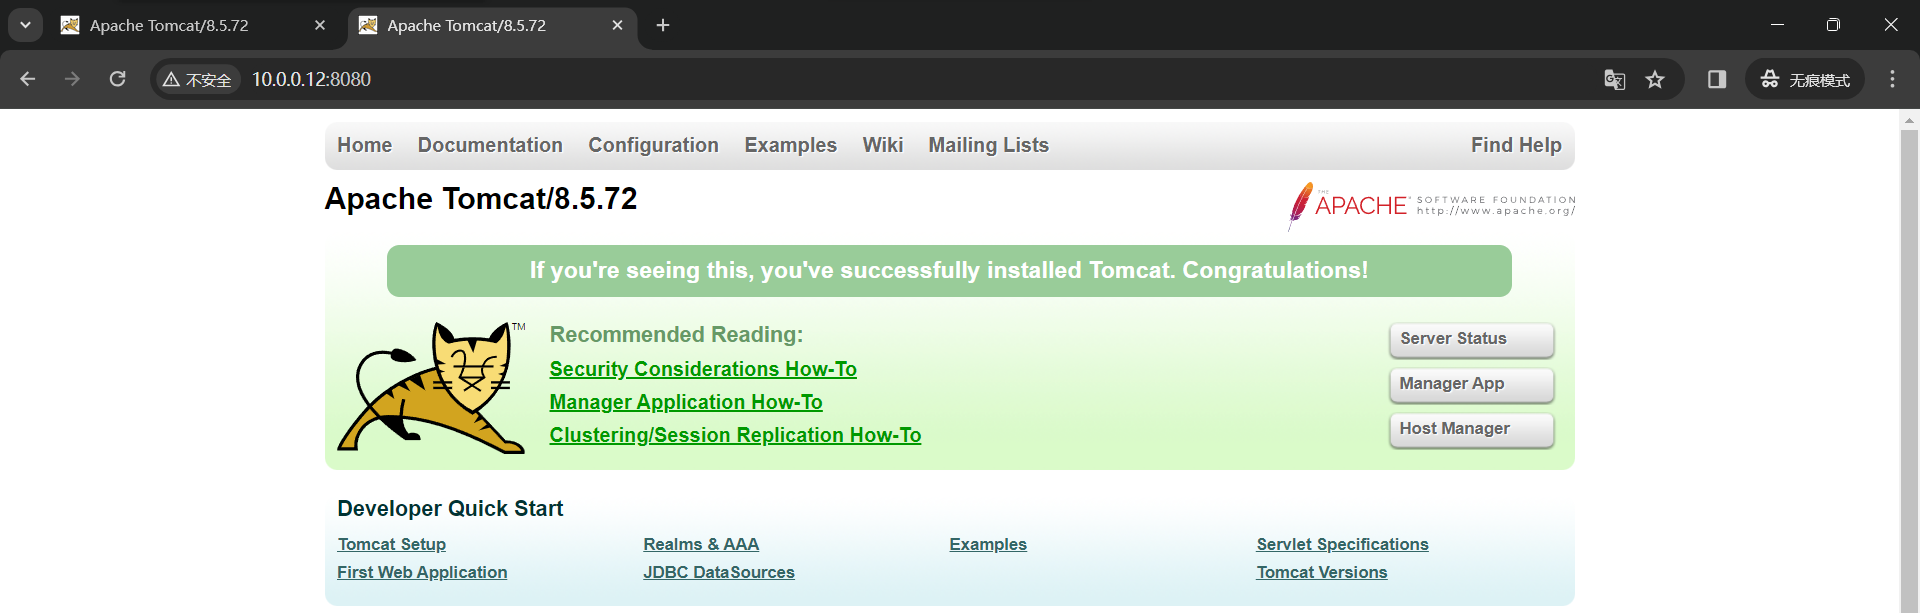
# Tomcat-2 安装步骤同上
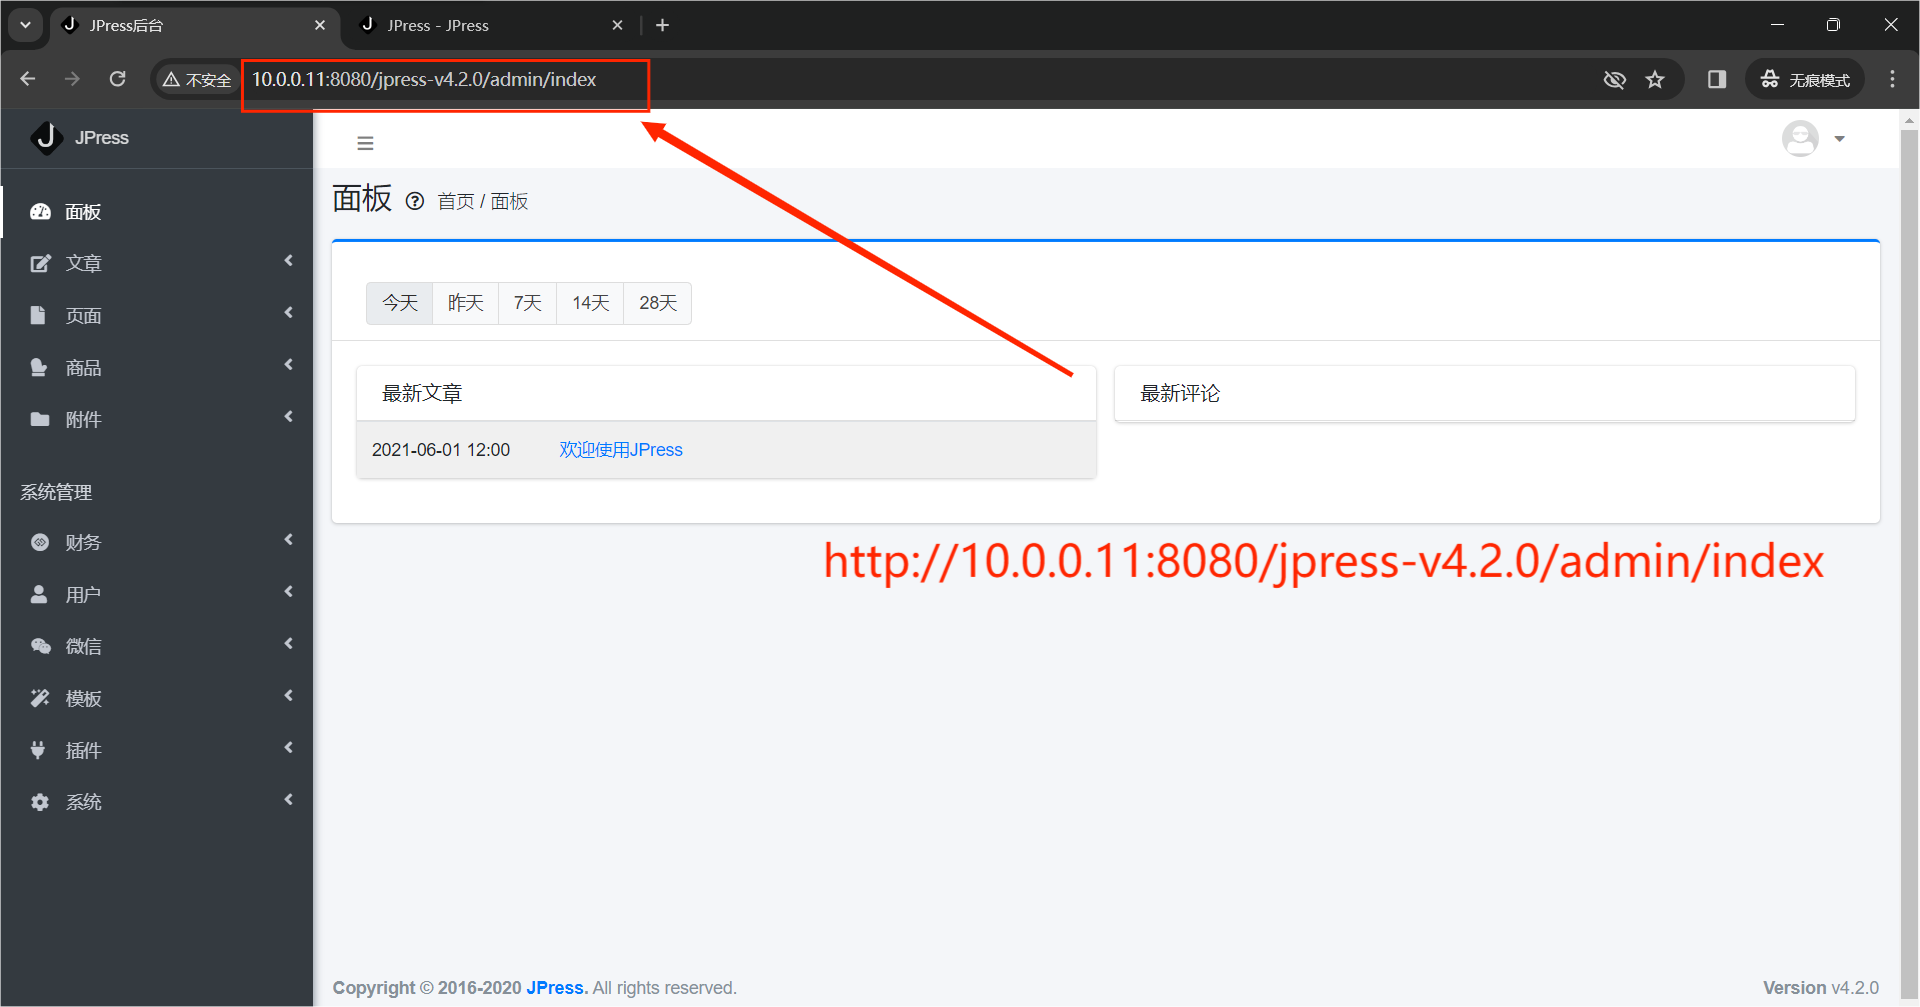
- Tomcat-1 测试访问
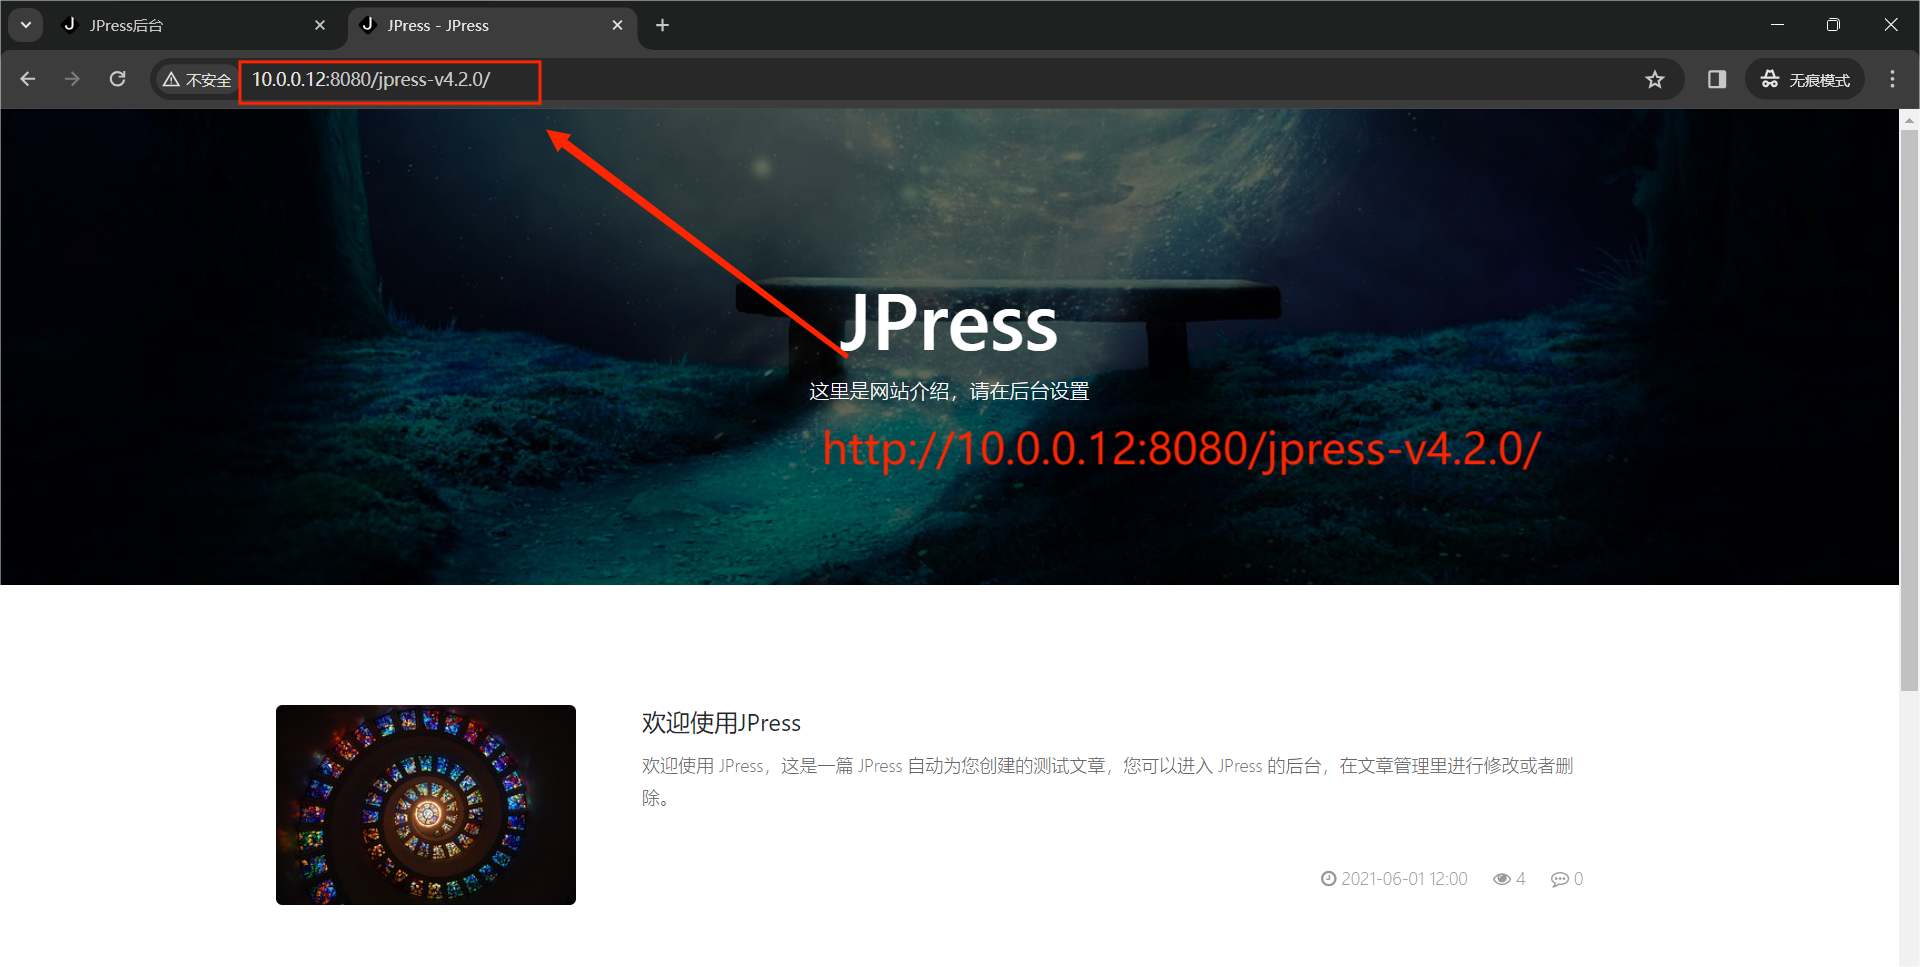
- Tomcat-2 测试访问
NFS
# NFS 共享 Jpress 网站文件
[root@nfs~]$ yum install nfs-utils -y
[root@nfs~]$ systemctl enable --now nfs
[root@nfs~]$ mkdir /data
[root@nfs/data]$ ls
jpress-v4.2.0.war

[root@nfs~]$ vim /etc/exports
/data           10.0.0.0/24(sync,wdelay,hide,no_subtree_check,sec=sys,rw,secure,root_squash,no_all_squash)

[root@nfs~]$ exportfs -r
[root@nfs~]$ exportfs -v
/data         	10.0.0.0/24(sync,wdelay,hide,no_subtree_check,sec=sys,rw,secure,root_squash,no_all_squash)

# Tomcat 挂载JPress网页文件
[root@tomcat-1~]$ yum -y install nfs-utils
# 查看远程主机共享
[root@tomcat-2~]$ showmount -e 10.0.0.14
Export list for 10.0.0.14:
/data 10.0.0.0/24
# 设置自动挂载
[root@tomcat-1~]$ vim /etc/fstab
10.0.0.14:/data /usr/local/apache-tomcat-8.5.72/webapps nfs defaults,_netdev  0  0

[root@tomcat-1~]$ mount -a
[root@tomcat-1~]$ df -h | grep data
10.0.0.14:/data           37G  2.2G   35G   6% /usr/local/apache-tomcat-8.5.72/webapps

[root@tomcat-1/usr/local/apache-tomcat-8.5.72/bin]$ ./shutdown.sh

# Tomcat-2 挂载步骤同上
[root@tomcat-2~]$ df -h | grep data
10.0.0.14:/data           37G  2.3G   35G   7% /usr/local/apache-tomcat-8.5.72/webapps

[root@tomcat-2/usr/local/apache-tomcat-8.5.72/bin]$ ./shutdown.sh && ./startup.sh

# 查看数据库
mysql> show databases;
+--------------------+
| Database           |
+--------------------+
| information_schema |
| JPress             |
| mysql              |
| performance_schema |
| sys                |
+--------------------+
5 rows in set (0.00 sec)
Redis
[root@redis~]$ tar xf redis-4.0.9.tar.gz -C /usr/local/
[root@redis/usr/local/redis-4.0.9]$ yum -y install gcc
[root@redis/usr/local/redis-4.0.9]$ make MALLOC=libc
[root@redis/usr/local/redis-4.0.9]$ make install
[root@redis/usr/local/redis-4.0.9]$ grep -v '^#' redis.conf
bind 10.0.0.13
protected-mode yes
port 6379
daemonize yes
requirepass 123456
[root@redis/usr/local/redis-4.0.9/src]$ ./redis-server /usr/local/redis-4.0.9/redis.conf
[root@redis~/redis-4.0.9/src]$ netstat -antup |grep redis
tcp 0 0 10.0.0.13:6379 0.0.0.0:* LISTEN 1523/./redis-server
# Tomcat-1-2 #两个Tomcat同等配置
[root@tomcat-1~]$ unzip tomcat8_redis_session.zip
Archive: tomcat8_redis_session.zip
inflating: commons-pool2-2.2.jar
inflating: jedis-2.5.2.jar
inflating: tomcat8.5-redis-session-manager.jar
[root@tomcat-1~]$ cp *.jar /usr/local/apache-tomcat-8.5.72/lib/
[root@tomcat-1/usr/local/apache-tomcat-8.5.72/conf]$ vim context.xml
<!--
<Manager pathname="" />
-->
###添加如下代码##
<Valve className="com.s.tomcat.redissessions.RedisSessionHandlerValve" />
<Manager className="com.s.tomcat.redissessions.RedisSessionManager"
host="10.0.0.13"
port="6379"
database="0"
password="123456"
maxInactiveInterval="60" />
</Context>
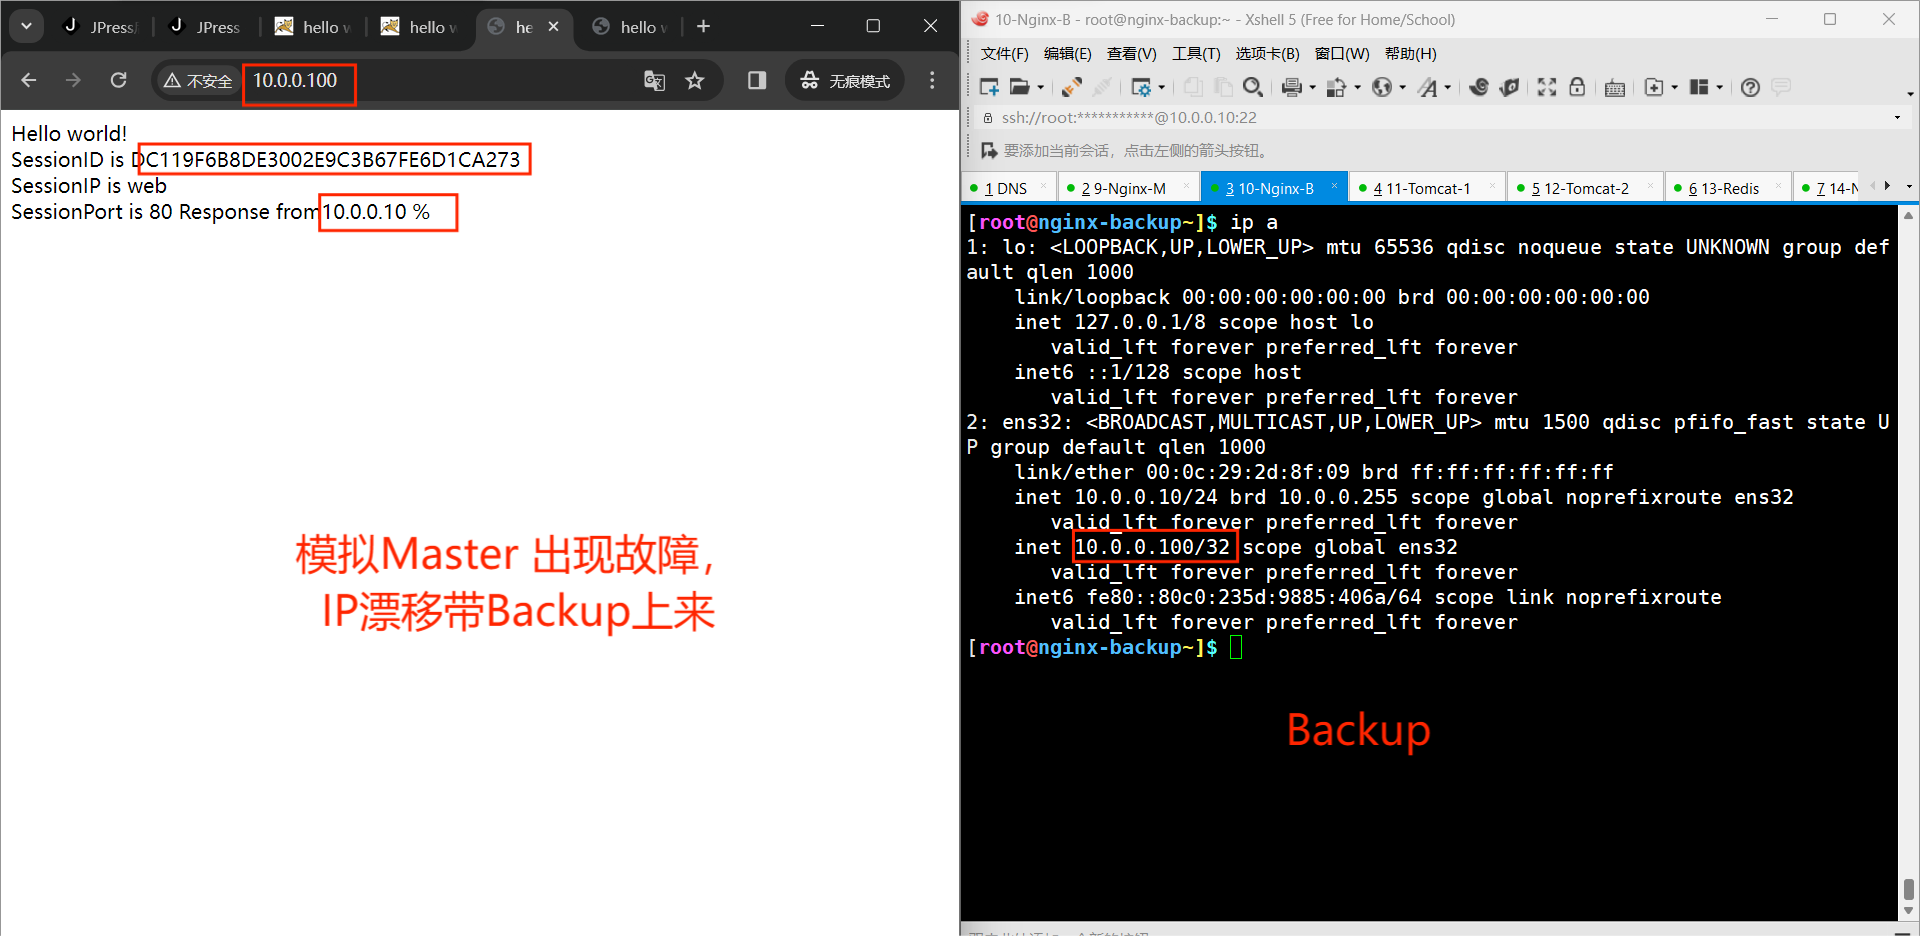
# 2台tomcat服务器各自在webapp目录下ROOT目录下新建index.jsp,添加如下代码查看session Id的变化
[root@tomcat-2/usr/local/apache-tomcat-8.5.72/webapps]$ mkdir ROOT
# 创建测试页面
[root@tomcat-2/usr/local/apache-tomcat-8.5.72/webapps/ROOT]$ vim index.jsp
<head>
<title>hello world</title>
</head>
<body>
Hello world!<br/>
SessionID is
<%=session.getId()%>
<BR> SessionIP is
<%=request.getServerName()%>
<BR> SessionPort is
<%=request.getServerPort()%>
<%
out.println("Response from" +request.getRemoteAddr());
%>
% </body>


Nginx
# Nginx-Master
[root@nginx-master~]$ yum -y install epel-release keepalived pcre-devel
[root@nginx-master~]$ cp /etc/keepalived/keepalived.conf /etc/keepalived/keepalived.conf.bak
[root@nginx-master~]$ vim /etc/keepalived/keepalived.conf
! Configuration File for keepalived
global_defs {
notification_email {
acassen@firewall.loc
failover@firewall.loc
sysadmin@firewall.loc
}
notification_email_from Alexandre.Cassen@firewall.loc
smtp_server 10.0.0.9
smtp_connect_timeout 30
router_id LVS_DEVEL
vrrp_skip_check_adv_addr
}
vrrp_script chk_nginx {
script /root/check_ng.sh
interval 3
}
vrrp_instance VI_1 {
state MASTER
interface ens32
virtual_router_id 52
priority 100
advert_int 1
authentication {
auth_type PASS
auth_pass 1111
}
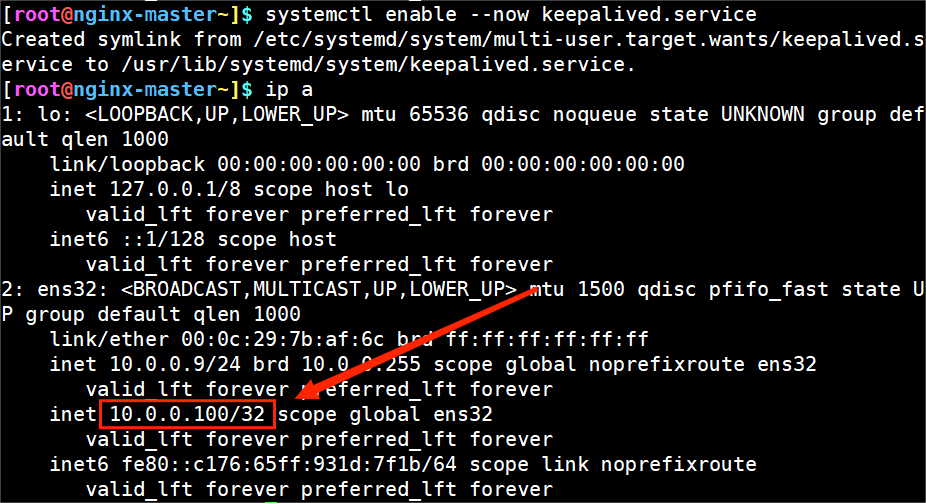
virtual_ipaddress {
10.0.0.100
}
track_script {
chk_nginx
}
}
# Nginx-Backup
[root@nginx-backup~]$ yum -y install epel-release keepalived pcre-devel
[root@nginx-backup~]$ cp /etc/keepalived/keepalived.conf /etc/keepalived/keepalived.conf.bak
[root@nginx-backup~]$ cat /etc/keepalived/keepalived.conf
! Configuration File for keepalived
global_defs {
notification_email {
acassen@firewall.loc
failover@firewall.loc
sysadmin@firewall.loc
}
notification_email_from Alexandre.Cassen@firewall.loc
smtp_server 10.0.0.10
smtp_connect_timeout 30
router_id LVS_DEVEL
vrrp_skip_check_adv_addr
}
vrrp_script chk_nginx {
script /root/check_ng.sh
interval 3
}
vrrp_instance VI_1 {
state BACKUP
interface ens32
virtual_router_id 52
priority 90
advert_int 1
authentication {
auth_type PASS
auth_pass 1111
}
virtual_ipaddress {
10.0.0.100
}
track_script {
chk_nginx
}
}
[root@nginx-master~]$ systemctl enable --now keepalived.service
[root@nginx-backup~]$ systemctl enable --now keepalived.service
# 编译安装Nginx,两个配置文件相同
# 健康检查前的配置文件
[root@nginx-master/apps/nginx/conf]$ vim nginx.conf
[root@nginx-backup/apps/nginx/conf]$ vim nginx.conf
upstream web {
server 10.0.0.11:8080;
server 10.0.0.12:8080;
}
server {
listen 80;
listen [::]:80;
server_name _;
root /apps/nginx/html;
include /etc/nginx/default.d/*.conf;
error_page 404 /404.html;
location = /404.html {
}
error_page 500 502 503 504 /50x.html;
location = /50x.html {
}
location / {
proxy_pass http://web;
}
}
# 健康检查
[root@nginx-master~]$ tar zxvf nginx_upstream_check_module-0.4.0.tar.gz -C /usr/local/src/nginx-1.24.0/third_moule/
# 打补丁
[root@nginx-master/usr/local/src/nginx-1.24.0]$ patch -p1 < /root/check_1.20.1+.patch
patching file src/http/modules/ngx_http_upstream_hash_module.c
patching file src/http/modules/ngx_http_upstream_ip_hash_module.c
patching file src/http/modules/ngx_http_upstream_least_conn_module.c
patching file src/http/ngx_http_upstream_round_robin.c
patching file src/http/ngx_http_upstream_round_robin.h
# 重新编译安装
[root@nginx-master/usr/local/src/nginx-1.24.0]$
./configure --prefix=/apps/nginx \
--with-http_ssl_module \
--with-http_v2_module \
--with-http_stub_status_module \
--with-stream \
--add-module=/usr/local/src/nginx-1.24.0/third_moule/nginx_upstream_check_module-0.4.0/ \
--user=nginx \
--group=nginx \
--with-http_realip_module \
--with-http_gzip_static_module \
--with-pcre \
--with-stream_ssl_module \
--with-stream_realip_module \
--with-http_gunzip_module \
--with-http_sub_module \
--with-http_flv_module \
--with-http_mp4_module
[root@nginx-master/usr/local/src/nginx-1.24.0]$ make && make install
[root@nginx-backup/apps/nginx/sbin]$ ln -s /apps/nginx/sbin/nginx /usr/sbin/
[root@nginx-master/usr/local/src/nginx-1.24.0]$ nginx -V
nginx version: nginx/1.24.0
built by gcc 4.8.5 20150623 (Red Hat 4.8.5-44) (GCC)
built with OpenSSL 1.0.2k-fips 26 Jan 2017
TLS SNI support enabled
configure arguments: --prefix=/apps/nginx --with-http_ssl_module --with-http_v2_module --with-http_stub_status_module --with-stream --add-module=/usr/local/src/nginx-1.24.0/third_moule/nginx_upstream_check_module-0.4.0/ --user=nginx --group=nginx --with-http_realip_module --with-http_gzip_static_module --with-pcre --with-stream_ssl_module --with-stream_realip_module --with-http_gunzip_module --with-http_sub_module --with-http_flv_module --with-http_mp4_module
# Nginx-Backup 与上述操作一致
[root@nginx-backup/apps/nginx/sbin]$ nginx -V
nginx version: nginx/1.24.0
built by gcc 4.8.5 20150623 (Red Hat 4.8.5-44) (GCC)
built with OpenSSL 1.0.2k-fips 26 Jan 2017
TLS SNI support enabled
configure arguments: --prefix=/apps/nginx --with-http_ssl_module --with-http_v2_module --with-http_stub_status_module --with-stream --add-module=/usr/local/src/nginx-1.24.0/third_moule/nginx_upstream_check_module-0.4.0/ --user=nginx --group=nginx --with-http_realip_module --with-http_gzip_static_module --with-pcre --with-stream_ssl_module --with-stream_realip_module --with-http_gunzip_module --with-http_sub_module --with-http_flv_module --with-http_mp4_module
# 做健康检查后的配置文件
# 编译安装Nginx,两个配置文件相同
[root@nginx-master/apps/nginx/conf]$ vim nginx.conf
[root@nginx-backup/apps/nginx/conf]$ vim nginx.conf
upstream web {
server 10.0.0.11:8080;
server 10.0.0.12:8080;
check interval=1000 rise=1 fall=1 timeout=1000 type=http;
check_http_send "GET / HTTP/1.0\r\n\r\n";
check_http_expect_alive http_2xx http_3xx;
}
server {
listen 80;
server_name _;
root /apps/nginx/html;
include /etc/nginx/default.d/*.conf;
error_page 404 /404.html;
location = /404.html {
}
error_page 500 502 503 504 /50x.html;
location = /50x.html {
}
location / {
proxy_pass http://web;
}
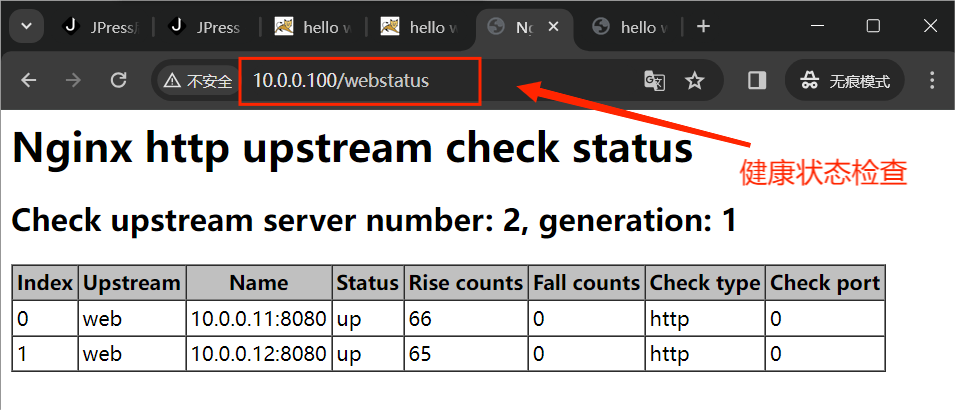
location /webstatus {
check_status;
access_log off;
}
}


DNS 域名解析
[root@dns~]$ yum -y install bind
[root@dns~]$ vim /etc/named.conf
options {
// listen-on port 53 { 127.0.0.1; };
listen-on-v6 port 53 { ::1; };
directory "/var/named";
dump-file "/var/named/data/cache_dump.db";
statistics-file "/var/named/data/named_stats.txt";
memstatistics-file "/var/named/data/named_mem_stats.txt";
recursing-file "/var/named/data/named.recursing";
secroots-file "/var/named/data/named.secroots";
// allow-query { localhost; };
[root@dns~]$ vim /etc/named.rfc1912.zones
zone "blog.ops.com" IN {
type master;
file "blog.ops.com.zone";
};
[root@dns/var/named]$ vim blog.ops.com.zone
$TTL 1D
@ IN SOA master smtp.ops.com. ( 01 1D 1H 1W 3H )
@ NS master
master A 10.0.0.8
www CNAME web
web A 10.0.0.100
# 做 Windows 本地 Host 解析
C:\WINDOWS\system32\drivers\etc\hosts
# 添加
10.0.0.100 www.ops.com
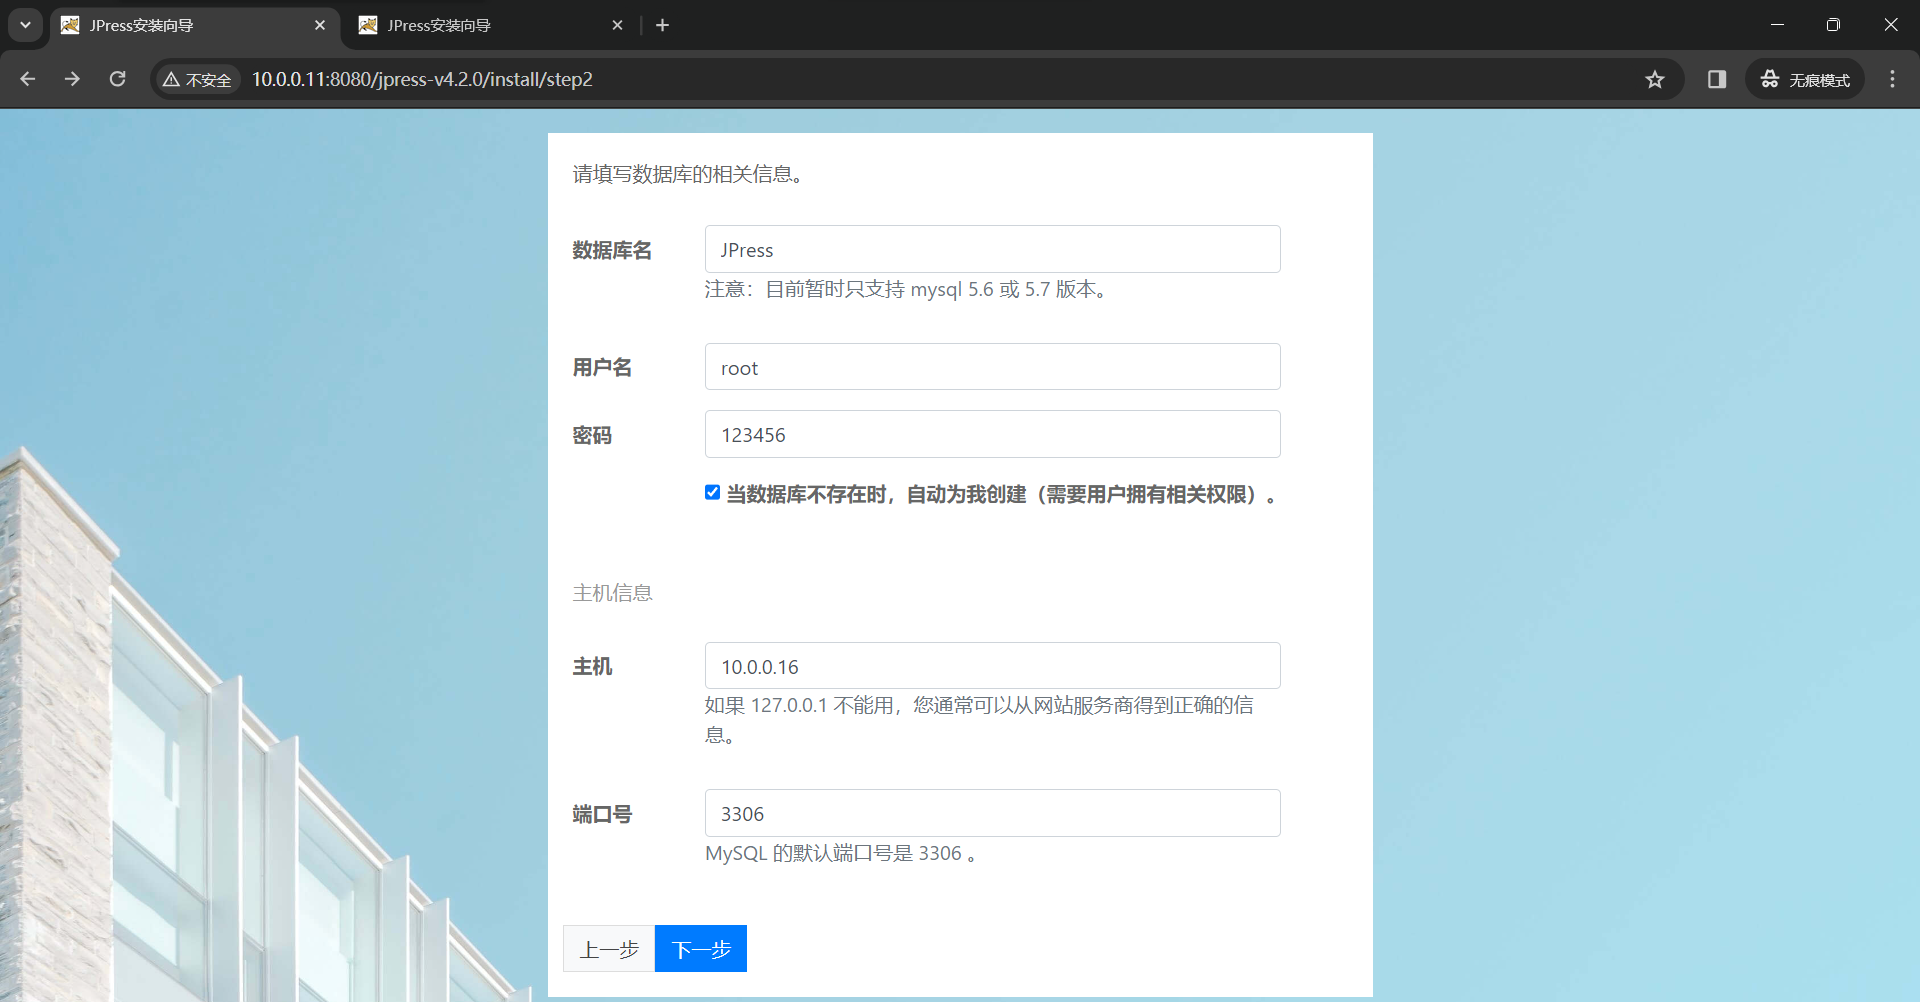
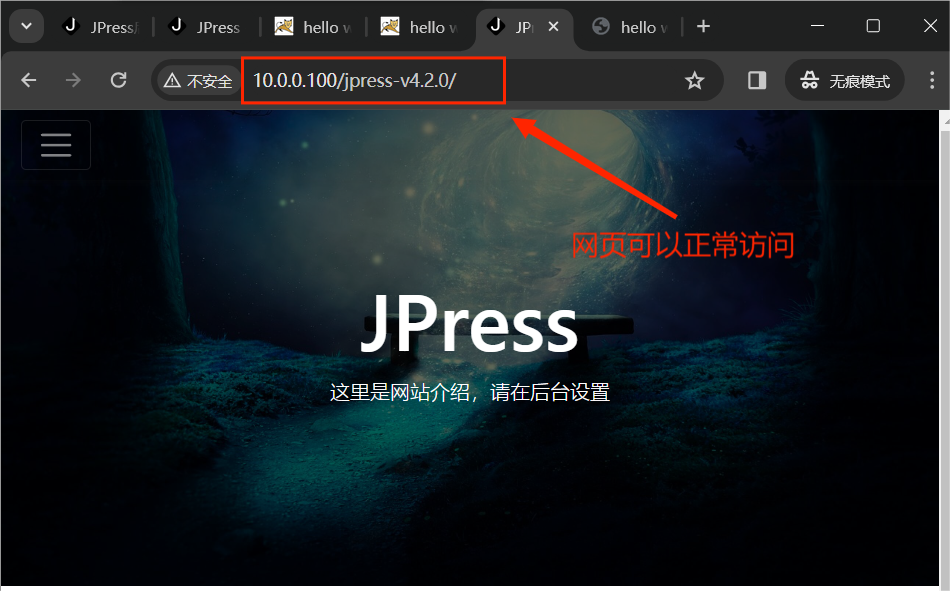
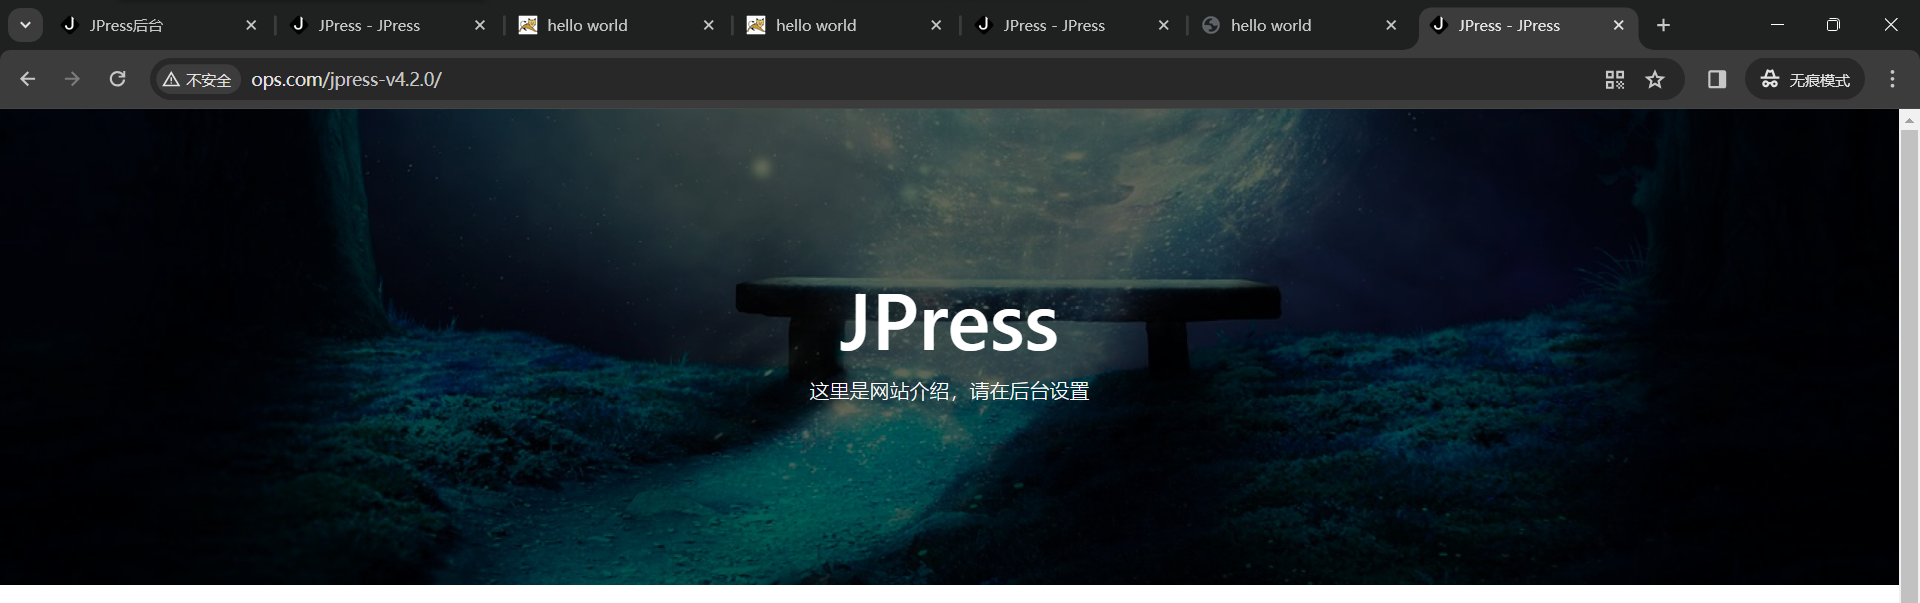
访问:http://www.ops.com/jpress-v4.2.0
# 部署证书
# Nginx-Master
[root@nginx-master/apps/nginx/conf/ssl]$ openssl genrsa -out blog.key 1024
Generating RSA private key, 1024 bit long modulus
...........................................++++++
............++++++
e is 65537 (0x10001)
[root@nginx-master/apps/nginx/conf/ssl]$ openssl req -new -key blog.key -out blog.csr
You are about to be asked to enter information that will be incorporated
into your certificate request.
What you are about to enter is what is called a Distinguished Name or a DN.
There are quite a few fields but you can leave some blank
For some fields there will be a default value,
If you enter '.', the field will be left blank.
-----
Country Name (2 letter code) [XX]:CN
State or Province Name (full name) []:HB
Locality Name (eg, city) [Default City]:WH
Organization Name (eg, company) [Default Company Ltd]:HP
Organizational Unit Name (eg, section) []:IT
Common Name (eg, your name or your server's hostname) []:www.ops.com
Email Address []:
Please enter the following 'extra' attributes
to be sent with your certificate request
A challenge password []:
An optional company name []:
[root@nginx-master/apps/nginx/conf/ssl]$ openssl x509 -req -days 365 -sha256 -in blog.csr -signkey blog.key -out blog.crt
Signature ok
subject=/C=CN/ST=HB/L=WH/O=HP/OU=IT/CN=www.ops.com
Getting Private key
[root@nginx-master/apps/nginx/conf/ssl]$ ls
blog.crt blog.csr blog.key
[root@nginx-master/apps/nginx/conf]$ vim nginx.conf
server {
listen 443 ssl;
server_name www.ops.com; #域名信息
ssl_certificate /apps/nginx/conf/ssl/blog.crt;
ssl_certificate_key /apps/nginx/conf/ssl/blog.key;
ssl_session_timeout 5m;
ssl_protocols TLSv1 TLSv1.1 TLSv1.2;
ssl_prefer_server_ciphers on;
ssl_ciphers "EECDH+CHACHA20:EECDH+CHACHA20-draft:EECDH+AES128:RSA+AES128:EECDH+AES256:RSA+AES256:EECDH+3DES:RSA+3DES:!MD5";
location / {
proxy_pass http://web;
}
}
# 检查语法没有问题
[root@nginx-backup/apps/nginx/conf]$ nginx -t
nginx: the configuration file /apps/nginx/conf/nginx.conf syntax is ok
nginx: configuration file /apps/nginx/conf/nginx.conf test is successful
# 重载 Nginx 服务
[root@nginx-backup/apps/nginx/conf]$ systemctl reload nginx
# 将生成的证书文件同步一份到Nginx-Backup,配置文件同样修改
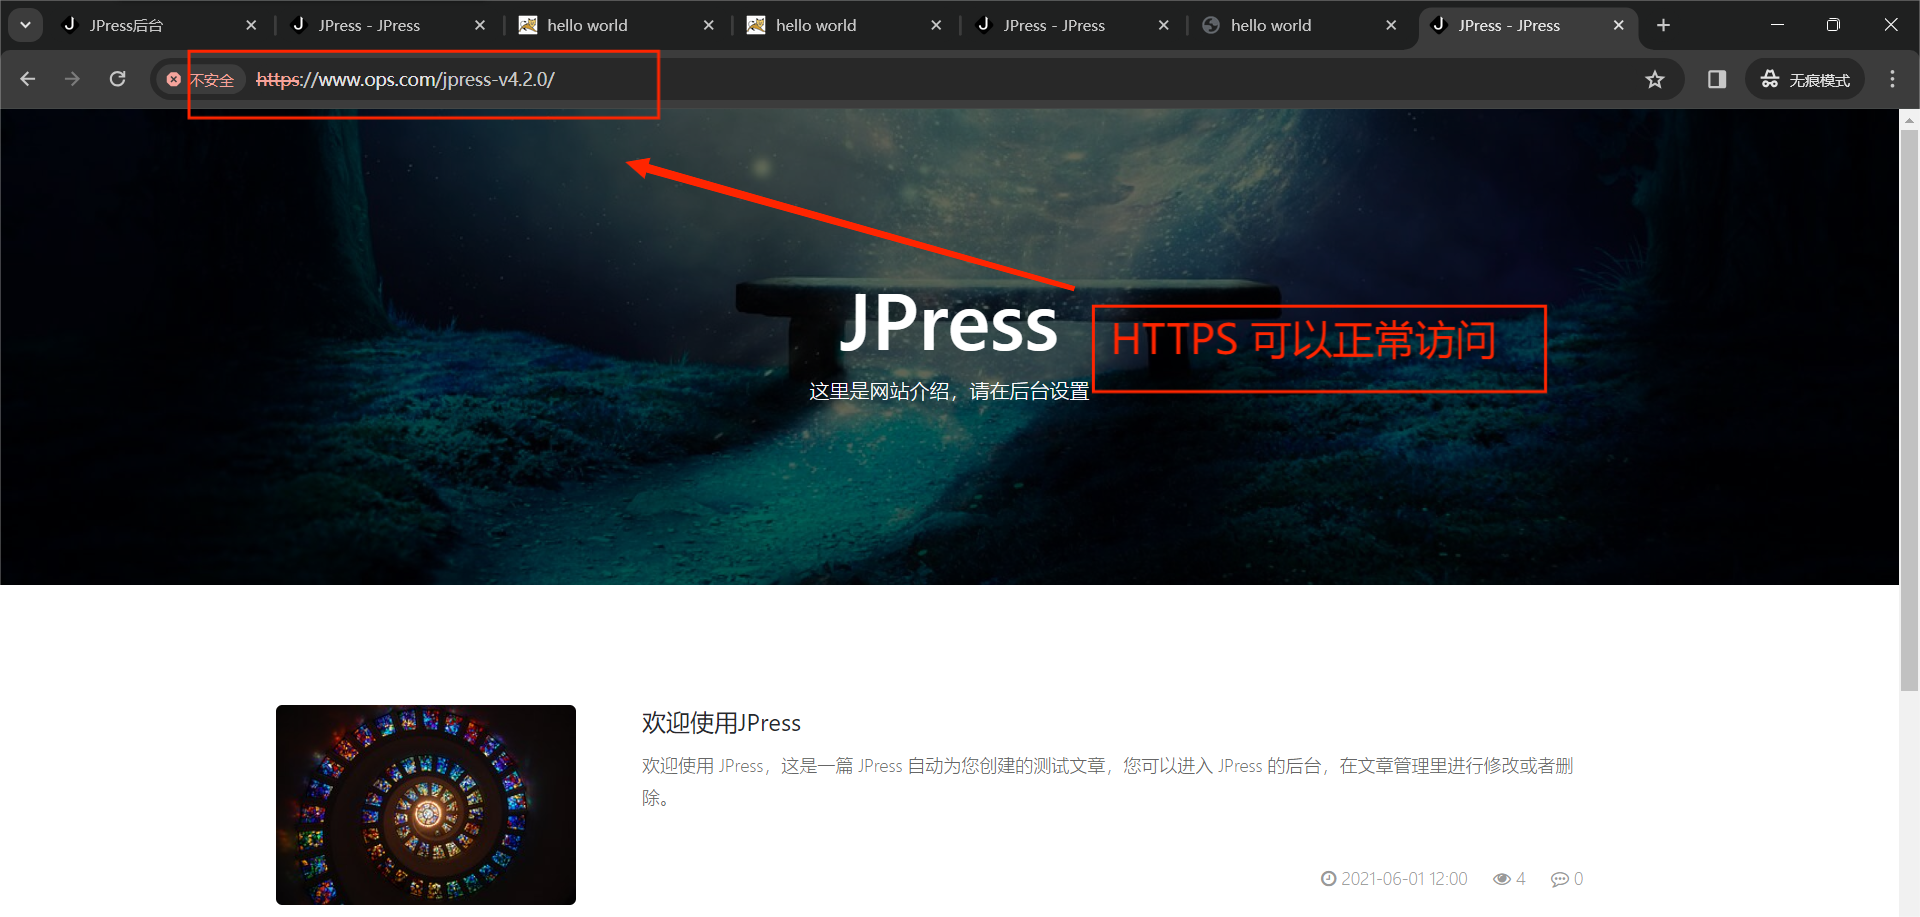
# 访问:https://www.ops.com/jpress-v4.2.0
JumpServer
# 安装Docker
# step 1: 安装必要的一些系统工具
[root@jump~]$ sudo yum install -y yum-utils device-mapper-persistent-data lvm2
# Step 2: 添加软件源信息
[root@jump~]$ sudo yum-config-manager --add-repo https://mirrors.aliyun.com/docker-ce/linux/centos/docker-ce.repo
# Step 3
[root@jump~]$ sudo sed -i 's+download.docker.com+mirrors.aliyun.com/docker-ce+' /etc/yum.repos.d/docker-ce.repo
# Step 4: 更新并安装Docker-CE
[root@jump~]$ sudo yum makecache fast
[root@jump~]$ sudo yum -y install docker-ce
# Step 5:配置镜像加速
cat > /etc/docker/daemon.json << EOF
{
"registry-mirrors": ["https://********.mirror.aliyuncs.com"]
}
EOF
# Step 6: 开启Docker服务
[root@jump~]$ systemctl enable --now docker
# 部署Mysql
[root@jump~]$ mkdir -p /etc/mysql/conf.d/
[root@jump~]$ mkdir -p /etc/mysql/mysql.conf.d/
[root@jump~]$ tee /etc/mysql/mysql.conf.d/mysqld.cnf <<EOF
[mysqld]
pid-file= /var/run/mysqld/mysqld.pid
socket= /var/run/mysqld/mysqld.sock
datadir= /var/lib/mysql
symbolic-links=0
#添加此行,指定字符集
character-set-server=utf8
EOF
[root@jump~]$ tee /etc/mysql/conf.d/mysql.cnf <<EOF
[mysql]
#添加此行,指定字符集
default-character-set=utf8
EOF
[root@jump~]$ tree /etc/mysql/
/etc/mysql/
├── conf.d
│ └── mysql.cnf
└── mysql.conf.d
└── mysqld.cnf
2 directories, 2 files
# 启动 Mysql 容器
[root@jump~]$ docker run -d -p 3306:3306 --name mysql --restart always \
-e MYSQL_ROOT_PASSWORD=123456 \
-e MYSQL_DATABASE=jumpserver \
-e MYSQL_USER=jumpserver \
-e MYSQL_PASSWORD=123456 \
-v /data/mysql:/var/lib/mysql \
-v /etc/mysql/mysql.conf.d/mysqld.cnf:/etc/mysql/mysql.conf.d/mysqld.cnf \
-v /etc/mysql/conf.d/mysql.cnf:/etc/mysql/conf.d/mysql.cnf mysql:5.7.30
[root@jump~]$ docker exec -it mysql bash
root@001dd02a18d7:/# mysql -uroot -p123456
mysql: [Warning] Using a password on the command line interface can be insecure.
Welcome to the MySQL monitor. Commands end with ; or \g.
Your MySQL connection id is 2
Server version: 5.7.30 MySQL Community Server (GPL)
Copyright (c) 2000, 2020, Oracle and/or its affiliates. All rights reserved.
Oracle is a registered trademark of Oracle Corporation and/or its
affiliates. Other names may be trademarks of their respective
owners.
Type 'help;' or '\h' for help. Type '\c' to clear the current input statement.
mysql> status;
--------------
mysql Ver 14.14 Distrib 5.7.30, for Linux (x86_64) using EditLine wrapper
Connection id: 2
Current database:
Current user: root@localhost
SSL: Not in use
Current pager: stdout
Using outfile: ''
Using delimiter: ;
Server version: 5.7.30 MySQL Community Server (GPL)
Protocol version: 10
Connection: Localhost via UNIX socket
Server characterset: utf8
Db characterset: utf8
Client characterset: utf8
Conn. characterset: utf8
UNIX socket: /var/run/mysqld/mysqld.sock
Uptime: 5 min 55 sec
Threads: 1 Questions: 10 Slow queries: 0 Opens: 105 Flush tables: 1 Open tables: 98 Queries per second avg: 0.028
--------------
mysql> show create database jumpserver;
+------------+---------------------------------------------------------------------+
| Database | Create Database |
+------------+---------------------------------------------------------------------+
| jumpserver | CREATE DATABASE `jumpserver` /*!40100 DEFAULT CHARACTER SET utf8 */ |
+------------+---------------------------------------------------------------------+
1 row in set (0.00 sec)
# 启动 Redis 服务
[root@jump~]$ docker run -d -p 6379:6379 --name redis --restart always redis:6.2.5
# 验证 Redis
[root@jump~]$ yum -y install redis
[root@jump~]$ redis-cli -h 10.0.0.15
10.0.0.15:6379> info server
# Server
redis_version:6.2.5
# 生成加密安全密钥
[root@jump~]$ sh key.sh
SECRET_KEY=aqrlkCFJxfd6w4OKTlP7ohO3yLfoCDmj40TB4ql1rC4VGja9Ez
BOOTSTRAP_TOKEN=xtukOJCPW5ZJYjjE
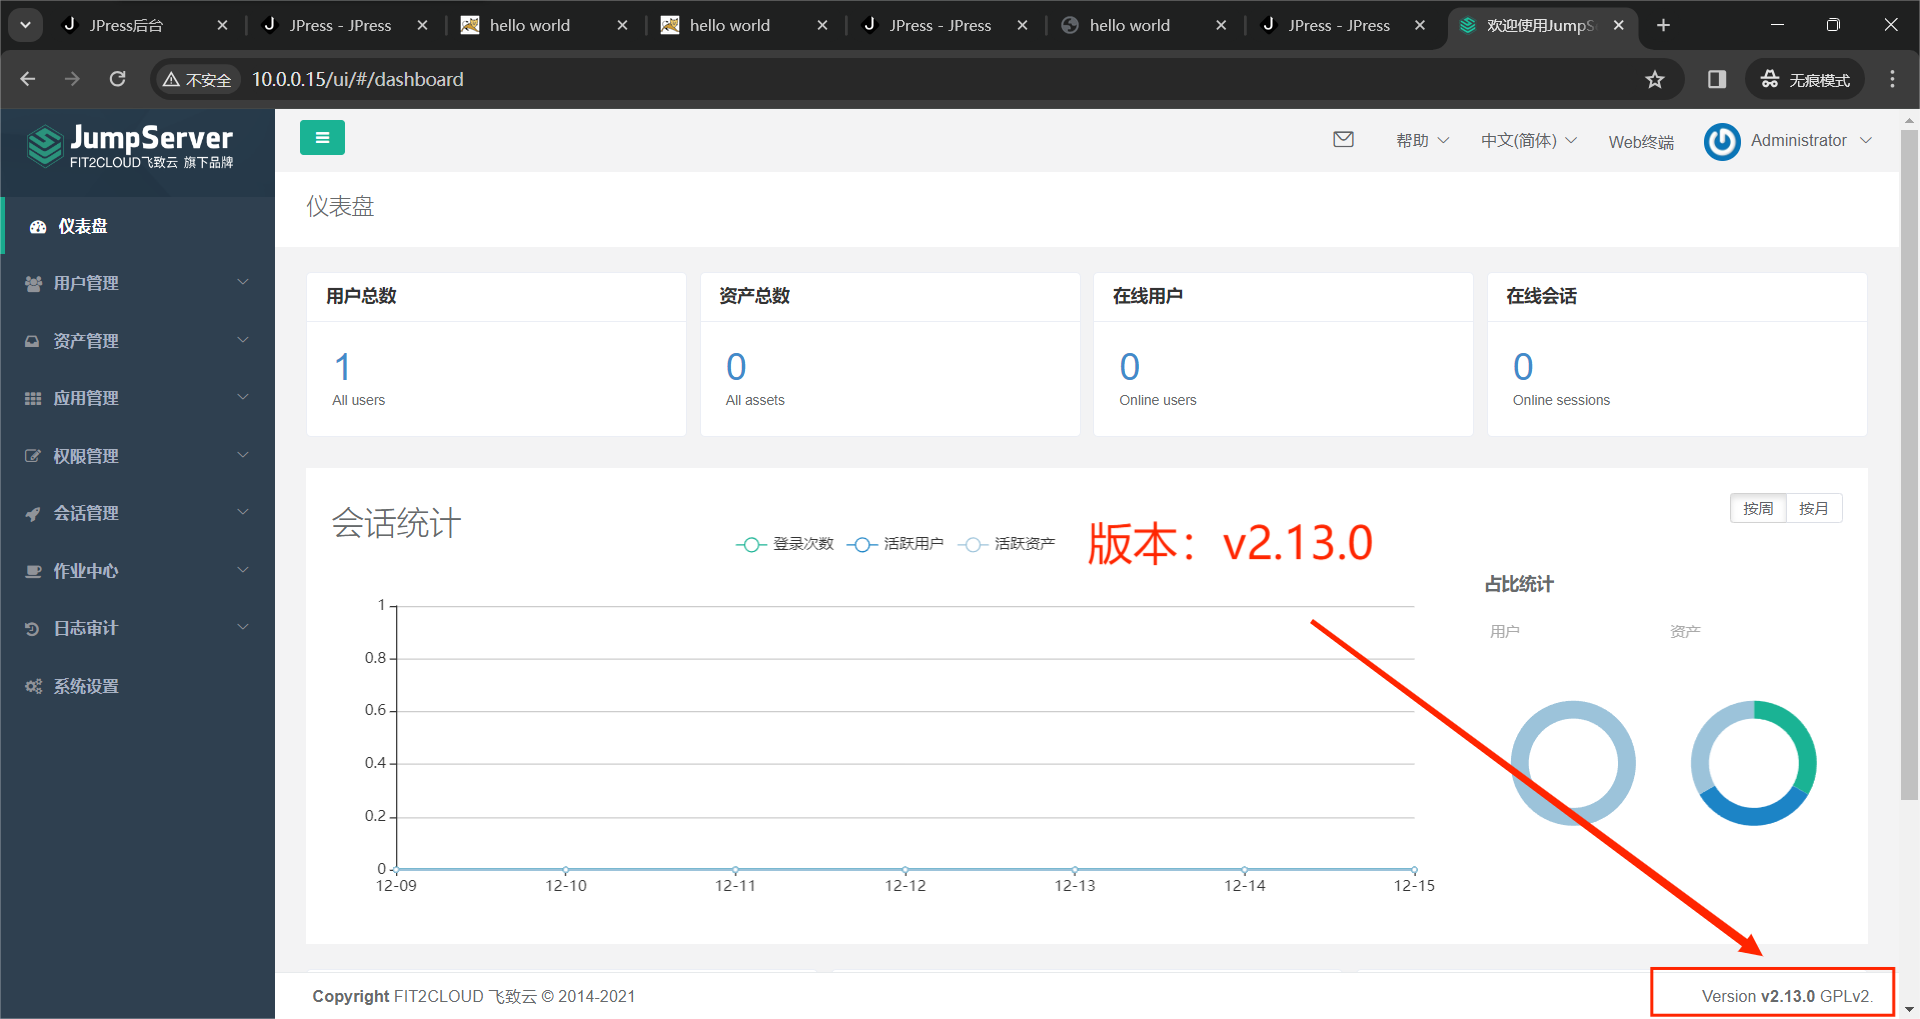
# 拉取JumpServer v2.13.0
[root@jump~]$ docker run --name jms_all -d \
-v /opt/jumpserver/core/data:/opt/jumpserver/data \
-v /opt/jumpserver/koko/data:/opt/koko/data \
-v /opt/jumpserver/lion/data:/opt/lion/data \
-p 80:80 \
-p 2222:2222 \
-e SECRET_KEY=aqrlkCFJxfd6w4OKTlP7ohO3yLfoCDmj40TB4ql1rC4VGja9Ez \
-e BOOTSTRAP_TOKEN=xtukOJCPW5ZJYjjE \
-e LOG_LEVEL=ERROR \
-e DB_HOST=10.0.0.15 \
-e DB_PORT=3306 \
-e DB_USER=jumpserver \
-e DB_PASSWORD=123456 \
-e DB_NAME=jumpserver \
-e REDIS_HOST=10.0.0.15 \
-e REDIS_PORT=6379 \
-e REDIS_PASSWORD='' \
--privileged=true \
jumpserver/jms_all:v2.13.0
[root@jump~]$ docker ps
CONTAINER ID IMAGE COMMAND CREATED STATUS PORTS NAMES
44b1f8b2e1ec jumpserver/jms_all:v2.13.0 "./entrypoint.sh" About a minute ago Up About a minute 0.0.0.0:80->80/tcp, :::80->80/tcp, 0.0.0.0:2222->2222/tcp, :::2222->2222/tcp jms_all
a3f98d48eb22 redis:6.2.5 "docker-entrypoint.s…" 9 minutes ago Up 9 minutes 0.0.0.0:6379->6379/tcp, :::6379->6379/tcp redis
001dd02a18d7 mysql:5.7.30 "docker-entrypoint.s…" 18 minutes ago Up 18 minutes 0.0.0.0:3306->3306/tcp, :::3306->3306/tcp, 33060/tcp mysql
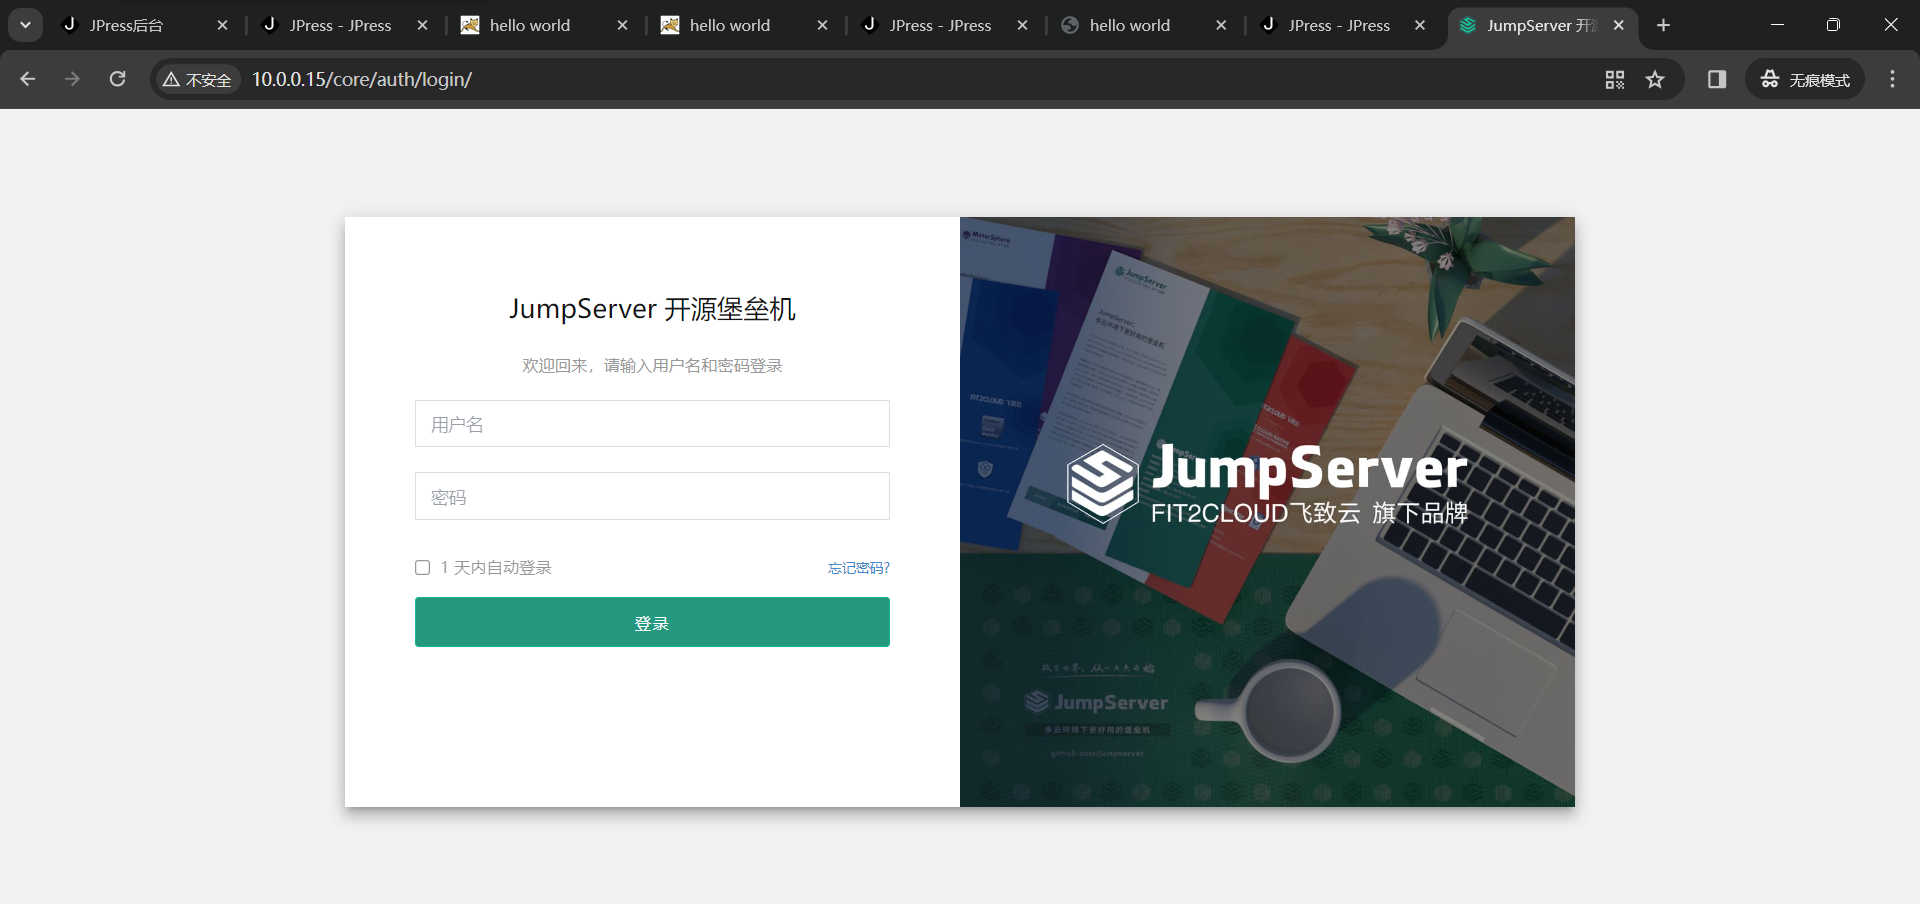
# 访问:http://10.0.0.15
# 默认用户: admin
# 初始密码: admin, 首次登录成功需要修改密码
- 创建用户

- 创建Tomcat 资产

- 创建数据库资产

- 创建Mysql 系统用户

- 对Mysql数据库进行(应用)授权

- 创建 Tomcat 系统用户

- 创建Tomcat资产并授权


- 切换到 zhangsan 用户

- 登录测试


- 切换到 lisi 用户

- 登录测试

防火墙策略
yum -y install iptables-services
systemctl enable --now iptables.service

# DNS
[root@dns~]$ iptables -A INPUT -i ens32 -p tcp -m multiport --dport 22,53,953,80,443 -j ACCEPT
[root@dns~]$ iptables -A OUTPUT -o ens32 -p tcp -m multiport --sport 22,53,953,80,443 -j ACCEPT
[root@dns~]$ iptables -A INPUT -i ens32 -p tcp -j DROP

# Nginx-Master
[root@nginx-master~]$ iptables -A INPUT -i ens32 -p tcp -m multiport --dport 22,80,443,8080,8009,53 -j ACCEPT
[root@nginx-master~]$ iptables -A OUTPUT -o ens32 -p tcp -m multiport --sport 22,80,443,8080,8009,53-j ACCEPT
[root@nginx-master~]$ iptables -A INPUT -i ens32 -p tcp -j DROP
# Nginx-Backup
[root@nginx-backup~]$ iptables -A INPUT -i ens32 -p tcp -m multiport --dport 22,80,443,8080,8009,53 -j ACCEPT
[root@nginx-backup~]$ iptables -A OUTPUT -o ens32 -p tcp -m multiport --sport 22,80,443,8080,8009,53-j ACCEPT
[root@nginx-backup~]$ iptables -A INPUT -i ens32 -p tcp -j DROP

# Tomcat-1
[root@tomcat-1~]$ iptables -A INPUT -i ens32 -p tcp -m multiport --dport 8080,8005,8009,6379,22,3306 -j ACCEPT
[root@tomcat-1~]$ iptables -A OUTPUT -o ens32 -p tcp -m multiport --sport 8080,8005,8009,6379,22,3306 -j ACCEPT
[root@tomcat-1~]$ iptables -A INPUT -i ens32 -p tcp -j DROP
# Tomcat-2
[root@tomcat-2~]$ iptables -A INPUT -i ens32 -p tcp -m multiport --dport 8080,8005,8009,6379,22,3306 -j ACCEPT
[root@tomcat-2~]$ iptables -A OUTPUT -o ens32 -p tcp -m multiport --sport 8080,8005,8009,6379,22,3306 -j ACCEPT
[root@tomcat-2~]$ iptables -A INPUT -i ens32 -p tcp -j DROP

# Redis
[root@redis~]$ iptables -A INPUT -i ens32 -p tcp -m multiport --dport 6379,22 -j ACCEPT
[root@redis~]$ iptables -A OUTPUT -o ens32 -p tcp -m multiport --sport 6379,22 -j ACCEPT
[root@redis~]$ iptables -A INPUT -i ens32 -p tcp -j DROP

# JumpServer
[root@jump~]$ iptables -A INPUT -i ens32 -p tcp -m multiport --dport 2222,80,22,25,3306,6379 -j ACCEPT
[root@jump~]$ iptables -A OUTPUT -o ens32 -p tcp -m multiport --sport 2222,80,22,25,3306,6379 -j ACCEPT
[root@jump~]$ iptables -A INPUT -i ens32 -p tcp -j DROP

# Mysql
[root@mysql~]$ iptables -A INPUT -i ens32 -p tcp -m multiport --dport 22,3306 -j ACCEPT
[root@mysql~]$ iptables -A OUTPUT -o ens32 -p tcp -m multiport --sport 22,3306 -j ACCEPT
[root@mysql~]$ iptables -A INPUT -i ens32 -p tcp -j DROP
