

一、CentOS7源码编译安装
源码编译安装版本:haproxy-2.2.25 LTS版本,更多版本下载:https://www.haproxy.org/#down
默认centos7中存在的lua包的版本过低,haproxy至少需要5.3以上的版本,因此需要安装更新的lua版本
[root@localhost soft]# lua -v
Lua 5.1.4  Copyright (C) 1994-2008 Lua.org, PUC-Rio
[root@localhost soft]#
编译安装lua
[root@localhost soft]# yum install gcc readline-devel make
[root@localhost soft]#wget http://www.lua.org/ftp/lua-5.4.4.tar.gz
[root@localhost soft]# tar zxf lua-5.4.4.tar.gz
[root@localhost soft]# cd lua-5.4.4
[root@localhost soft]# make all test1.1 编译安装haproxy
1)安装依赖
[root@localhost soft]# yum -y install gcc openssl-devel pcre-devel systemd-devel2)解压源码包
[root@localhost soft]# tar zxvf haproxy-2.2.25.tar.gz -C /usr/local/3)编译源码包
[root@localhost haproxy-2.2.25]# make ARCH=x86_64 TARGET=linux-glibc USE_PCRE=1 USE_OPENSSL=1 USE_ZLIB=1 USE_SYSTEMD=1 USE_LUA=1 LUA_INC=/opt/soft/lua-5.4.4/src/ LUA_LIB=/opt/soft/lua-5.4.4/src/注意:如果是1.8或者1.9的版本编译安装的命令有一定区别
[root@centos17haproxy-1.8.20]#make ARCH=x86_64 TARGET=linux2628 USE_PCRE=1 USE_OPENSSL=1 USE_ZLIB=1 USE_SYSTEMD=1 USE_CPU_AFFINITY=1 USE_LUA=1 LUA_INC=/opt/soft/lua-5.4.4/src/ LUA_LIB=/opt/soft/lua-5.4.4/src/ PREFIX=/usr/local/haproxy4)编译安装
[root@localhost haproxy-2.2.25]# make install PREFIX=/usr/local/haproxy1.2生成软连接
[root@localhost haproxy-2.2.25]# ln -s /usr/local/haproxy/sbin/haproxy /usr/sbin/1.3 版本验证
[root@localhost haproxy-2.2.25]# haproxy -v
HA-Proxy version 2.2.25-50b5f5d 2022/07/28 - https://haproxy.org/
1.4 服务管理,配置service
[root@localhost ~]#vim /usr/lib/systemd/system/haproxy.service
[root@localhost ~]#cat /usr/lib/systemd/system/haproxy.service
[Unit]
Description=HAProxy Load Balancer
After=syslog.target network.target
[Service]
ExecStartPre=/usr/sbin/haproxy -f /etc/haproxy/haproxy.cfg  -c -q
ExecStart=/usr/sbin/haproxy -Ws -f /etc/haproxy/haproxy.cfg -p /var/lib/haproxy/haproxy.pid
ExecReload=/bin/kill -USR2 $MAINPID
LimitNOFILE=100000
[Install]
WantedBy=multi-user.target
新建haproxy的配置文件目录
[root@localhost haproxy-2.2.25]# mkdir /etc/haproxy/1.5 创建配置文件
将配置文件模板复制到/etc/haproxy目录下,并重新命名haproxy.cfg
[root@localhost ~]# cd /usr/local/haproxy-2.2.25/examples/ #模板配置文件路径
[root@localhost examples]# cp option-http_proxy.cfg /etc/haproxy/haproxy.cfg
1.6 创建用户和组
[root@localhost ~]# useradd -r -s /sbin/nologin -d /usr/local/haproxy/ haproxy1.7 启动服务
[root@localhost ~]# vim /etc/haproxy/haproxy.cfg 修改此配置文件中的
"frontend test-proxy
bind 192.168.1.100:8080" 此处的IP地址修改成宿主机的IP,否则无法启动
[root@localhost ~]# systemctl start haproxy
[root@localhost ~]# ps -ef |grep haproxy
root 78655 1 0 15:30 ? 00:00:00 /usr/sbin/haproxy -Ws -f /etc/haproxy/haproxy.cfg -p /var/lib/haproxy/haproxy.pid
200 78657 78655 0 15:30 ? 00:00:00 /usr/sbin/haproxy -Ws -f /etc/haproxy/haproxy.cfg -p /var/lib/haproxy/haproxy.pid
200 78658 78655 0 15:30 ? 00:00:00 /usr/sbin/haproxy -Ws -f /etc/haproxy/haproxy.cfg -p /var/lib/haproxy/haproxy.pid
200 78659 78655 0 15:30 ? 00:00:00 /usr/sbin/haproxy -Ws -f /etc/haproxy/haproxy.cfg -p /var/lib/haproxy/haproxy.pid
200 78660 78655 0 15:30 ? 00:00:00 /usr/sbin/haproxy -Ws -f /etc/haproxy/haproxy.cfg -p /var/lib/haproxy/haproxy.pid
root 78664 2997 0 15:30 pts/1 00:00:00 grep --color=auto haproxy二、配置haproxy
haproxy配置文件手册:http://docs.haproxy.org/

官方文档:
http://cbonte.github.io/haproxy-dconv/
http://cbonte.github.io/haproxy-dconv/2.2/configuration.html
5.1 haproxy配置文件
HAProxy 的配置文件haproxy.cfg由两大部分组成,分别是global和proxies部分
global
    log         127.0.0.1 local2      # 需要设置/etc/rsyslog.conf加上local2设备的日志记录级别和日志路径
   chroot      /var/lib/haproxy
    nbthread 4                                    #此选项不支持和多进程共存
    pidfile     /var/run/haproxy.pid
    maxconn     4000                  # 这是前段对外的最大连接数。代理http时,1G空闲内存承载20000以上没大问题
    user        haproxy
    group       haproxy
    daemon
    stats socket /var/lib/haproxy/stats  # 开启动态查看、管理haproxy的状态文件
                                         # 另外建议设置spread-checks全局项,且百分比建议为2-5之间
defaults
    mode                    http         # 7层http代理,另有4层tcp代理
    log                     global
    option                  httplog      # 在日志中记录http请求、session信息等
    option                  dontlognull  # 不要在日志中记录空连接
    option http-server-close             # 后端为动态应用程序建议使用http-server-close,后端为静态建议使用http-keep-alive
    option forwardfor       except 127.0.0.0/8  # haproxy将在发往后端的请求中加上"X-Forwarded-For"首部字段
    option                  redispatch   # 当某后端down掉使得haproxy无法转发携带cookie的请求到该后端时,将其转发到别的后端上
    timeout http-request    10s     # 此为等待客户端发送完整请求的最大时长,应该设置较短些防止洪水攻击,如设置为2-3秒
                                    # haproxy总是要求一次请求或响应全部发送完成后才会处理、转发,
    timeout queue           1m      # 请求在队列中的最大时长,1分钟太长了。设置为10秒都有点长,10秒请求不到资源客户端会失去耐心
    timeout connect         10s     # haproxy和服务端建立连接的最大时长,设置为1秒就足够了。局域网内建立连接一般都是瞬间的
    timeout client          1m      # 和客户端保持空闲连接的超时时长,在高并发下可稍微短一点,可设置为10秒以尽快释放连接
    timeout server          1m      # 和服务端保持空闲连接的超时时长,局域网内建立连接很快,所以尽量设置短一些,特别是并发时,如设置为1-3秒
    timeout http-keep-alive 10s     # 和客户端保持长连接的最大时长。优先级高于timeout http-request高于timeout client
    timeout check           10s     # 和后端服务器成功建立连接后到最终完成检查的时长(不包括建立连接的时间,只是读取到检查结果的时长),
                                    # 可设置短一点,如1-2秒
    maxconn                 3000    # 默认和前段的最大连接数,但不能超过global中的maxconn硬限制数
2.2 配置文件解读
haproxy的配置文件 haproxy.cf 的 默认地址:/etc/haproxy/haproxy.cfg
haproxy.cf 由两大部分组成,分别是 global 和 proxies 部分。
global:全局配置:
进程及安全配置相关的参数
性能调整相关参数
Debug参数
proxies:代理配置
defaults:为 frontend, backend, listen提供默认配置
frontend:前端,相当于 nginx 中的 server {}
backend: 后端,相当于 nginx 中的 upstream {}
listen: 同时拥有 前端和后端配置2.2.1 global 全局配置
chroot                   # 锁定运行目录
deamon                   # 以守护进程运行
stats socket /var/lib/haproxy/haproxy.sock mode 600 level admin    # socket文件
user, group, uid, gid     # 运行haproxy的用户身份
nbproc                    # 开启的haproxy进程数,与CPU保持一致
nbthread                  # 指定每个haproxy进程开启的线程数,默认为每个进程一个线程
cpu-map 1 0               # 绑定haproxy 进程至指定CPU,主要针对多核心CPU设置(进程:核心数)
#cpu-map 1 0
#cpu-map 2 1
#cpu-map 3 2
#cpu-map 4 3
maxconn                   # 每个haproxy进程的最大并发连接数
maxsslconn                # 每个haproxy进程ssl最大连接数,用于haproxy配置了证书的场景下
maxconnrate               # 每个进程每秒创建的最大连接数量
spread-checks             # 后端server状态check随机提前或延迟百分比时间,建议2-5(20%-50%)之间
pidfile                   # 指定pid文件路径
log 127.0.0.1 local3 info    # 定义全局的syslog服务器;最多可以定义两个
全局配置示例
global
chroot /var/haproxy # 锁定运行目录
uid 99 # 所属运行的用户uid
gid 99 # 所属运行的用户组
daemon # 守护进程。以后台形式运行haproxy
nbproc 1 # haproxy进程数,与CPU保持一致
pidfile /var/run/haproxy.pid # haproxy的pid存放路径,启动进程的用户必须有权限访问此文件
ulimit-n 65535 # ulimit的数量限制
maxconn 20480 # 默认最大连接数
log 127.0.0.1 local0 # 日志输出配置,所有日志都记录在本机系统日志,通过 local0 输出
log 127.0.0.1 local1 notice # notice 为日志级别,通常有24个级别(error warring info debug2.2.2 proxy 代理配置
主要分为下面4个部分
defaults [<name>]  # 默认配置项,针对以下的frontend、backend和lsiten生效,可以多个name
frontend <name>    # 前端servername,类似于Nginx的一个虚拟主机 server。
backend <name>     # 后端服务器组,等于nginx的upstream
listen  <name>      # 将frontend和backend合并在一起配置
1)proxies 配置-defaults
option redispatch           # 当server Id对应的服务器挂掉后,强制定向到其他健康的服务器
option abortonclose         # 当服务器负载很高的时候,自动结束掉当前队列处理比较久的链接
option http-keep-alive      # 开启与客户端的会话保持
option forwardfor           # 透传客户端真实IP至后端web服务器
mode http                   # 默认工作类型
timeout connect 120s        # 客户端请求到后端server的最长连接等待时间(TCP之前)
timeout server 600s         # 客户端请求到后端服务端的超时超时时长(TCP之后)
timeout client 600s         # 与客户端的最长非活动时间
timeout http-keep-alive 120s # session 会话保持超时时间,范围内会转发到相同的后端服务器
timeout check 5s            # 对后端服务器的检测超时时间
defaults配置示例:
#########################  默认设置  ##########################
## 这些参数可以被利用配置到 frontend,backend,listen组件
defaults
    mode http                       # 所处理的类别 (网络七层协议中,tcp是第4层的会话层、http是第7层的应用层)
    maxconn 20480                   # 最大连接数
    option httplog                  # 日志类别http日志格式
    option httpclose                # 每次请求完毕后主动关闭http通道
    option dontlognull              # 不记录健康检查的日志信息
    option forwardfor               # 如果后端服务器需要获得客户端真实ip需要配置的参数,可以从Http Header中获得客户端ip
    option redispatch               # 当server Id对应的服务器挂掉后,强制定向到其他健康的服务器
    option abortonclose             # 当服务器负载很高的时候,自动结束掉当前队列处理比较久的连接
    stats refresh 30                # 统计页面刷新间隔
    retries 3                       # 检查节点服务器失败次数,连续达到三次失败,则认为节点不可用
    balance roundrobin              # 默认的负载均衡的方式,轮询方式
    #balance source                 # 默认的负载均衡的方式,类似nginx的ip_hash
    #balance leastconn              # 默认的负载均衡的方式,最小连接
    contimeout 5000                 # 客户端请求haproxy到后端server的最长等待连接的超时时间
    clitimeout 50000                # 客户端请求haproxy的超时时间
    srvtimeout 50000                # 服务器的超时时间
    timeout check 2000              # 心跳检测的超时时间
2)proxies配置-frontend 配置参数
frontend 配置参数
bind:指定HAProxy的监听地址,可以是IPV4或IPV6,可以同时监听多 个IP或端口,可同时用于1isten字段中
bind [<address>]:<port_range> [, ...] [param*]
listen http_proxy #监听听http的多个IP的多个端口和sock文件
bind :80,:443,:8801-8810
bind 10.0.0.1:10080,10.0.0.1:10443
bind /var/run/ssl-frontend. sock user root mode 600 accept-proxy
1isten http_https_proxy #https监听
bind :80
bind :443 ssl crt /etc/haproxy/site.pem
1isten http_https_proxy_explicit #监听ipv6、ipv4和unix sock文件
bind ipv6@:80
bind ipv4@public_ssl:443 ssl crt /etc/haproxy/site.pem
bind unix@ssl-frontend.sock user root mode 660 accept-proxy
1isten external bind app1 #监听file descriptor
bind "fd@$(FD_APP1)"
生产示例:
frontend WEB_PORT
bind :80,:8080
bind 192.168.7.102:10080,:8801-8810,192.168.7.101:9001-9010
default_backend backend_name #定义默认服务器组,如果没有匹配到服务器组,那就使用默认的服务器组。
mode http/tcp #指定负载协议类型
use-backend backend_name #调用的后端服务器组名称3)proxies配置-backend 配置参数
定义一组后端服务器,backend服务器将被frontend进行调用。
mode http/tcp #指定负载协议类型
option #配置选项
server #定义后端real server
注意:option后面加httpchk, smtpchk,mysql-check,pgsql-check, ssl-hello-chk方法可以用于实现更多应用层检测功能
option httpchk GET /index.html ##设置7层的心跳检测
检测功能。
check #对指定real进行健康状态检查,默认不开启,如果加了,默认是对端口进行健康检查
addr IP #可指定的健康状态检测IP
port num #指定的健康状态监控端口
inter num #健康状态检查间隔时间,默认2000ms
fall num #后端服务器失效检查次数,默认为3次
rise num #后端服务器从下线到恢复前检查次数,默认为2,如果2次检查都OK,就加入集群
weight #默认为1,最大值为256,0代表不参与负载均衡
backup #将后端服务器标记为备份状杰
disabled #将后端服务器标记为不可用状态
redirect prefix http://www.wcfeng.top #将请求临时重定向到其他的URL地址,仅限于http模式,作用于frontend段
redir 等同于redirect,作用于backend段中,redir http://www.myhopu.com
maxconn <maxconn>: #当前后端server的最大并发连按数
backlog <back1og>: #当server的连接数达到上限后的后援队列长度
注意:如果配置文件后不加“inter 5s fall 5”这类参数,默认是2秒检查一次,检查3次,一共6s,如果有问题就将服务器摘除。4)fronten+backend的配置
##定义业务入口
frontend WEB_PORT
    bind :80
    use_backend web_svr1     #使用后端服务器组
    backlog 1024          #后援队列长度
    #临时重定向到其他的网站( 也可以写在backend中,redir http://www.myhopu.com)
    #redirect prefix http://www.myhopu.com
<p>##后端服务器组<br />
backend web_svr1
  mode http
  option forwardfor
  server web01 192.168.1.101:80   maxconn 10   check  addr 192.168.1.101 port 81 inter 2s  fall 3 rise 5  weight 2
  server web02 192.168.1.102:80   maxconn 10   check  addr 192.168.1.102 port 82 inter 2s  fall 3 rise 5  weight 1

  注意:addr ‘ip’ port ‘port_num’一般是指在多端口的业务场景下,专门用于健康检测的端口,当端口异常后,服务器就下线,不在接收用户的请求
5)proxies配置中listen替代fronten+backend的4层配置
   listen web_svr1
  bind 192.168.1.100:80
  balance source
  mode tcp    ##4层配置
  option forwardfor
  server web1 192.168.1.101:22 check inter 3s fall 3 rise 5 weight 5
  server web2 192.168.1.102:22 check inter 3s fall 3 rise 5 weight 1
配置完成后,我们测试SSH的转发代理
[root@localhost ~]# ssh -p80 192.168.1.100 'ifconfig' |sed -n '2p'|awk '{print $2}' ##查看代理后的IP地址6)完整配置
global
chroot /var/lib/haproxy
uid 99
gid 99
daemon
nbtread 4 ##此选项不支持和多进程共存
nbproc 4
cpu-map 1 0
cpu-map 2 1
cpu-map 3 2
cpu-map 4 3
#在多进程的环境下,建议可以配置多个socket,然后可以根据不同的socket来动态调整权重等其他信息
stats socket /var/lib/haproxy/haproxy.sock1 mode 600 level admin process 1
stats socket /var/lib/haproxy/haproxy.sock2 mode 600 level admin process 2
stats socket /var/lib/haproxy/haproxy.sock3 mode 600 level admin process 3
stats socket /var/lib/haproxy/haproxy.sock4 mode 600 level admin process 4
pidfile /var/run/haproxy.pid
ulimit-n 65535
maxconn 20480
log 127.0.0.1 local0 info<br />
</p>
<p>defaults
log global
mode http
option httplog
retries 3
maxconn 100000
option redispatch
option abortonclose
option http-keep-alive
option forwardfor
timeout connect 120s
timeout server 600s
timeout client 600s
timeout http-keep-alive 120s
timeout check 5s </p>
<p>listen admin_stats
bind 192.168.1.100:8080
mode http
option httplog
maxconn 1000
stats refresh 30s
stats uri /stats
stats auth admin:admin
stats hide-version
##网站业务入口
listen http_web
bind 192.168.1.100:80
mode http
option forwardfor
balance roundrobin
cookie WEBSRV insert nocache
server web01 192.168.1.101:80 check weight 1 inter 3000 rise 2 fall 2 cookie cksrv1
server web02 192.168.1.102:80 check weight 1 inter 3000 rise 2 fall 2 cookie cksrv22.3 基于TCP端口的健康检查
   listen web_svr1
  bind 192.168.1.100:80
  mode tcp        ##4层配置
  balance   roundrobin
  option forwardfor
  server web1 192.168.1.101:80 check port 80  inter 3s fall 3 rise 5 weight 2
  server web2 192.168.1.102:80 check port 80  inter 3s fall 3 rise 5 weight 1
2.4 基于HTTP的IP url的健康检查
2.4.1 基于HEAD方法
option httpchk HEAD /check.html HTTP/1.1
这种方式相当于使用curl -I 192.168.1.101/check.html或者wget 192.168.1.101/check.html,如果可以访问则代表后端服务器是正常的实例:
 listen web_svr1
  bind 192.168.1.100:80
  balance roundrobin
  mode http
  option forwardfor
  option httpchk HEAD /check.html HTTP/1.0  ##指定HTTP协议版本
  server web1 192.168.1.101:80 check inter 3s fall 3 rise 5 weight 5
  server web2 192.168.1.102:80 check inter 3s fall 3 rise 5 weight 2
2.4.2 基于GET的方式
option httpchk GET /check.html实例:
   listen web_svr1
  bind 192.168.1.100:80
  balance roundrobin
  mode http
  option forwardfor
 # option httpchk HEAD /check.html HTTP/1.0
  option httpchk GET /check.html   HTTP/1.0   ##不指定HTTP协议版本,默认是HTTP/1.1
  server web1 192.168.1.101:80 check inter 3s fall 3 rise 5 weight 5
  server web2 192.168.1.102:80 check  inter 3s fall 3 rise 5 weight 2
关于“option httpchk”选项的详细内容,请参考.haproxy/doc/haproxy/configuration.txt文件。
2.5 其他服务的健康状态检查
haproxy还可以针对mysql,ldap,smtp等其他的服务器进行健康状态检查
2.5.1 针对mysql,ldap,smtp的语法示例
option ldap-check
Use LDAPv3 health checks for server testing.
option mysql-check [ user <sername> ]
Use MySQL health checks for server testing
option smtpchk
option smtpchk <hello> <domain>
Use SMTP health checks for server testing3、HAProxy的调度算法
HAProxy通过固定参数 balance 指明对后端服务器的调度算法,该参数可以配置在listen或backend选项中。
HAProxy的调度算法分为静态和动态调度算法,但是有些算法可以根据参数在静态和动态算法中相互转换。
HAPorxy调度算法:http://docs.haproxy.org/2.2/configuration.html#4-balance
3.1 静态调度算法
静态算法(static-rr):按照事先定义好的规则轮询公平调度,不关心后端服务器的当前负载、连接数和响应速度等,且无法实时修改权重,只能靠重启HAProxy生效。
服务器权重动态调整
# yum install socat -y
socat是 Linux 下的一个多功能的网络工具,名宇来由是socket CAT, socat 的主要特点就是在两个数据流之间建立通道,且支持众多协议和连接方式。如 IP、TCP、UDP、 IPv6、 Socket文件等</p>
<h1 id="echo "help" | socat stdio /var/lib/haproxy/haproxy.sock">echo "help" | socat stdio /var/lib/haproxy/haproxy.sock</h1><h1 id="echo "get weight web_svr1/web1" | socat stdio /var/lib/haproxy/haproxy.sock">echo "get weight web_svr1/web1" | socat stdio /var/lib/haproxy/haproxy.sock</h1>
<p>1 (initial 1)</p>
<h1 id="echo "set weight web_svr1/web1 2" |socat stdio /var/lib/haproxy/haproxy.sock">echo "set weight web_svr1/web1 2" |socat stdio /var/lib/haproxy/haproxy.sock</h1>
<p>Backend is using a static LB algorithm and only accepts weights '0%'and '100%'
总结:通过socat方式不仅可以动态调整后端服务器的优先级,还可以根据不同的socket来设置权重(在多进程的环境下),同时还可以关闭后端服务器的socket(监控平台查看状态)
[root@localhost ~]# echo "disable server web_svr1/web1" |socat stdio /var/lib/haproxy/haproxy.sock1
[root@localhost ~]# echo "disable server web_svr1/web1" |socat stdio /var/lib/haproxy/haproxy.sock2
[root@localhost ~]# echo "enable server web_svr1/web1" |socat stdio /var/lib/haproxy/haproxy.sock2
[root@localhost ~]# echo "enable server web_svr1/web1" |socat stdio /var/lib/haproxy/haproxy.sock1
3.1.1 static-rr--------->tcp/http
基于权重的轮询调度,不支持权重的动态调整及后端服务器慢启动,其他后端主机量没有限制
  listen web_svr1
  bind 192.168.1.100:80
  balance static-rr    ##调度算法
  mode http
  option forwardfor
  server web1 192.168.1.101:80 check inter 3s fall 3 rise 5 weight 1
  server web2 192.168.1.102:80 check inter 3s fall 3 rise 5 weight 1
3.1.2 first------------->tcp/http
根据服务器在列表中的位置,至上而下进行调度,但是其只会当第一台服务器的连接数达到上限,新的请求才会分配给下一台服务去,因此会忽略服务器权重设置(列表优先,榨干前任再调下一任)
  listen web_svr1
  bind 192.168.1.100:80
  balance first    ##调度算法
  mode http
  option forwardfor
  server web1 192.168.1.101:80 maxconn 1 check inter 3s fall 3 rise 5 weight 2
  server web2 192.168.1.102:80 check inter 3s fall 3 rise 5 weight 1
测试效果
while true;do curl http://192.168.1.100/index.html;sleep 0.1;done3.2 动态调度算法
动态算法:基于后端服务器状态进行调度适当调整,新请求将优先调度至当前负载较低的服务器,且权重可以在haproxy运行时动态调整无需重启。
3.2.1 roundrobin
基于权重的轮询动态调度算法,支持权重运行时调整,最多支持4095个RS,为默认的调度算法
  listen web_svr1
  bind 192.168.1.100:80
  balance   roundrobin  ##调度算法
  mode http
  option forwardfor
  server web1 192.168.1.101:80 check inter 3s fall 3 rise 5 weight 1
  server web2 192.168.1.102:80 check inter 3s fall 3 rise 5 weight 1
动态调整权重
[root@haproxy ~]# echo "get weight web_svr1/web1" |socat stdio /var/lib/haproxy/haproxy.sock1
1 (initial 1)
[root@haproxy ~]# echo "set weight web_svr1/web1 2" |socat stdio /var/lib/haproxy/haproxy.sock1
[root@haproxy ~]# echo "get weight web_svr1/web1" |socat stdio /var/lib/haproxy/haproxy.sock1
2 (initial 1)3.2.2 leastconn
leastconn加权的最少连接的动态,支持权重运行时调整和慢启动,当前服务器连接最少的优先调度(新连接),适用于mysql的场景
  listen web_svr1
  bind 192.168.1.100:80
  balance leastconn   ##调度算法
  mode http
  option forwardfor

  server web1 192.168.1.101:80 check inter 3s fall 3 rise 5 weight 1
  server web2 192.168.1.102:80 check inter 3s fall 3 rise 5 weight 1
3.3 其他算法
其他部分算法既可以作为静态算法,又可以通过选项成为动态
3.3.1 source
源地址hash,基于用户源地址hash并将请求转发到后端服务器,默认为静态取模方式,可以通过hash-type选项更改,后续同一个源地址请求将被转发至同一个后端服务器。
两种转发计算方式:一致性hash和取模
1)map-base取模法
基于服务器总权重的hash数组取模,该hash时静态的不支持在线权重调整,不知道慢启动,其对后端服务器调度均衡,缺点是当服务器的总权重发生变化时(服务器上下线),都会因其权重发生变化而导致调度结果改变
取模运算:计算两数相除之后的余数,10%6=4,7%4=3,基于权重取模:(2^32-1)%(1+1+2)

listen web_svr1
bind 192.168.1.100:80
balance source ##算法
mode http
option forwardfor
server web1 192.168.1.101:80 check inter 3s fall 3 rise 5 weight 5
server web2 192.168.1.102:80 check inter 3s fall 3 rise 5 weight 1
##取模法是一种静态算法,无法动态修改权重值
echo "set weight web_svr1/web1 2" |socat stdio /var/lib/haproxy/haproxy.sock1
Backend is using a static LB algorithm and only accepts weights '0%' and '100%'.2)一致性hash
一致性hash,该hash是动态,支持在线调整权重,支持慢启动,优点在于当服务器的总权重发生变化时,对调度的结果是局部的,不会引起大的变动.
一致性hash的映射关系
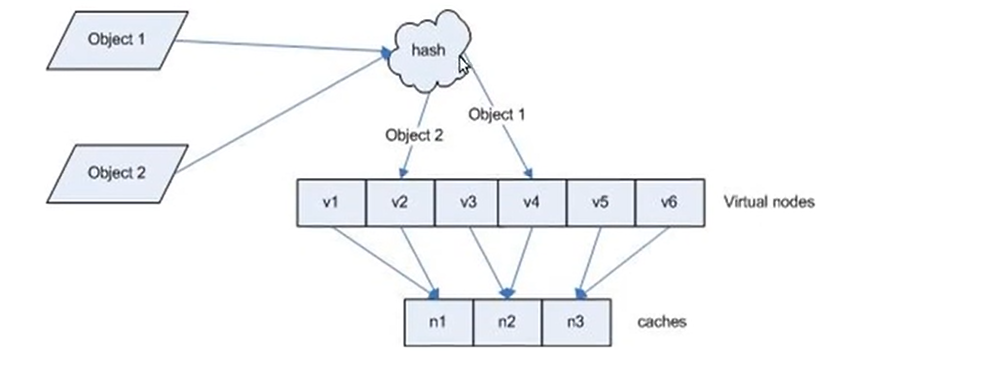
后端服务器在线和离线的调度方式

一致性hash示例:
   listen web_svr1
  bind 192.168.1.100:80
  balance source
  hash-type consistent     ##算法
  mode http
  option forwardfor
  server web1 192.168.1.101:80 check inter 3s fall 3 rise 5 weight 5
  server web2 192.168.1.102:80 check inter 3s fall 3 rise 5 weight 1


支持在线动态调整权重
  echo "set weight web_svr1/web1 2" |socat stdio /var/lib/haproxy/haproxy.sock1
3.3.2 uri算法
基于对用户请求的uri做hash并将请求转发到后端指定服务器,也可以通过map-based和consistent定义使用取模法还是一致性hash,再将hash结果对总权重进行取模后,根据最终结果将请求转发到后端指定服务器(也就是对同一个uri访问,调度到同一个后端)。适用于后端是缓存服务器场景
http://example.org/absolute/URI/with/absolute/path/to/resource.txt #URI/URL
ftp://example.org/resource.txt #URI/URL
/relative/URI/with/absolute/path/to/resource.txt #URI
默认是静态算法,也可以通过hash-type指定map-based和consistent,来定义使用取模法还是一致性hash
注意:此算法基于应用层,所以只支持 mode http ,不支持 mode tcp
 listen web_svr1
mode http
balance uri
 #hash-type map-base
hash-type consistent
server web1 192.168.1.101:80 check inter 3000 fall 2 rise 5 weight 1
server web2 192.168.1.102:80 check inter 3000 fall 2 rise 5 weight 3
#通过访问不同的uri测试,相同的uri会调度到同一台服务器
[root@haproxy ~]# while true; do curl http://192.168.1.100/index.html; sleep 0.1;done
[root@haproxy ~]# while true; do curl http://192.168.1.100/check.html; sleep 0.1;done3.3.3 hdr
针对用户每个http头部(header)请求中的指定信息做hash,此处由 name 指定的http首部将会被取出并做hash计算,然后由服务器总权重相除以后派发至某挑出的服务器,假如无有效的值,则会使用默认的轮询调度
1)hdr取模算法配置示例
listen web_svr1
       bind 192.168.1.100:80
       mode http
       #User-Agent浏览器类型
       balance hdr(User-Agent)
      server web1 192.168.1.101:80 check inter 3000 fall 2 rise 5 weight 1
      server web2 192.168.1.102:80 check inter 3000 fall 2 rise 5 weight 3
2)hdr一致性hash配置示例
listen web_svr1
       bind 192.168.1.100:80
       mode http
       #User-Agent浏览器类型
       balance hdr(User-Agent)
       hash-type consistent
      server web1 192.168.1.101:80 check inter 3000 fall 2 rise 5 weight 1
      server web2 192.168.1.102:80 check inter 3000 fall 2 rise 5 weight 3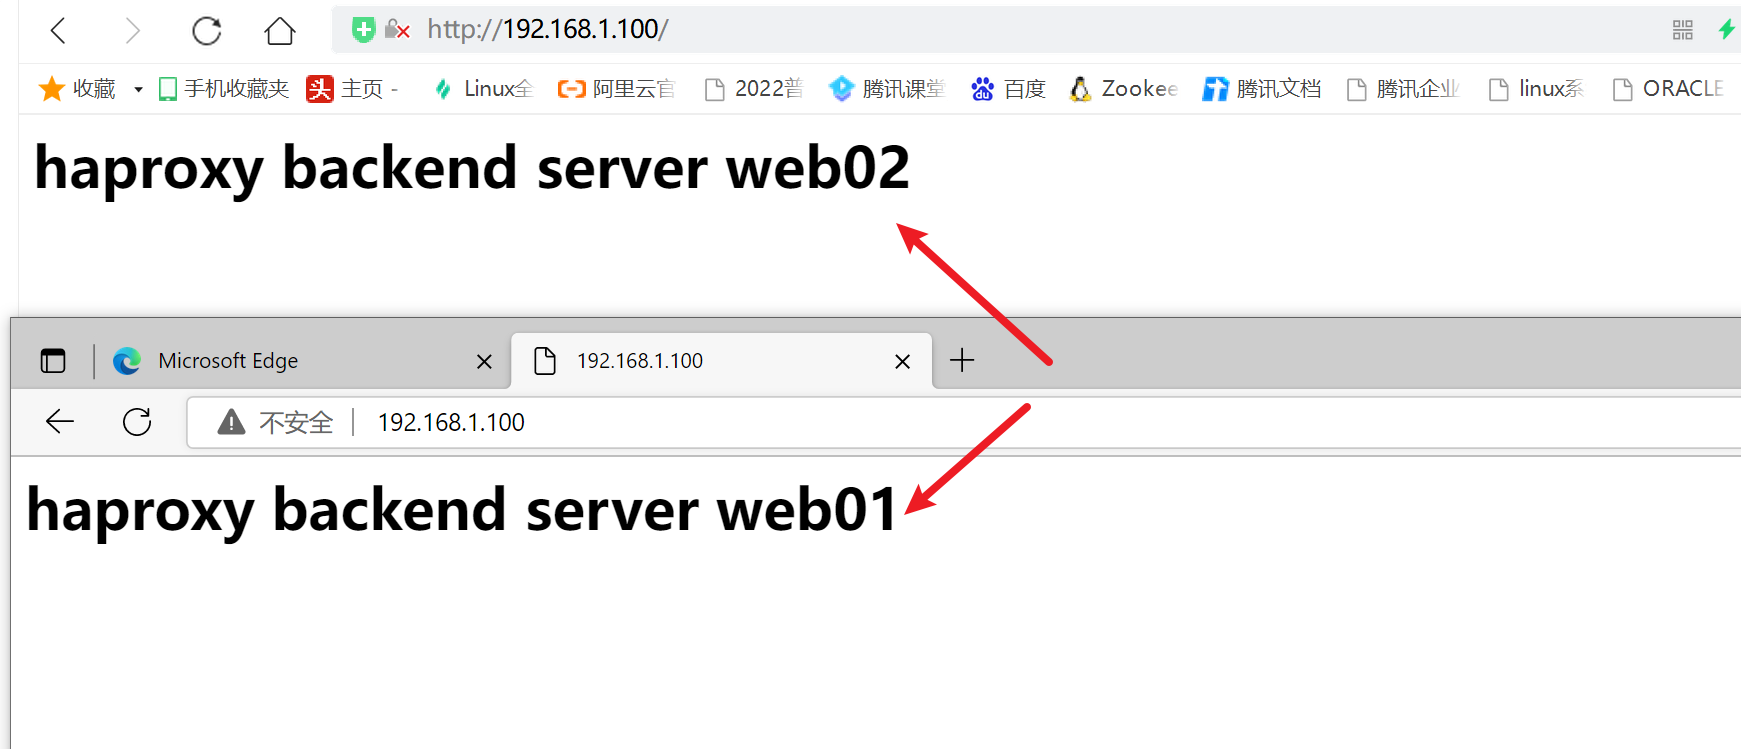
3.3.4 rdp-cookie
rdp-cookie使⽤客户端cookie保持会话,实现对windows远程桌⾯的负载等,rdp-cookie只支持tcp负载
1)rdp-cookie取模法配置示例
listen RDP_svr1
        bind 192.168.1.100:80
       mode tcp
       balance rdp-cookie
       server rdp01 192.168.1.100:3389 weight 1 check inter 3000 fall 3 rise 5
2)rdp-cookie一致性hash配置
listen RDP_svr1
       bind 192.168.1.100:80
       mode tcp
       balance rdp-cookie
       hash-type consistent
       server rdp01 192.168.1.100:3389 weight 1 check inter 3000 fall 3 rise 5
3.3.5 random
在1.9版本开始增加一个叫做random的负载平衡算法,其基于一个随机数作为一致性hash的key,随机负载平衡对于大型服务器场或经常添加或删除服务器非常有用,因为它可以避免在这种情况下由roundrobin或leastconn导致的锤击效应
1)random配置示例
listen web_svr1
       bind 192.168.1.100:80
       mode http
       balance random
      server web1 192.168.1.101:80 check inter 3000 fall 2 rise 5 weight 1
      server web2 192.168.1.102:80 check inter 3000 fall 2 rise 5 weight 3
3.4 算法总结
#静态
static-rr--------->tcp/http
first------------->tcp/http
#动态
roundrobin-------->tcp/http
leastconn--------->tcp/http
random------------>tcp/http
#以下静态和动态取决于hash_type是否consistent
source------------>tcp/http
Uri--------------->http
hdr--------------->http
rdp-cookie-------->tcp3.5 各算法使用场景
first #使用较少
static-rr #做了session共享的web集群
roundrobin
random
leastconn #数据库
source #基于客户端公网IP的会话保持
Uri ---------------> http #缓存服务器,CDN服务商,蓝汛、百度、阿里云、腾讯
url_param ---------> http #可以实现session保持
hdr #基于客户端请求报文头部做下一步处理
rdp-cookie #基于Windows主机,很少使用4、 高级功能及配置
介绍HAProxy高级配置及实用案例
4.1 基于cookie的会话保持
cookie value:为当前server指定cookie值,实现基于cookie的会话黏性,相对于基于 source 地址hash 调度算法对客户端的粒度更精准,但同时也加大了haproxy负载,目前此模式使用较少, 已经被session共享服务器代替
注意:不支持 tcp mode,使用 http mode
4.1.1 配置选项
cookie name [ rewrite | insert | prefix ][ indirect ] [ nocache ][ postonly ] [ preserve ][ httponly ] [ secure ][ domain ]* [ maxidle <idle> ][ maxlife ]
name: #cookie 的 key名称,用于实现持久连接
insert: #插入新的cookie,默认不插入cookie
indirect: #如果客户端已经有cookie,则不会再发送cookie信息
nocache: #当client和hapoxy之间有缓存服务器(如:CDN)时,不允许中间缓存器缓存cookie,因为这会导致很多经过同一个CDN的请求都发送到同一台后端服务器4.1.2 配置示例
[root@haproxy ~]#vim /etc/haproxy/conf.d/web_host.cfg
listen web_host
bind 192.168.252.132:80
mode http
log global
cookie WEBSRV insert nocache indirect
#hash-type consistent
server 192.168.3.15 192.168.3.15:80 weight 1 check cookie host1
server 192.168.3.16 192.168.3.16:80 weight 1 check cookie host2
[root@haproxy ~]#systemctl restart haproxy
[root@haproxy ~]#systemctl status haproxy
</p>
<h1 id="浏览器访问测试</code></pre><p style="text-align: start; "><img src="/upload/image-20220612124000866.png" style="display: inline-block"></p><p style="text-align: start; "></p><p style="text-align: start; "><img src="/upload/image-20220612124046495.png" style="display: inline-block"></p><pre><code># curl 访问过程中不携带(存储) cookie 所以访问轮询">浏览器访问测试
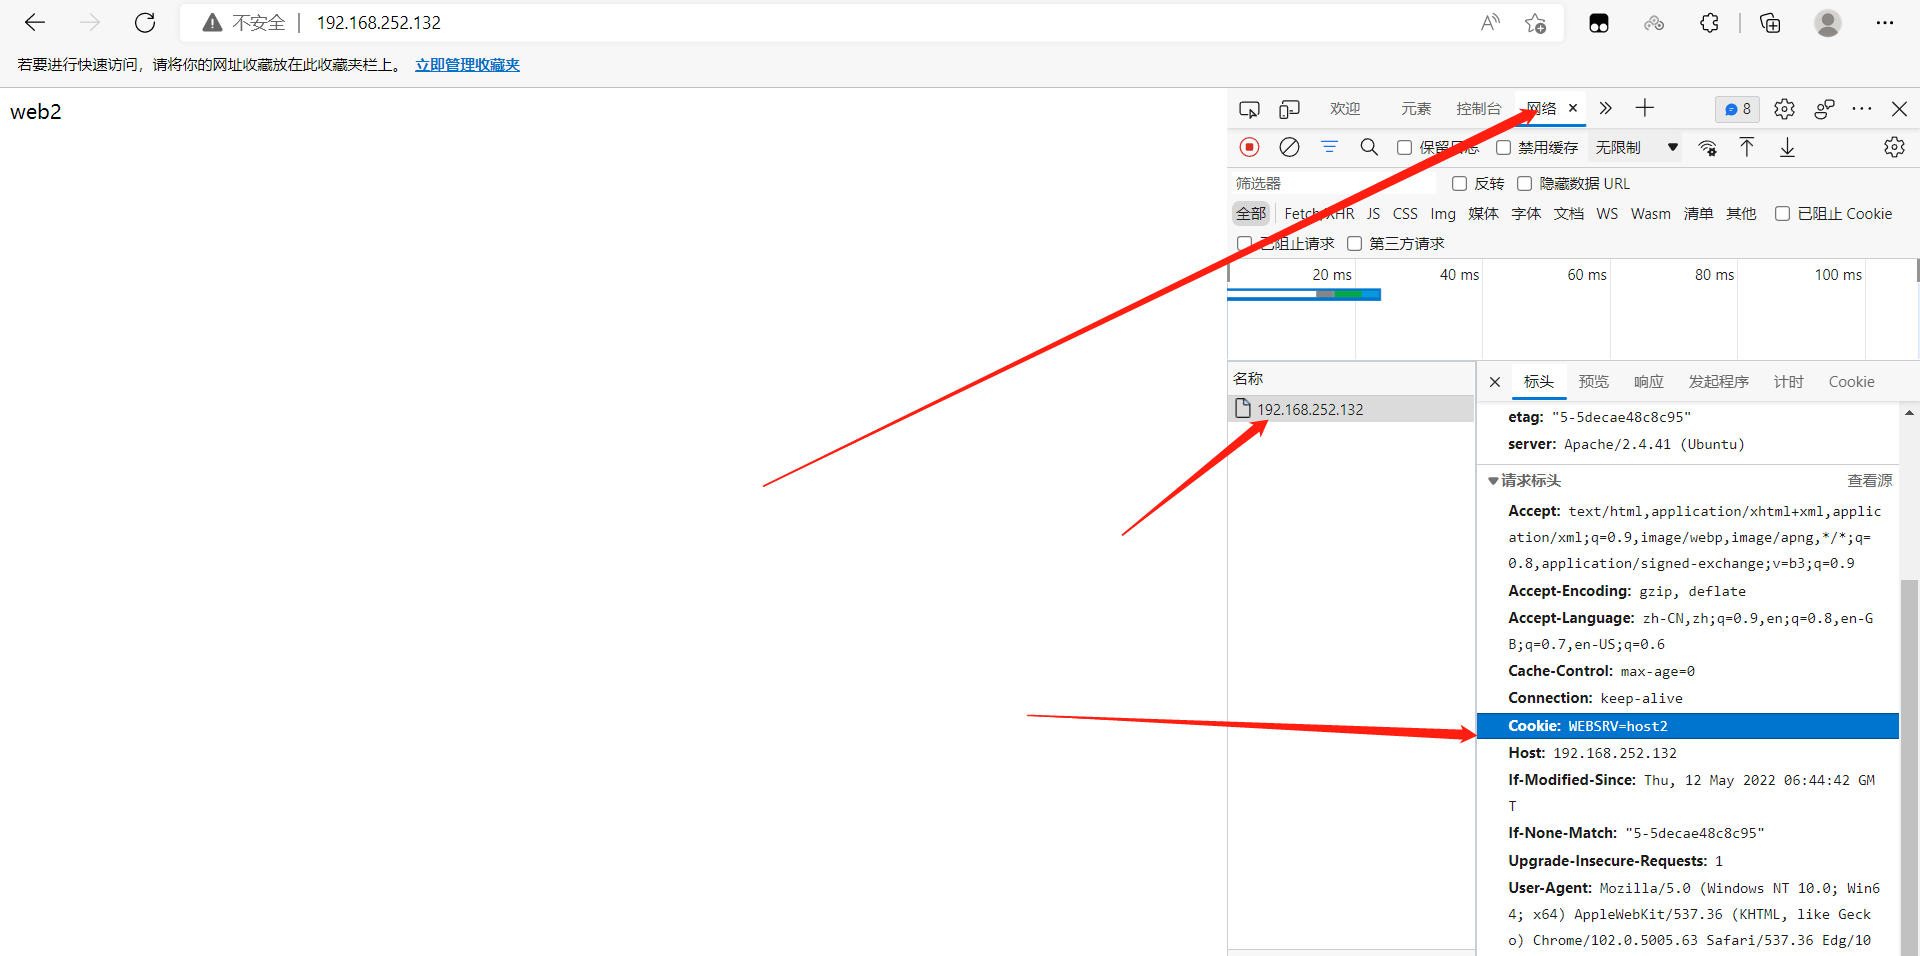
# curl 访问过程中不携带(存储) cookie 所以访问轮询</h1>
<p>[root@client ~]#while :; do curl 192.168.252.132;sleep 0.5;done
web2
web1
web2
web1
web2
[root@client ~]#curl -vi 192.168.252.132</p>
<ul>
<li>Rebuilt URL to: 192.168.252.132/</li>
<li> Trying 192.168.252.132...</li>
<li>TCP_NODELAY set</li>
<li>Connected to 192.168.252.132 (192.168.252.132) port 80 (#0)
> GET / HTTP/1.1
> Host: 192.168.252.132
> User-Agent: curl/7.61.1
> Accept: <em>/</em>
>
< HTTP/1.1 200 OK
HTTP/1.1 200 OK
< date: Sun, 12 Jun 2022 04:45:08 GMT
date: Sun, 12 Jun 2022 04:45:08 GMT
< server: Apache/2.4.37 (centos)
server: Apache/2.4.37 (centos)
< last-modified: Thu, 12 May 2022 06:43:54 GMT
last-modified: Thu, 12 May 2022 06:43:54 GMT
< etag: "5-5decae1aee7a3"
etag: "5-5decae1aee7a3"
< accept-ranges: bytes
accept-ranges: bytes
< content-length: 5
content-length: 5
< content-type: text/html; charset=UTF-8
content-type: text/html; charset=UTF-8
< set-cookie: WEBSRV=host1; path=/
set-cookie: WEBSRV=host1; path=/
< cache-control: private
cache-control: private
<
web1</li>
<li>Connection #0 to host 192.168.252.132 left intact
</li>
</ul>
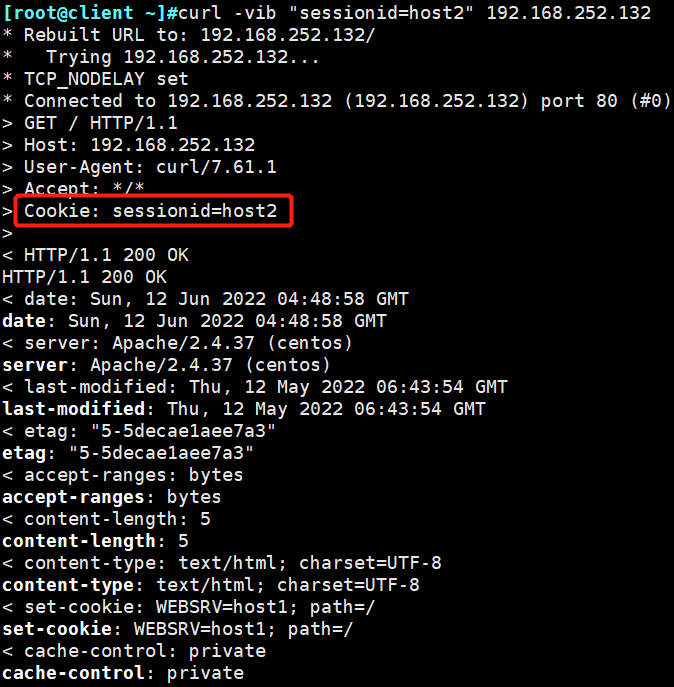
<h1 id="指定 cookie 进行调度">指定 cookie 进行调度</h1>
<p>[root@client ~]#curl -b "sessionid=host1" 192.168.252.132
web2
[root@client ~]#curl -b "sessionid=host2" 192.168.252.132
web1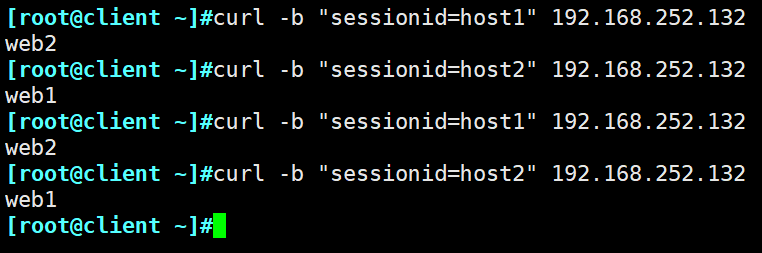
[root@client ~]#curl -vib "sessionid=host1" 192.168.252.132
[root@client ~]#curl -vib "sessionid=host2" 192.168.252.132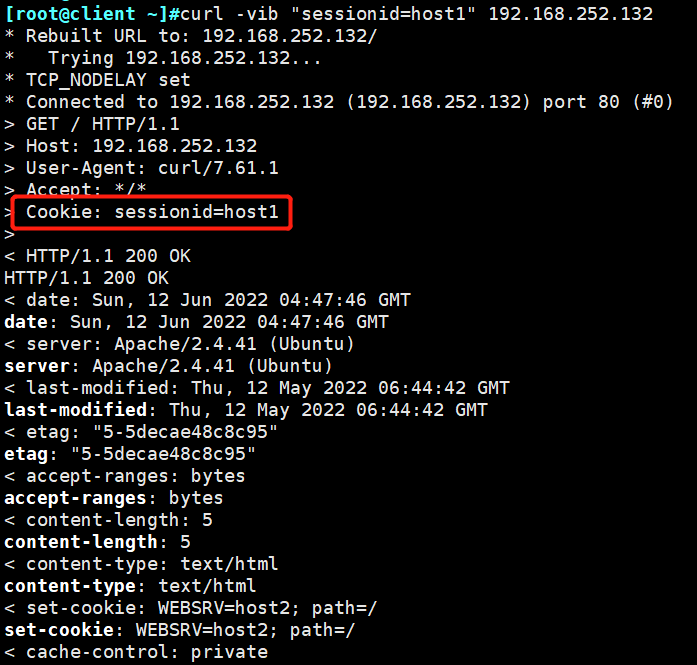
4.2 HAproxy的ACL
访问控制列表(ACL,Access Control Lists)是一种基于包过滤的访问控制技术,它可以根据设定的条件对经过服务器传输的数据包进行过滤(条件匹配),即对接收到的报文进行匹配和过滤,
基于请求报文头部中的源地址、源端口、目标地址、目标端口、请求方法、URL、文件后缀等信息内容进行匹配并执行进一步操作,比如允许其通过或丢弃。
ACL的功能主要是为了完成如下的2个功能
1、通过设置ACL规则来检查客户端请求是否符合规则,将不符合规则要求的请求直接中断---》访问控制;
2、符合ACL规则的请求由backend指定的后端服务器池执行基于ACL规则的负载均衡,不符合的可以直接中断响应,也可以交由其它服务器池执行-----》7层调度
注意:Haproxy中的ACL汇总设置在frontend部分,frontend 配置里面可以定义多个 acl 进行匹配操作
4.2.1 ACL语法
acl 名称 方法 -i [匹配的路径或文件]
-i:忽略大小写
-f:从指定的文件中加载模式
说明:
acl:区分字符大小写,且其只能包含大小写字母、数字、-(连接线)、_(下划线)、.(点号)和:(冒号);haproxy中,acl可以重名,这可以把多个测试条件定义为一个共同的acl。4.2.2 常用的方法
1、hdr_beg(host):用于测试请求报文的指定首部的开头部分是否符合指定的模式
acl host_static hdr_beg(host) -i img. video. download. ftp.
use_backend web_svr1 if host_static ##调用ACL规则
测试请求是否为提供静态内容的主机img、video、download或ftp。2、hdr_end(host):用于测试请求报文的指定首部的结尾部分是否符合指定的模式
acl host_static hdr_end(host) -i .aa.com .bb.com
use_backend web_svr1 if host_static ##调用ACL规则3、hdr_reg(host):通过正则匹配主机名
acl bbs hdr_reg(host) -i ^(bbs.test.com|shequ.test.com|forum) #定义ACL规则
use_backend web_svr1 if bbs ##调用ACL规则4、path_beg: 用于测试请求的URL是否以指定的模式开头
#用于测试URL是否以/static、/javascript或/stylesheets开头
acl url_static path_beg -i /static /javascript /stylesheets
use_backend web_svr1 if url_static ##调用ACL规则5、path_end:用于测试请求的URL是否以指定的模式结尾
 #测试URL是否以.jpg、.gif、.png、.css或.js结尾。
acl url_static path_end -i .jpg .gif .png .css .js
use_backend  web_svr1  if url_static     ##调用ACL规则
6、根据访问的地址和端口进行规制设置:
dst:目标地址
dst_port:目标端口
src:源地址
src_port:源端口
方法1:
frontend http02
bind 192.168.10.100:8888
acl invalid_src src 10.0.0.100 192.168.10.0/24
acl invalid_port src_port 0:1023
http-response deny if invalid_src
use_backend web_svr3
backend web_svr3
server web1 192.168.1.102:80 check inter 2s rise 3 fall 3
方法2:
listen http02
mode http
bind 192.168.10.100:8888
acl invalid_src src 192.168.10.1
http-response deny if invalid_src
server web1 192.168.10.102:80 check inter 2s rise 3 fall 3
7、url_reg:正则匹配URL地址
acl html url_reg -i .html$
use_backend web_svr1 if html
8、实现数据过滤
示例1:
acl forbidden_dst url_ip 192.168.0.0/16
acl forbidden_dst url_ip 172.16.0.0/12
acl forbidden_dst url_ip 10.0.0.0/8
http-request deny if forbidden_dst
示例2:
acl allow_host src 192.168.1.200/32
http-request deny if !allow_host
5、HAproxy基于rsyslog配置日志功能
5.1 配置本地接收日志 (收束)
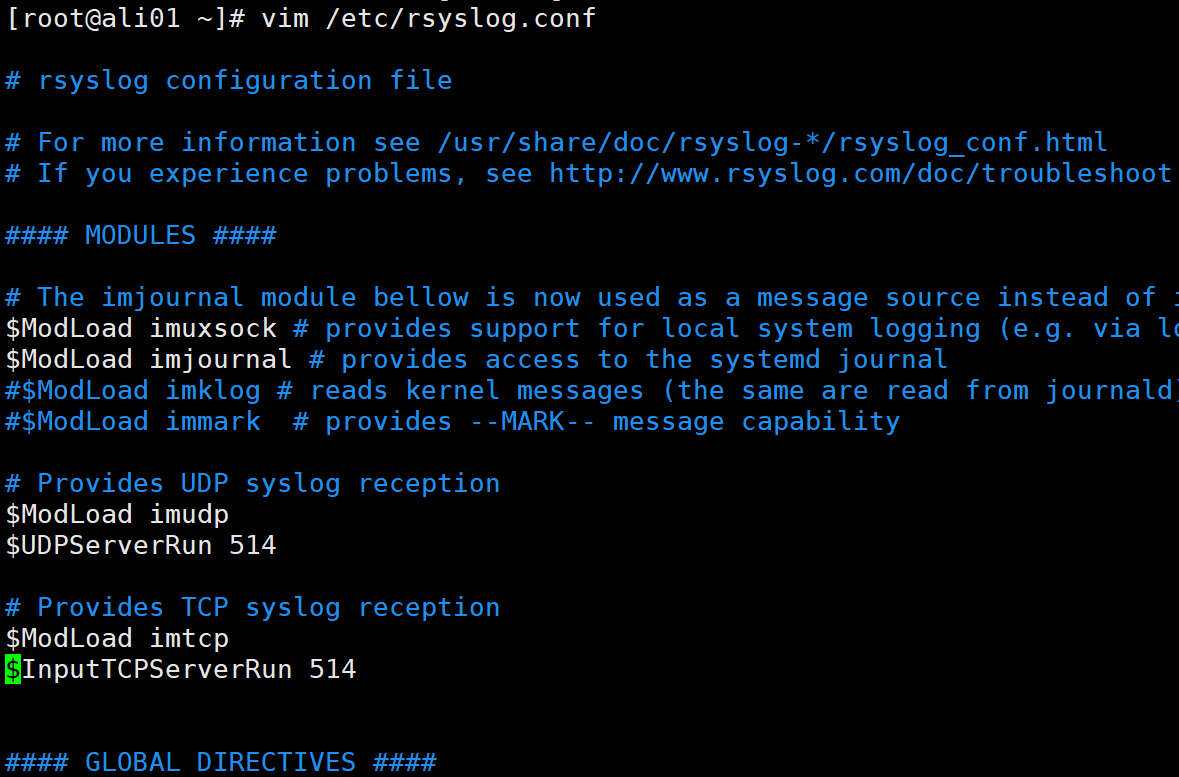
5.1.1 配置/etc/rsyslog.conf
在此配置文件中加入如下内容,此内容的日志级别和haproxy.cfg配置文件中定义的要一致
# haproxy application log
local0.*                                                /var/log/haproxy.log
将下面2个开关打开</p>
<h1 id="Provides UDP syslog reception ">Provides UDP syslog reception </h1>
<p>$ModLoad imudp
$UDPServerRun 5145.1.2 重启rsyslog服务
[root@haproxy ~]# systemctl restart rsyslog5.1.3 配置haproxy.cfg配置文件
在此配置文件的global段中加入如下内容
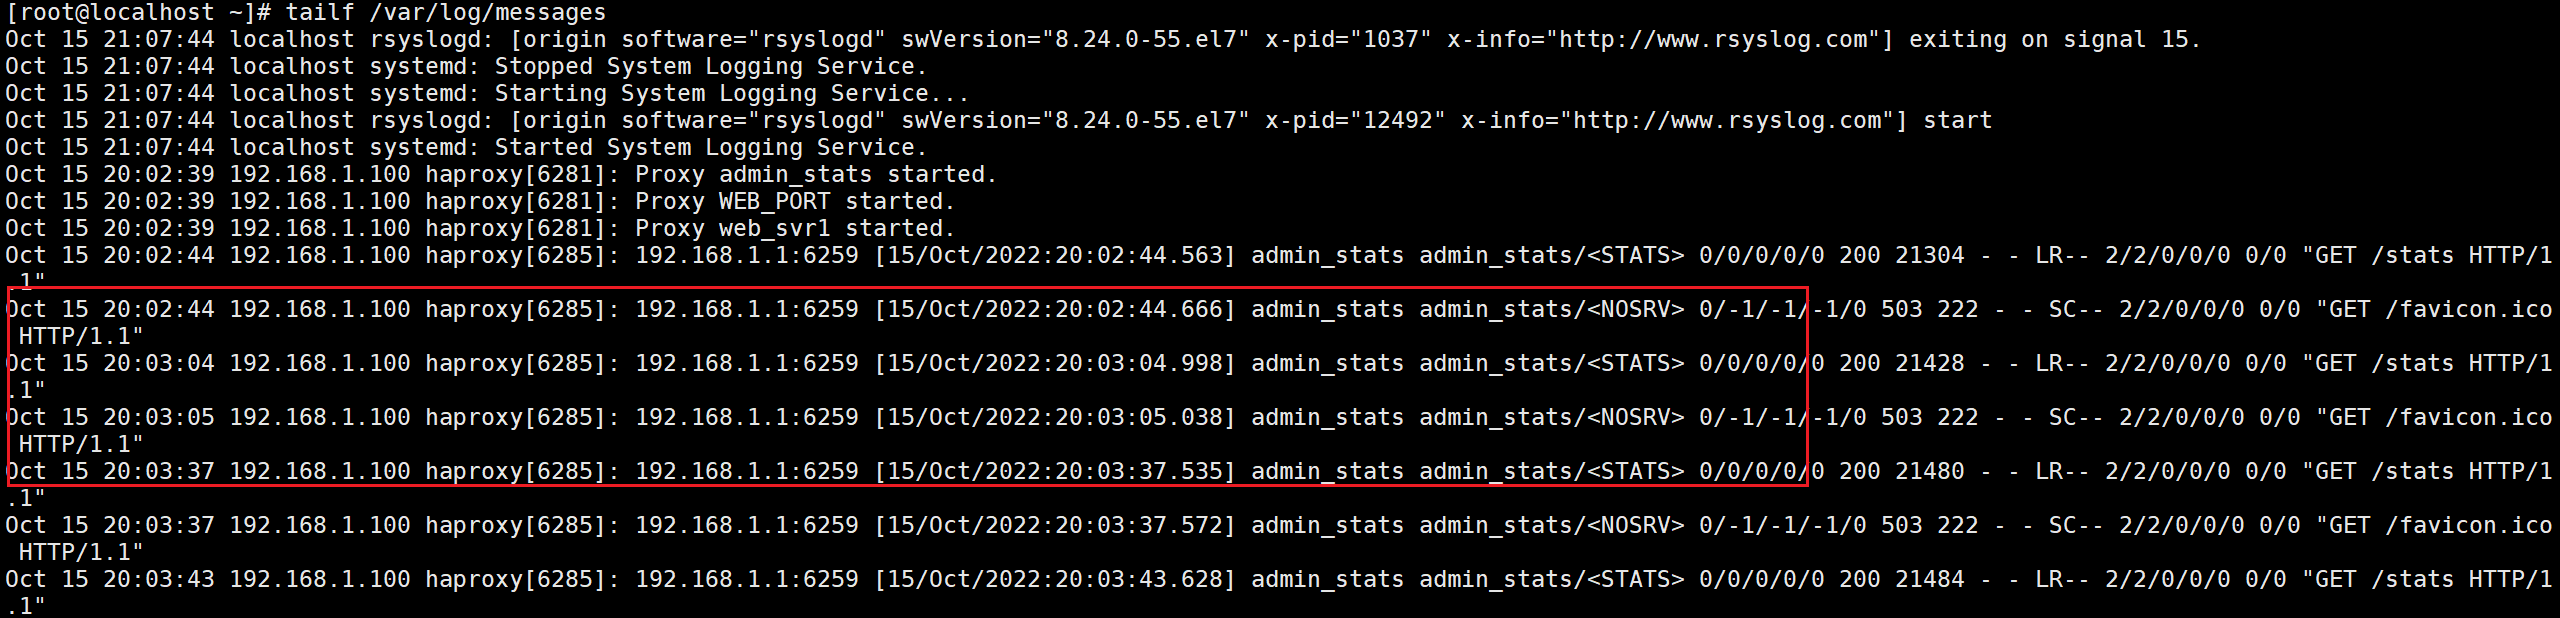
log 127.0.0.1 local0 info5.1.4 查看日志
[root@haproxy log]# tail -n 5 haproxy.log
Oct 14 09:22:36 localhost haproxy[10929]: 192.168.1.1:11378 [14/Oct/2022:09:22:36.962] admin_stats admin_stats/<NOSRV> 0/-1/-1/-1/0 503 222 - - SC-- 2/1/0/0/0 0/0 "GET /favicon.ico HTTP/1.1"
Oct 14 09:23:06 localhost haproxy[10929]: 192.168.1.1:11378 [14/Oct/2022:09:23:06.971] admin_stats admin_stats/<STATS> 0/0/0/0/0 200 20879 - - LR-- 2/1/0/0/0 0/0 "GET /stats HTTP/1.1"
Oct 14 09:23:07 localhost haproxy[10929]: 192.168.1.1:11378 [14/Oct/2022:09:23:07.010] admin_stats admin_stats/<NOSRV> 0/-1/-1/-1/0 503 222 - - SC-- 2/1/0/0/0 0/0 "GET /favicon.ico HTTP/1.1"
Oct 14 09:23:37 localhost haproxy[10929]: 192.168.1.1:2977 [14/Oct/2022:09:23:37.014] admin_stats admin_stats/<STATS> 0/0/0/0/0 200 20883 - - LR-- 1/1/0/0/0 0/0 "GET /stats HTTP/1.1"
Oct 14 09:23:37 localhost haproxy[10929]: 192.168.1.1:2977 [14/Oct/2022:09:23:37.055] admin_stats admin_stats/<NOSRV> 0/-1/-1/-1/0 503 222 - - SC-- 1/1/0/0/0 0/0 "GET /favicon.ico HTTP/1.1"
[root@haproxy log]#
5.2 远程接收服务器的日志
5.2.1 在日志服务器接收端开启日志收集的模块
打开rsyslog的配置文件,将$ModLoad imudp和$ModLoad imtcp两个模块打开,表示开启日志接收的功能,端口是514;
5.2.2 开启后,重启日志服务

可以看到UDP和TCP的514端口均已经开启,服务段已经准备好了,接下来开始配置客户端;
5.2.3 在日志的发送方的配置,打开haproxy配置文件
在global段加入如下内容:
log 192.168.1.104 local0 info
5.2.4 重启haproxy
[root@haproxy haproxy]# systemctl restart haproxy5.2.5 模拟访问haproxy的vip地址,观察日志的接收端的日志输出
[root@myx05/etc/haproxy]$ cat haproxy.cfg</p>
<h1></h1><h1 id="demo config for Proxy mode">demo config for Proxy mode</h1><h1></h1>
<p>
global
maxconn 20000
ulimit-n 16384
log 10.0.0.10 local0 info
uid 995
gid 995
daemon
chroot /var/lib/haproxy
#nbtread 1 ##此选项不支持和多进程共存
nbproc 4
cpu-map 1 0
cpu-map 2 1
cpu-map 3 2
cpu-map 4 3
stats socket /var/lib/haproxy/haproxy.sock1 mode 600 level admin process 1
stats socket /var/lib/haproxy/haproxy.sock2 mode 600 level admin process 2
stats socket /var/lib/haproxy/haproxy.sock3 mode 600 level admin process 3
stats socket /var/lib/haproxy/haproxy.sock4 mode 600 level admin process 4
pidfile /var/run/haproxy.pid
ulimit-n 65535
maxconn 20480
log 127.0.0.1 local0 info<br />
defaults
log global
mode http
option httplog
retries 3
maxconn 100000
option redispatch
option abortonclose
option http-keep-alive
option forwardfor
timeout connect 120s
timeout server 600s
timeout client 600s
timeout http-keep-alive 120s
timeout check 5s
listen admin_stats
bind 10.0.0.12:8080
mode http
option httplog
maxconn 1000
stats refresh 30s
stats uri /stats
stats auth admin:admin
stats hide-version
listen http_web
bind 10.0.0.12:80
mode http
option forwardfor
balance roundrobin
# cookie WEBSRV insert nocache
server web01 10.0.0.13:80 check weight 1 inter 3000 rise 2 fall 2
server web02 10.0.0.14:80 check weight 1 inter 3000 rise 2 fall 2
listen web_svr1
bind 10.0.0.12:82
# balance roundrobin
# balance uri # 调度算法 static-rr,first,roundrobin,leastconn
# hash-type consistent
mode http
balance random
hash-type consistent
# mode tcp ##4层配置
# option forwardfor
# option httpchk GET /check.html # 基于GET的方式
# option httpchk HEAD /check.html HTTP/1.0 ##指定HTTP协议版本
server web3 10.0.0.15:80 check inter 3s fall 3 rise 5 weight 1
server web4 10.0.0.16:80 check inter 3s fall 3 rise 5 weight 3
listen web_host
bind 10.0.0.12:83
mode http
log global
cookie WEBSRV insert nocache indirect
server web3 10.0.0.15:80 check inter 3s fall 3 rise 5 weight 1
server web4 10.0.0.16:80 check inter 3s fall 3 rise 5 weight 3
listen http02
mode http
bind 10.0.0.12:84
acl invalid_src src 10.0.0.100 10.0.0.0/24
http-response deny if invalid_src
server web3 10.0.0.15:80 check inter 2s rise 3 fall 3
server web4 10.0.0.16:80 check inter 2s rise 3 fall 3
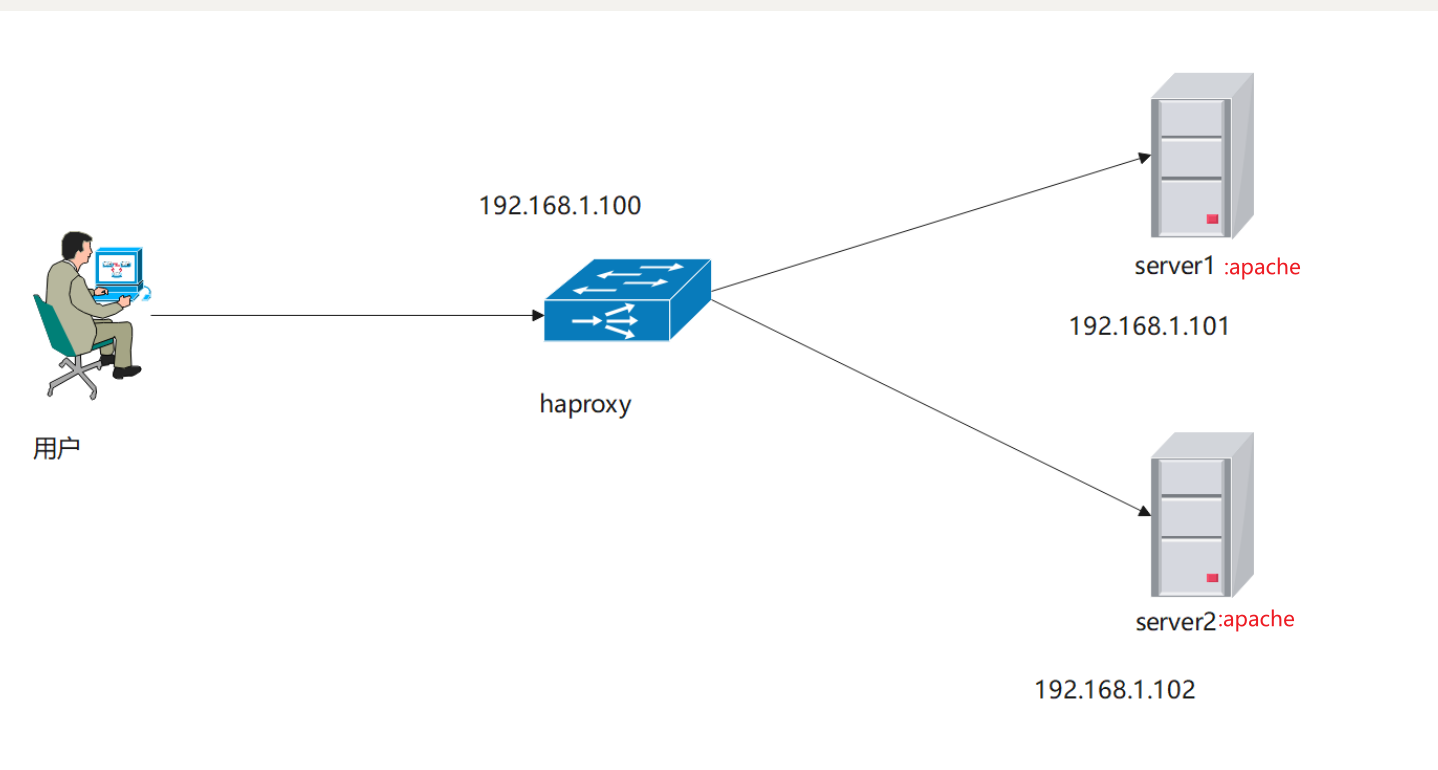
6、HAProxy实战1:配置haproxy负载均衡实现apache负载均衡
6.1 实验拓扑如下
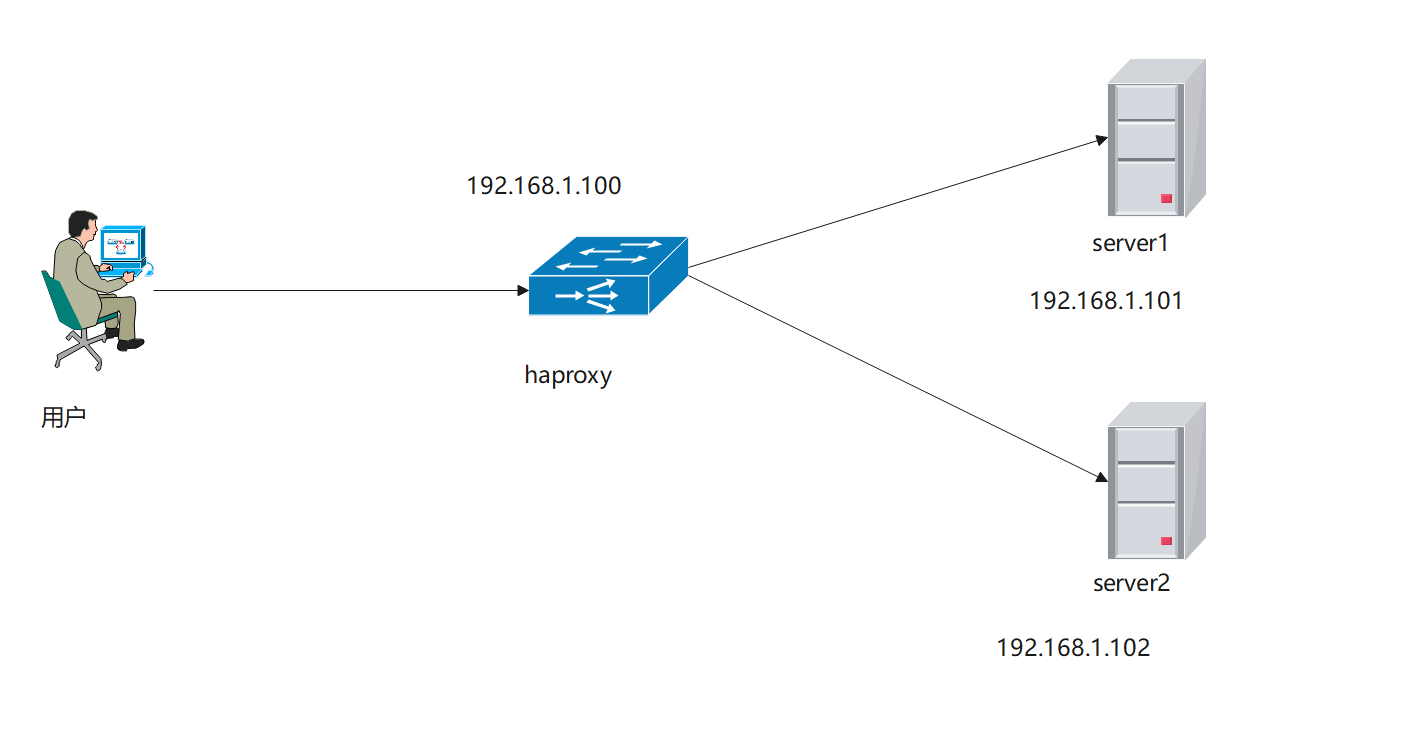
6.2 先配置后端的server,分别安装httpd服务,并启动服务
server1:
[root@server1 ~]# yum -y install httpd
[root@server1 ~]# cat /var/www/html/index.html
<h1>haproxy backend server web01<h1>
[root@server1 ~]# systemctl enable --now httpd
[root@server1 ~]#
server2:
[root@server2 ~]# yum -y install httpd
[root@server2 ~]# cat /var/www/html/index.html
<h1>haproxy backend server web02<h1>
[root@server2 ~]# systemctl enable --now httpd
[root@server2 ~]#6.3 配置haproxy
global
chroot /var/lib/haproxy
uid 99
gid 99
daemon
nbproc 2
#在多进程的环境下,建议可以配置多个socket,然后可以根据不同的socket来动态调整权重等其他信息
stats socket /var/lib/haproxy/haproxy.sock1 mode 600 level admin process 1
stats socket /var/lib/haproxy/haproxy.sock2 mode 600 level admin process 2
pidfile /var/run/haproxy.pid
ulimit-n 65535
maxconn 20480
log 127.0.0.1 local0 info<br />
</p>
<p>defaults
log global
mode http
option httplog
retries 3
maxconn 4096
option redispatch
option abortonclose
option http-keep-alive
option forwardfor
timeout connect 120s
timeout server 600s
timeout client 600s
timeout http-keep-alive 120s
timeout check 5s </p>
<p>listen admin_stats
bind 192.168.1.100:8080
mode http
option httplog
maxconn 1000
stats refresh 30s
stats uri /stats
stats auth admin:admin
stats hide-version
##网站业务入口
frontend WEB_PORT
bind 192.168.1.100:80
use_backend web_svr1
backlog 1024
log global
option httplog
option httpclose
default_backend web_svr1
##后端服务器
backend web_svr1
mode http
option forwardfor
balance roundrobin
option httpchk GET /check.html
cookie SERVERID insert indirect nocache
server web01 192.168.1.101:80 cookie 1 check inter 2s fall 3 rise 5 weight 1
server web02 192.168.1.102:80 cookie 1 check inter 2s fall 3 rise 5 weight 16.4 测试
[root@localhost ~]# curl 192.168.1.100
<h1>haproxy backend server web01<h1>
[root@localhost ~]# curl 192.168.1.100
<h1>haproxy backend server web02<h1>
[root@localhost ~]# curl 192.168.1.100
<h1>haproxy backend server web01<h1>
[root@localhost ~]# curl 192.168.1.100
<h1>haproxy backend server web02<h1>
[root@localhost ~]# curl 192.168.1.100
<h1>haproxy backend server web02<h1>
[root@localhost ~]# curl 192.168.1.100
<h1>haproxy backend server web01<h1>
[root@localhost ~]#
7、HAProxy实战2:配置haproxy实现mysql的负载均衡
7.1 实验拓扑图
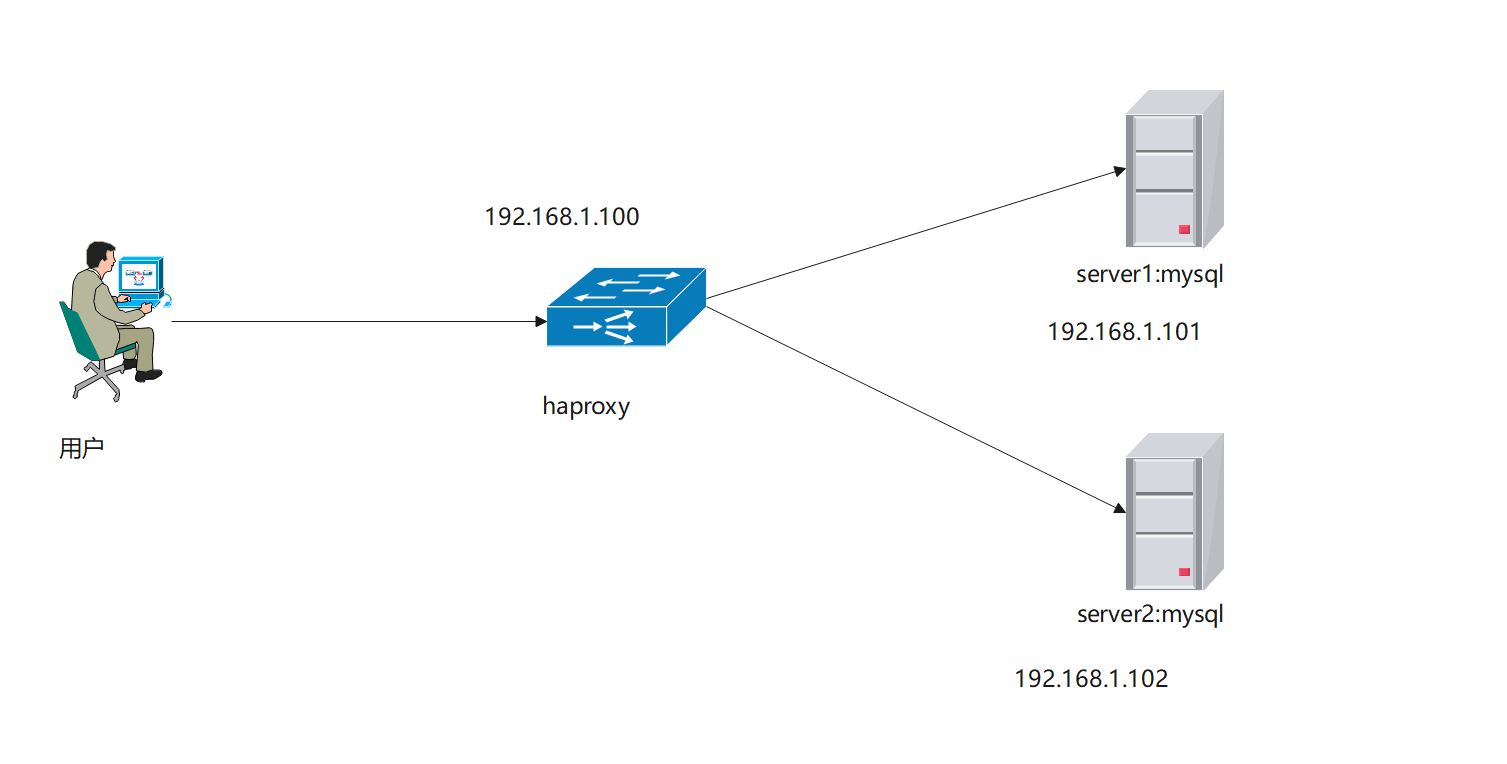
7.2 先在后端服务器上安装mysql5.7
server1&server2同样安装:
[root@server1 ~]# ~]# wget -i -c http://dev.mysql.com/get/mysql57-community-release-el7-10.noarch.rpm
##使用上面的命令就直接下载了安装用的Yum Repository,大概25KB的样子,然后就可以直接yum安装了。
[root@server1 ~]# yum -y install mysql57-community-release-el7-10.noarch.rpm
##之后就开始安装MySQL服务器。
[root@server1 ~]# rpm --import https://repo.mysql.com/RPM-GPG-KEY-mysql-2022
##替换旧的密钥
[root@server1 ~]# yum -y install mysql-community-server
##这步可能会花些时间,安装完成后就会覆盖掉之前的mariadb。7.3 安装完成后,启动mysql,使用临时密码登录服务器修改密码
关闭密码强度审计:validate-password=off
[root@server1 ~]# systemctl restart mysqld
[root@server1 ~]# grep 'password' /var/log/mysqld.log
2022-10-15T12:33:00.461303Z 1 [Note] A temporary password is generated for root@localhost: s?X4%0ji;3md
[root@server1 ~]#
mysql> set global validate_password_policy=0;
Query OK, 0 rows affected (0.00 sec)
mysql> set global validate_password_length=6;
Query OK, 0 rows affected (0.00 sec)
mysql> set password for 'root'@'localhost'=password('123456');
Query OK, 0 rows affected, 1 warning (0.00 sec)
mysql>
7.4 配置server1&server2服务器
[root@server1 ~]# vim /etc/my.cnf
在[mysqld]添加如下内容:
log-bin=mysql-bin-master #启用二进制日志
server-id=1 #本机数据库ID 标示
binlog-do-db=HA #可以被从服务器复制的库。二进制需要同步的数据库名
binlog-ignore-db=mysql #不可以被从服务器复制的库
validate-password=off #关闭密码审计强度
[root@server2 ~]# vim /etc/my.cnf
在[mysqld]添加如下内容
server-id = 2 #服务器的ID
log-bin=mysql-bin-slave #开启binlog
binlog-do-db=HA ##同步的数据库
binlog-ignore-db=mysql #忽略同步的数据库
validate-password=off ##关闭密码强度审计7.5 重启数据库
[root@server1 ~]# systemctl restart mysqld
[root@server2 ~]# systemctl restart mysqld7.6 在server1&server2授权可以同步本端数据库的用户
server1:
mysql> show master status;
+-------------------------+----------+--------------+------------------+-------------------+
| File | Position | Binlog_Do_DB | Binlog_Ignore_DB | Executed_Gtid_Set |
+-------------------------+----------+--------------+------------------+-------------------+
| mysql-bin-master.000002 | 154 | HA | mysql | |
+-------------------------+----------+--------------+------------------+-------------------+
1 row in set (0.00 sec)
mysql> grant replication slave on <em>.</em> to slave@'192.168.1.102' identified by '123456'; ##授权192.168.1.102可以使用slave用户,密码是123456来连接本端
Query OK, 0 rows affected, 1 warning (0.00 sec)
mysql> Query OK, 0 rows affected, 1 warning (0.01 sec)
server2:
mysql> show master status;
+------------------------+----------+--------------+------------------+-------------------+
| File | Position | Binlog_Do_DB | Binlog_Ignore_DB | Executed_Gtid_Set |
+------------------------+----------+--------------+------------------+-------------------+
| mysql-bin-slave.000002 | 154 | HA | mysql | |
+------------------------+----------+--------------+------------------+-------------------+
1 row in set (0.00 sec)
mysql> grant replication slave on <em>.</em> to slave@'192.168.1.101' identified by '123456';
Query OK, 0 rows affected, 1 warning (0.00 sec)
mysql>7.7 相互指定对方为自己的主数据库
server1:
mysql> change master to master_host='192.168.1.102',master_user='slave',master_password='123456';
Query OK, 0 rows affected, 2 warnings (0.00 sec)
server2:
mysql> change master to master_host='192.168.1.101',master_user='slave',master_password='123456';
Query OK, 0 rows affected, 2 warnings (0.01 sec)7.8 server1&serve2开启同步
执行:
mysql> start slave;
Query OK, 0 rows affected (0.00 sec)
7.9 查看同步状态
确保IO线程和SQL线程是yes即可:
       Slave_IO_Running: Yes
       Slave_SQL_Running: Yes
mysql> show slave status\G
*************************** 1. row ***************************
Slave_IO_State: Waiting for master to send event
Master_Host: 192.168.1.102
Master_User: slave
Master_Port: 3306
Connect_Retry: 60
Master_Log_File: mysql-bin-slave.000002
Read_Master_Log_Pos: 450
Relay_Log_File: server1-relay-bin.000003
Relay_Log_Pos: 675
Relay_Master_Log_File: mysql-bin-slave.000002
Slave_IO_Running: Yes
Slave_SQL_Running: Yes
Replicate_Do_DB:
Replicate_Ignore_DB:
Replicate_Do_Table:
Replicate_Ignore_Table:
Replicate_Wild_Do_Table:
Replicate_Wild_Ignore_Table:
Last_Errno: 0
Last_Error:
Skip_Counter: 0
Exec_Master_Log_Pos: 450
Relay_Log_Space: 1109
Until_Condition: None
Until_Log_File:
Until_Log_Pos: 0
Master_SSL_Allowed: No
Master_SSL_CA_File:
Master_SSL_CA_Path:
Master_SSL_Cert:
Master_SSL_Cipher:
Master_SSL_Key:
Seconds_Behind_Master: 0
Master_SSL_Verify_Server_Cert: No
Last_IO_Errno: 0
Last_IO_Error:
Last_SQL_Errno: 0
Last_SQL_Error:
Replicate_Ignore_Server_Ids:
Master_Server_Id: 2
Master_UUID: e43ce633-4d4e-11ed-80a6-000c29c79690
Master_Info_File: /var/lib/mysql/master.info
SQL_Delay: 0
SQL_Remaining_Delay: NULL
Slave_SQL_Running_State: Slave has read all relay log; waiting for more updates
Master_Retry_Count: 86400
Master_Bind:
Last_IO_Error_Timestamp:
Last_SQL_Error_Timestamp:
Master_SSL_Crl:
Master_SSL_Crlpath:
Retrieved_Gtid_Set:
Executed_Gtid_Set:
Auto_Position: 07.10 测试,在server1上创建数据库HA
####server1:
mysql> create database HA;
Query OK, 1 row affected (0.00 sec)
mysql> use HA;
Database changed
mysql> create table t1(id int,name varchar(50));
Query OK, 0 rows affected (0.01 sec)
mysql> insert into t1 values(1,'zhangsan');
Query OK, 1 row affected (0.00 sec)
###server2:
mysql> show databases;
+--------------------+
| Database |
+--------------------+
| information_schema |
| HA |
| mysql |
| performance_schema |
| sys |
+--------------------+
5 rows in set (0.00 sec)
mysql> use HA;
Reading table information for completion of table and column names
You can turn off this feature to get a quicker startup with -A
Database changed
mysql> select * from t1;
+------+----------+
| id | name |
+------+----------+
| 1 | zhangsan |
+------+----------+
1 row in set (0.00 sec)
反向测试
###server2:
mysql> insert into t1 values(1,'lisi');
Query OK, 1 row affected (0.01 sec)
###server1:
mysql> select * from t1;
+------+----------+
| id | name |
+------+----------+
| 1 | zhangsan |
| 1 | lisi | ##server2新增的数据也可以在server1查看到。
+------+----------+
2 rows in set (0.00 sec)7.11 配置haproxy
listen mysql
bind 192.168.1.100:3307
option forwardfor
balance roundrobin
mode tcp
server server1 192.168.1.101:3306 check   inter 2s  fall 3 rise 5  weight 1
server server2 192.168.1.102:3306 check   inter 2s  fall 3 rise 5  weight 1
7.12 重启haproxy
[root@haproxy haproxy]# systemctl restart haproxy
[root@haproxy haproxy]#  netstat -antup
Active Internet connections (servers and established)
Proto Recv-Q Send-Q Local Address           Foreign Address         State       PID/Program name
tcp        0      0 192.168.1.100:3307      0.0.0.0:*               LISTEN      7078/haproxy
7.13 测试
使用Navicat进行测试连接,注意前提对服务器进行授权,允许外部远程连接
授权命令如下:
mysql> grant all privileges on <em>.</em> to root@'%' identified by '123456';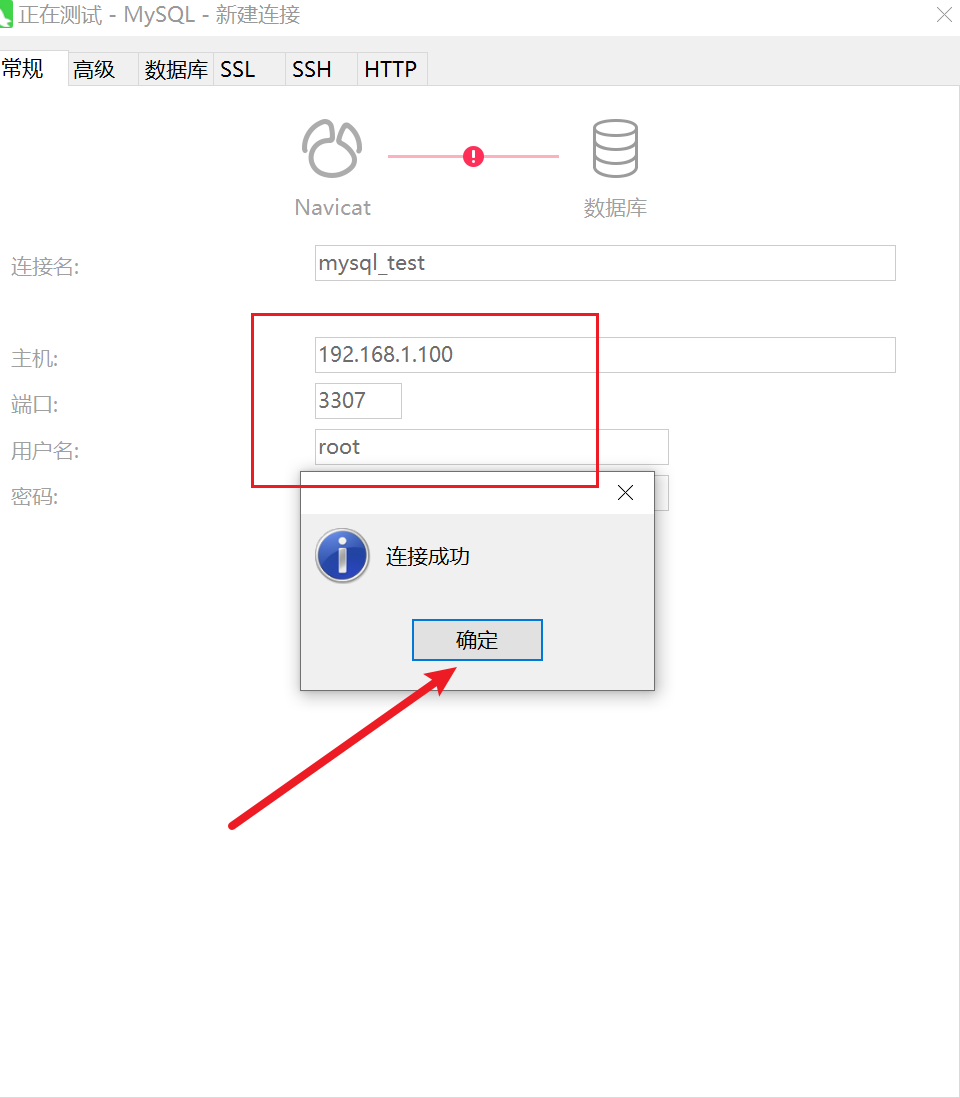
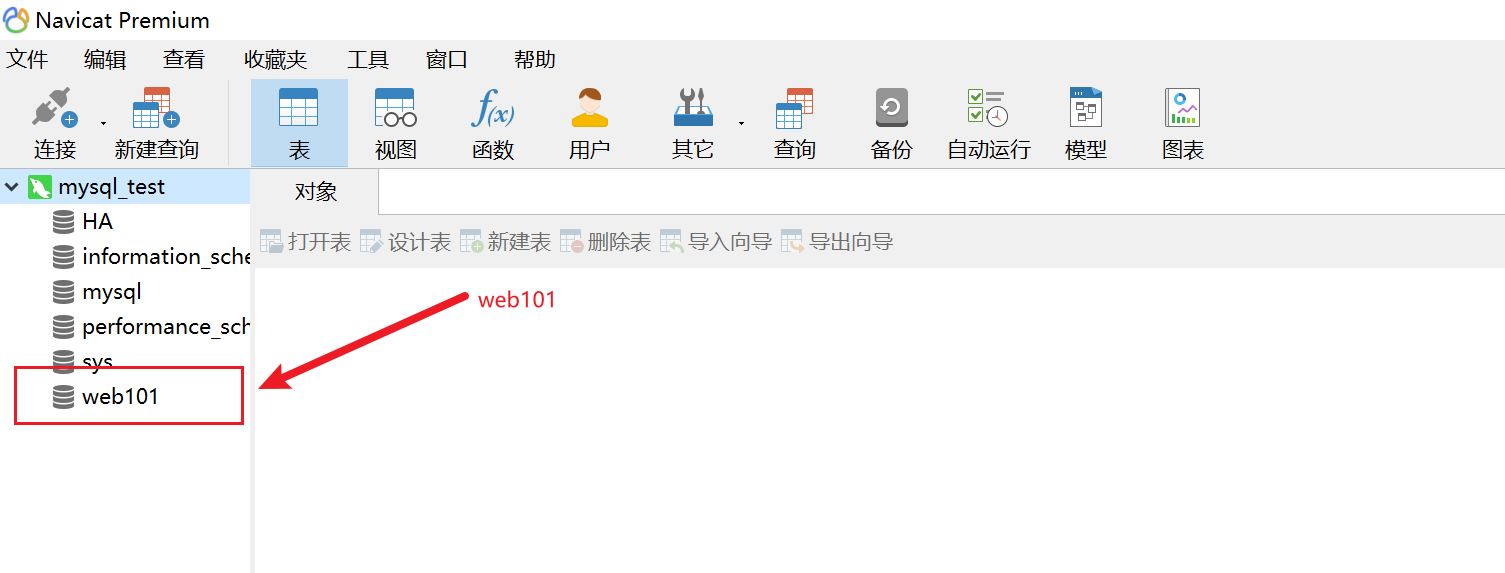
利用navicat连接192.168.1.100的3307端口,理论上我们会连接到后端的server1或者server2的mysql上,为了区别,我们分别从server1和server2单独建立两个库以便区分:
192.168.1.101 server1建立测试数据库web101;
192.168.1.102 server2建立测试数据库web102;
server1:
mysql> create database web101;
Query OK, 1 row affected (0.00 sec)
mysql>
server2:
mysql> create database web102;
Query OK, 1 row affected (0.00 sec)
mysql>再次测试:
断开连接后再次测试
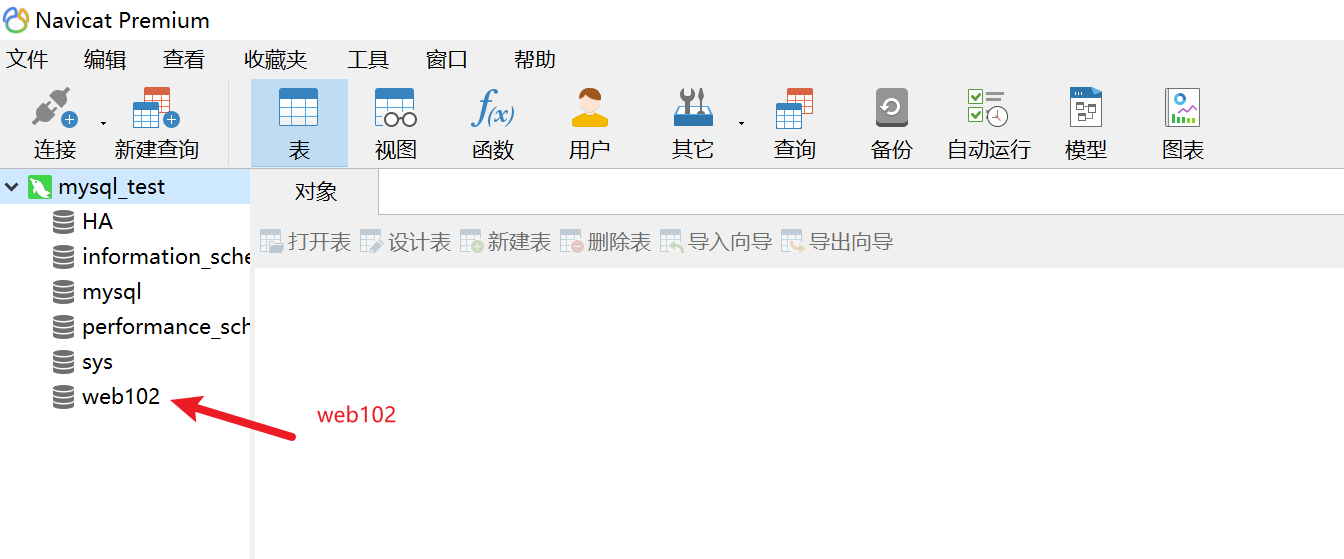
由此看出来,haproxy实现了对mysql的负载均衡。而server1和server2做了双主同步策略,因此可以实现数据库的数据同步。
8、HAProxy实战案例3:HAproxy实现web动静分离
8.1 实验拓扑图
8.2 在后端服务器上安装http,并启动服务
server1:设置静态页
[root@server1 ~]# yum -y install httpd
[root@server1 ~]# cat /var/www/html/index.html 新建静态页面
<h1>haproxy backend server web01<h1>
[root@server1 ~]# systemctl enable --now httpd
[root@server1 ~]#
server2:设置动态页
[root@server2 ~]# yum -y install httpd php
[root@server2 html]# cat index.php
<?php
phpinfo();
?>
[root@server2 ~]# systemctl enable --now httpd8.3 配置haproxy
##网站业务入口
frontend  http
   bind 192.168.1.100:80
   acl url_dyn path_end -i .php
   acl url_sta path_end -i  .jpg .gif .png .css .js .html .txt
   use_backend   staticblog if url_sta
   use_backend   dynamicblog if url_dyn
   option forwardfor
backend staticblog
   balance     roundrobin
   cookie WEBSRV insert nocache
   server web01 192.168.1.101:80 check weight 1   inter 3000 rise 2 fall 2 cookie cksrv1
backend dynamicblog
   balance     roundrobin
   cookie WEBSRV insert nocache
   server web02 192.168.1.102:80 check weight 1  inter 3000 rise 2 fall 2 cookie cksrv2
8.4 重启haproxy进行测试
[root@haproxy haproxy]# systemctl restart haproxy
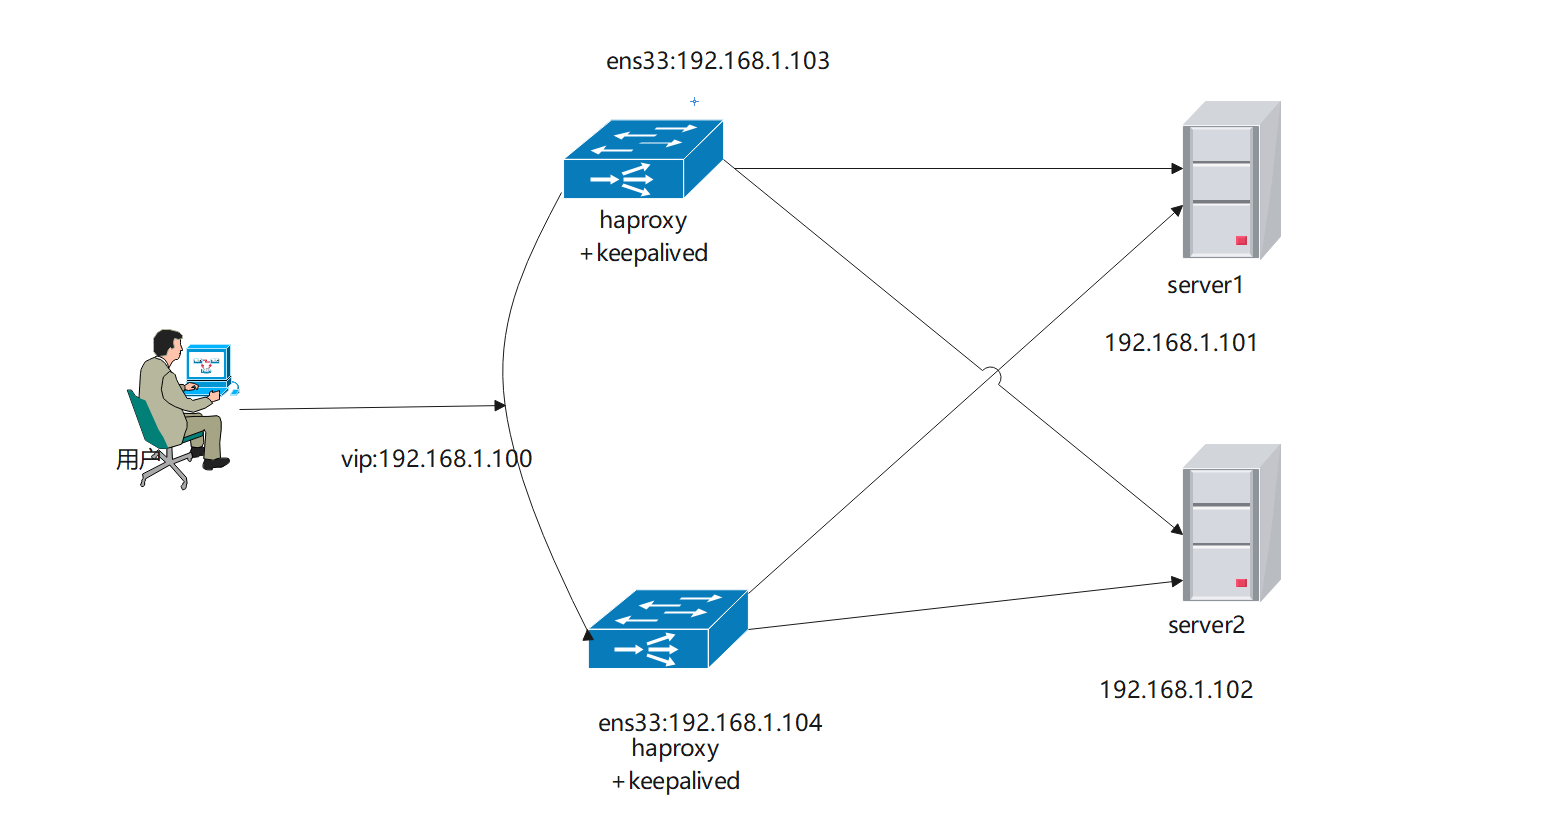
9、HAProxy实战案例4:haproxy+keepalived+apache实现高可用
9.1 实验拓扑图
9.2 安装haproxy,这里我们采用的是源码安装
9.2.1 编译安装lua
[root@localhost soft]# yum install gcc readline-devel make
[root@localhost soft]#wget http://www.lua.org/ftp/lua-5.4.4.tar.gz
[root@localhost soft]# tar zxf lua-5.4.4.tar.gz
[root@localhost soft]# cd lua-5.4.4
[root@localhost soft]# make all test9.2.2 编译安装haproxy
1)安装依赖
[root@localhost soft]# yum -y install gcc openssl-devel pcre-devel systemd-devel2)解压源码包
[root@localhost soft]# tar zxvf haproxy-2.2.25.tar.gz -C /usr/local/3)编译源码包
[root@localhost haproxy-2.2.25]# make ARCH=x86_64 TARGET=linux-glibc USE_PCRE=1 USE_OPENSSL=1 USE_ZLIB=1 USE_SYSTEMD=1 USE_LUA=1 LUA_INC=/opt/soft/lua-5.4.4/src/ LUA_LIB=/opt/soft/lua-5.4.4/src/注意:如果是1.8或者1.9的版本编译安装的命令有一定区别
[root@centos17haproxy-1.8.20]#make ARCH=x86_64 TARGET=linux2628 USE_PCRE=1 USE_OPENSSL=1 USE_ZLIB=1 USE_SYSTEMD=1 USE_CPU_AFFINITY=1 USE_LUA=1 LUA_INC=/opt/soft/lua-5.4.4/src/ LUA_LIB=/opt/soft/lua-5.4.4/src/ PREFIX=/usr/local/haproxy4)编译安装
[root@localhost haproxy-2.2.25]# make install PREFIX=/usr/local/haproxy9.2.3 生成软连接
[root@localhost haproxy-2.2.25]# ln -s /usr/local/haproxy/sbin/haproxy /usr/sbin/9.2.4 版本验证
[root@localhost haproxy-2.2.25]# haproxy -v
HA-Proxy version 2.2.25-50b5f5d 2022/07/28 - https://haproxy.org/
9.2.5 服务管理,配置service
[root@localhost ~]#vim /usr/lib/systemd/system/haproxy.service
[root@localhost ~]#cat /usr/lib/systemd/system/haproxy.service
[Unit]
Description=HAProxy Load Balancer
After=syslog.target network.target
[Service]
ExecStartPre=/usr/sbin/haproxy -f /etc/haproxy/haproxy.cfg  -c -q
ExecStart=/usr/sbin/haproxy -Ws -f /etc/haproxy/haproxy.cfg -p /var/lib/haproxy/haproxy.pid
ExecReload=/bin/kill -USR2 $MAINPID
LimitNOFILE=100000
[Install]
WantedBy=multi-user.target
新建haproxy的配置文件目录
[root@localhost haproxy-2.2.25]# mkdir /etc/haproxy/9.2.6 创建配置文件
将配置文件模板复制到/etc/haproxy目录下,并重新命名haproxy.cfg
[root@localhost ~]# cd /usr/local/haproxy-2.2.25/examples/ 模板配置文件路径
[root@localhost examples]# cp option-http_proxy.cfg /etc/haproxy/haproxy.cfg
9.2.7 创建用户和组
[root@localhost ~]# useradd -r -s /sbin/nologin -d /usr/local/haproxy/ haproxy9.2.8 启动服务
[root@localhost ~]# vim /etc/haproxy/haproxy.cfg 修改此配置文件中的
"frontend test-proxy
bind 192.168.1.100:8080" 此处的IP地址修改成宿主机的IP,否则无法启动
[root@localhost ~]# systemctl start haproxy
[root@localhost ~]# ps -ef |grep haproxy
root 78655 1 0 15:30 ? 00:00:00 /usr/sbin/haproxy -Ws -f /etc/haproxy/haproxy.cfg -p /var/lib/haproxy/haproxy.pid
200 78657 78655 0 15:30 ? 00:00:00 /usr/sbin/haproxy -Ws -f /etc/haproxy/haproxy.cfg -p /var/lib/haproxy/haproxy.pid
200 78658 78655 0 15:30 ? 00:00:00 /usr/sbin/haproxy -Ws -f /etc/haproxy/haproxy.cfg -p /var/lib/haproxy/haproxy.pid
200 78659 78655 0 15:30 ? 00:00:00 /usr/sbin/haproxy -Ws -f /etc/haproxy/haproxy.cfg -p /var/lib/haproxy/haproxy.pid
200 78660 78655 0 15:30 ? 00:00:00 /usr/sbin/haproxy -Ws -f /etc/haproxy/haproxy.cfg -p /var/lib/haproxy/haproxy.pid
root 78664 2997 0 15:30 pts/1 00:00:00 grep --color=auto haproxy
[root@localhost ~]#
9.3 配置haproxy策略(haproxy1和haproxy2)
global
chroot /var/lib/haproxy
uid 99
gid 99
daemon
nbproc 4
#在多进程的环境下,建议可以配置多个socket,然后可以根据不同的socket来动态调整权重等其他信息
stats socket /var/lib/haproxy/haproxy.sock1 mode 600 level admin process 1
stats socket /var/lib/haproxy/haproxy.sock2 mode 600 level admin process 2
stats socket /var/lib/haproxy/haproxy.sock3 mode 600 level admin process 3
stats socket /var/lib/haproxy/haproxy.sock4 mode 600 level admin process 4
pidfile /var/run/haproxy.pid
ulimit-n 65535
maxconn 20480
log 127.0.0.1 local0 info<br />
</p>
<p>defaults
log global
mode http
option httplog
retries 3
maxconn 100000
option redispatch
option abortonclose
option http-keep-alive
option forwardfor
timeout connect 120s
timeout server 600s
timeout client 600s
timeout http-keep-alive 120s
timeout check 5s </p>
<p>listen admin_stats
bind 192.168.1.100:8080
mode http
option httplog
maxconn 1000
stats refresh 30s
stats uri /stats
stats auth admin:admin
stats hide-version
##网站业务入口
listen http_web
bind 192.168.1.100:80
mode http
option forwardfor
balance roundrobin
cookie WEBSRV insert nocache
server web01 192.168.1.101:80 check weight 1 inter 3000 rise 2 fall 2 cookie cksrv1
server web02 192.168.1.102:80 check weight 1 inter 3000 rise 2 fall 2 cookie cksrv29.4 启动haproxy
[root@haproxy01 haproxy]# systemctl restart haproxy
[root@haproxy02 haproxy]# systemctl restart haproxy
9.5 在2台haproxy服务器上分别安装keepalived软件
[root@haproxy01 ~]# yum -y install keepalived
[root@haproxy02 ~]# yum -y install keepalived9.6 配置keepalived
9.6.1 haproxy master的配置
! Configuration File for keepalived
global_defs {
notification_email {
acassen@firewall.loc
failover@firewall.loc
sysadmin@firewall.loc
}
notification_email_from Alexandre.Cassen@firewall.loc
smtp_server 192.168.1.103
smtp_connect_timeout 30
router_id LVS_DEVEL
vrrp_skip_check_adv_addr
}
vrrp_instance VI_1
{
state MASTER
interface ens33
virtual_router_id 66
priority 100
advert_int 1
authentication {
auth_type PASS
auth_pass 1111
}
virtual_ipaddress {
192.168.1.100
}
}
9.6.2 haproxy slave的配置
! Configuration File for keepalived
global_defs {
notification_email {
acassen@firewall.loc
failover@firewall.loc
sysadmin@firewall.loc
}
notification_email_from Alexandre.Cassen@firewall.loc
smtp_server 192.168.1.104
smtp_connect_timeout 30
router_id LVS_DEVEL
vrrp_skip_check_adv_addr
}
vrrp_instance VI_1 {
state BACKUP ##切换成备用服务器
interface ens33
virtual_router_id 66 ##同一组服务,虚拟路由器ID要一致
priority 90 ##优先级调整
advert_int 1
authentication {
auth_type PASS
auth_pass 1111
}
virtual_ipaddress {
192.168.1.100 ##VIP地址和master一致
}
}
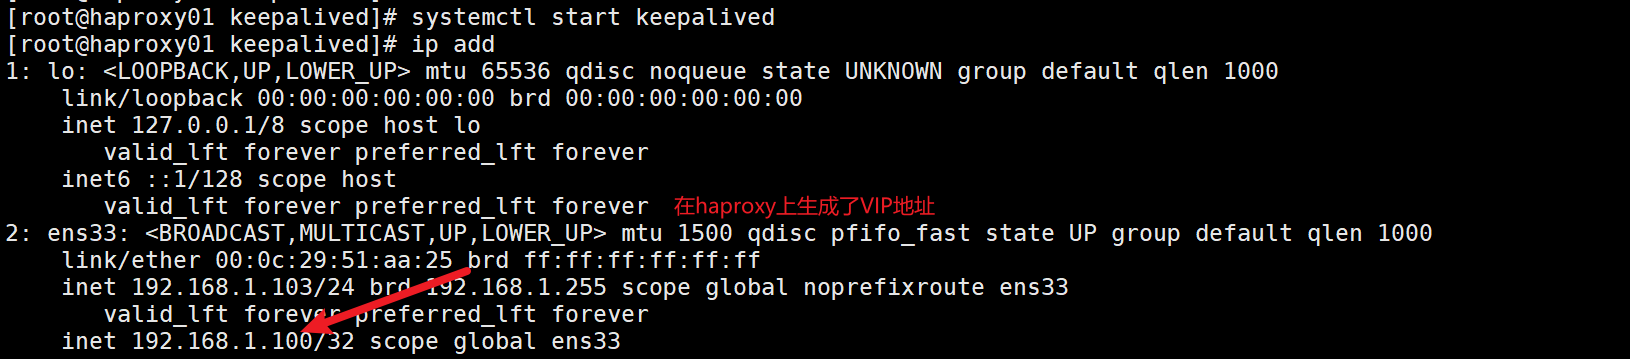
9.7 启动keepalived
9.8 real server安装http服务
server1:
[root@server1 ~]# yum -y install httpd
[root@server1 ~]# cat /var/www/html/index.html
<h1>haproxy backend server web01<h1>
[root@server1 ~]# systemctl enable --now httpd
[root@server1 ~]#
server2:
[root@server2 ~]# yum -y install httpd
[root@server2 ~]# cat /var/www/html/index.html
<h1>haproxy backend server web02<h1>
[root@server2 ~]# systemctl enable --now httpd
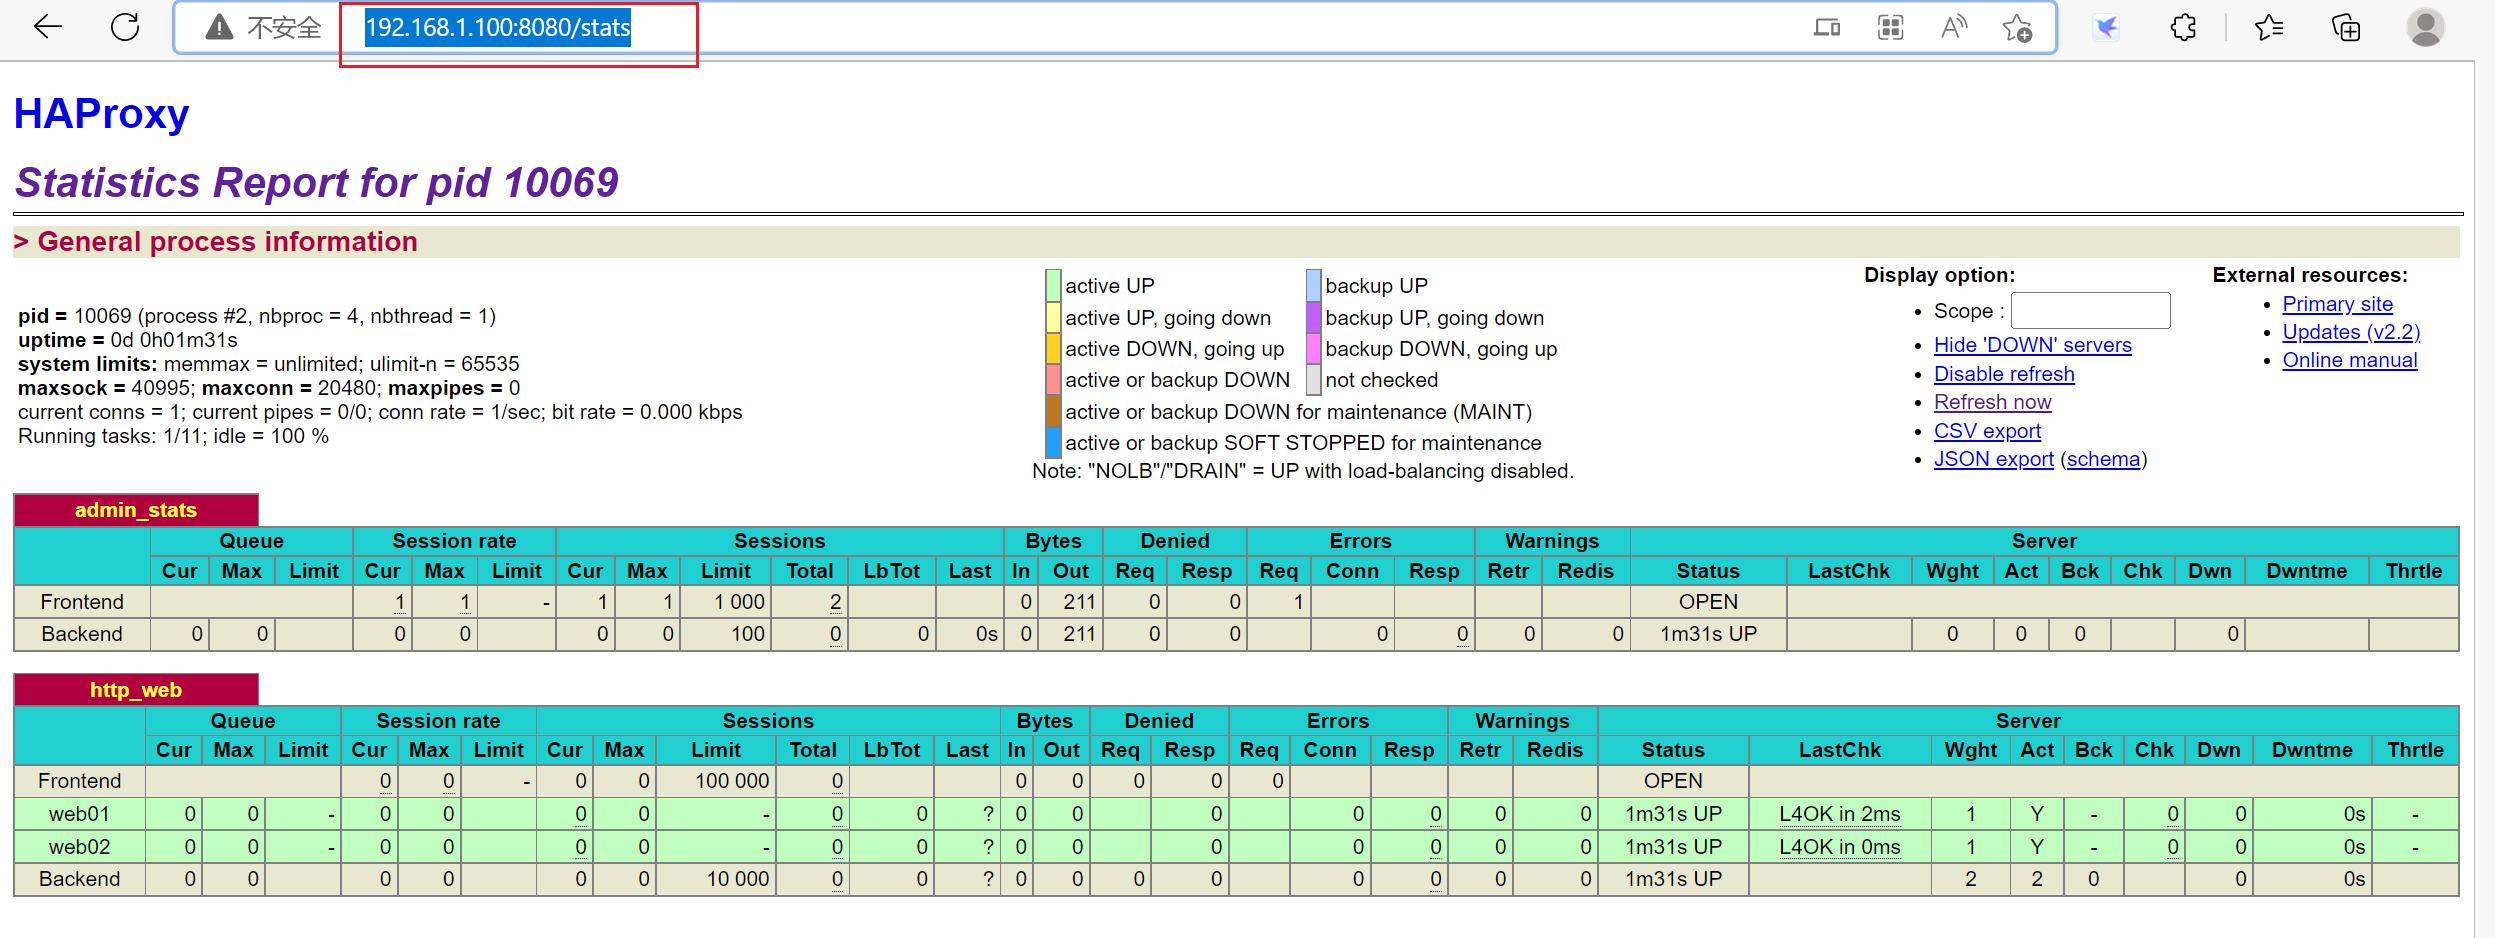
[root@server2 ~]#9.9 测试VIP是否正常
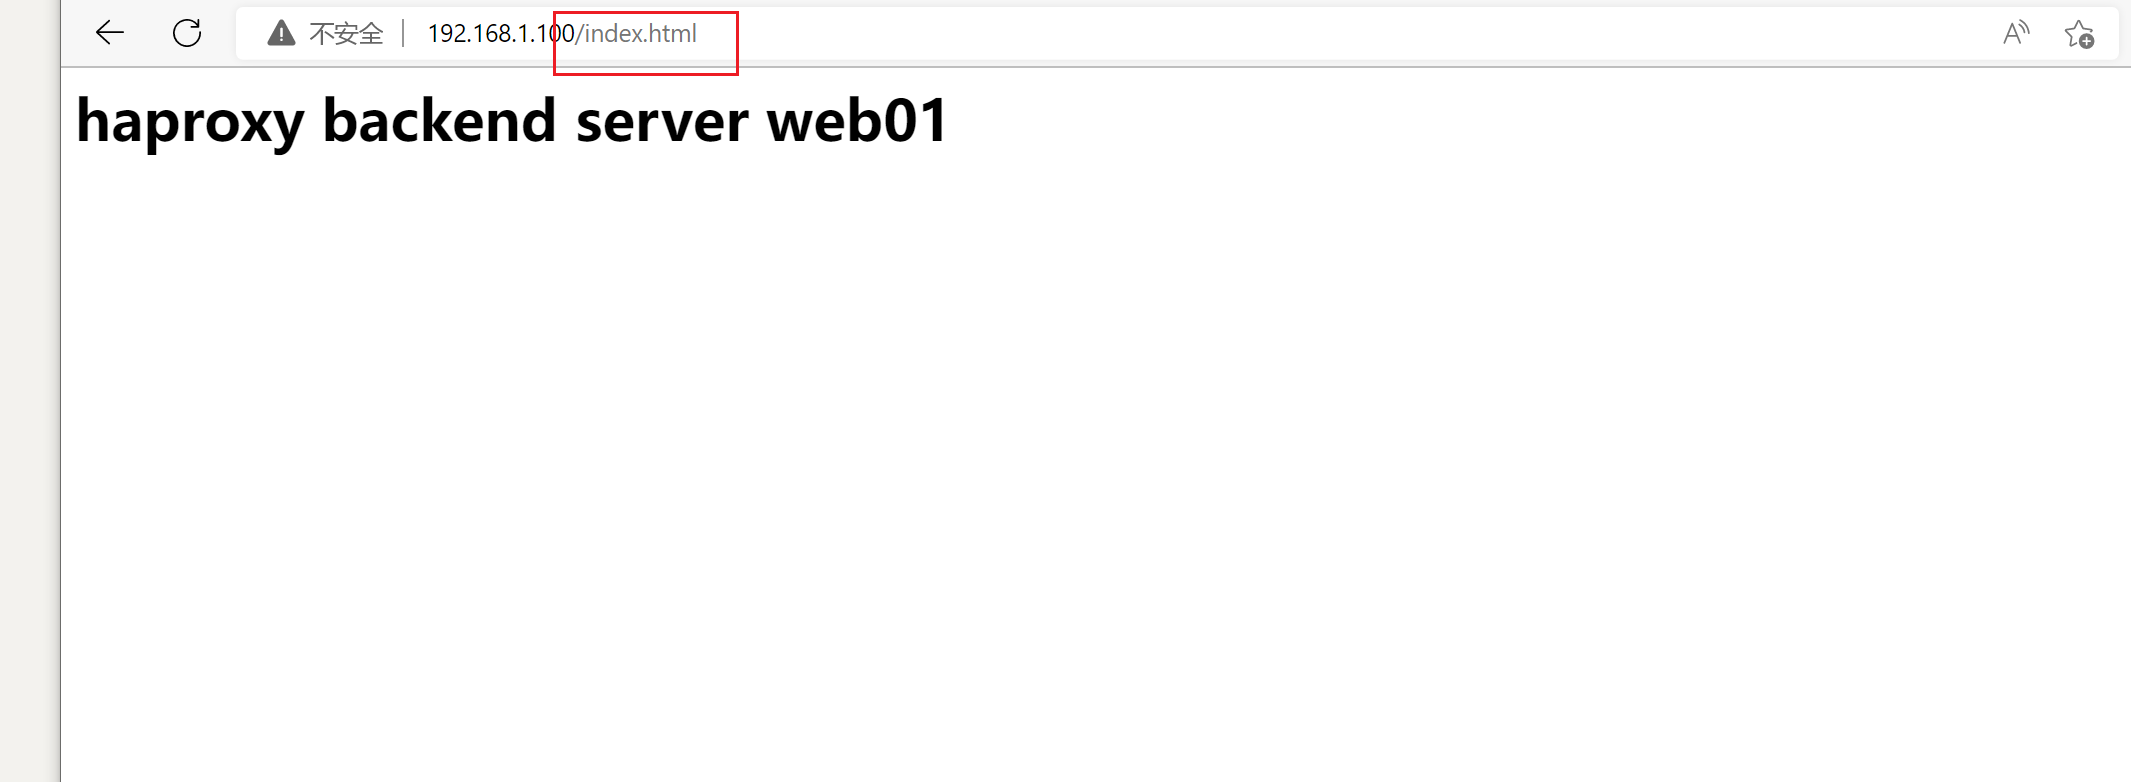
9.9.1 查看监控页是否正常
9.9.2 访问测试
curl 192.168.1.100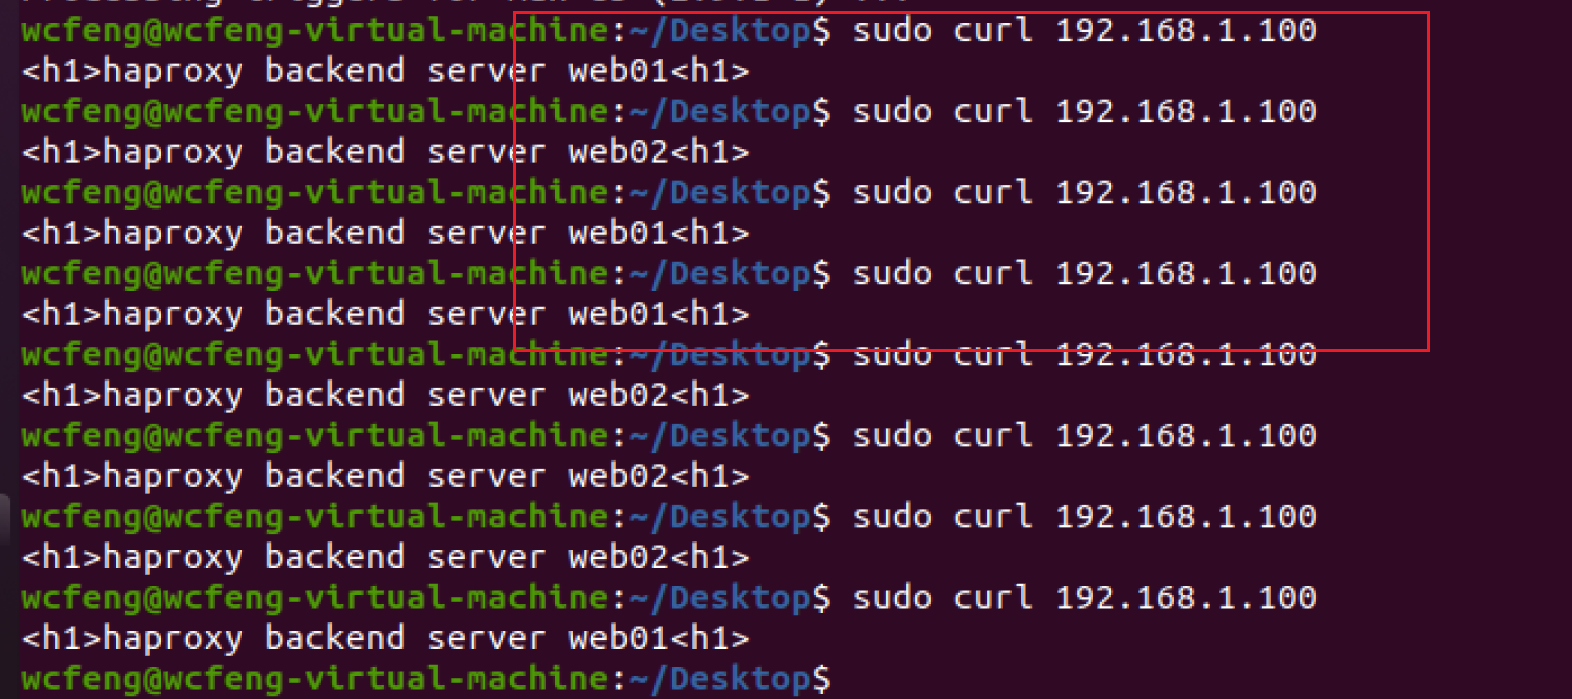
9.10 模拟高可用
将haproxy1服务器的keepalived服务器停止,查看VIP地址是否漂移到haproxy2号服务器,并查看服务中断时间
while true;do curl http://192.168.1.100/index.html;sleep 1;done
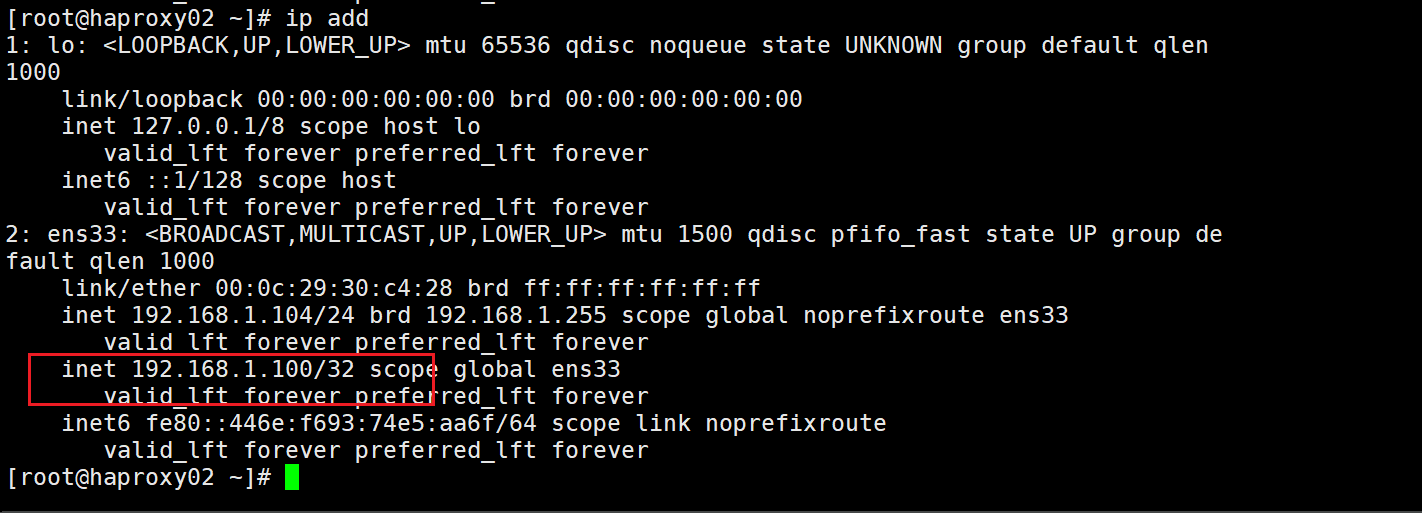
可以看到在停止服务的瞬间,VIP完成了漂移,服务也切换成功了,正常访问。
常用选项
ipvsadm
ipvsadm -e [-t|u|f] service-address -r service-address [-g|i|m] [-w weight]
-A	添加虚拟机
-t	TCP服务
-u  UDP服务
-f	表示firewall make 标记
-s	指定调度算法(rr,wrr)
-E	修改规则
-D	删除规则</p>
<p>增加规则:ipvsadm -A -t 192.168.1.101:80 -s rr -p 60    (60秒)
修改规则:ipvsadm -E -t 192.168.1.101:80 -s wrr</p>
<p>管理后端真实服务器
-a	添加 real server 地址
-r	指定 real server 地址
-m	NAT方式的LVS
-i	表示ipip,IP-YUN模式
-g	DR模式 (需要接 -w 指定权重)
-w	权重
-Ln	查看规则 加 [-c] 选项查看连接 [-stats 统计数据;-rate 速率;-timeout 会话超时时长 ]