
LVS-DR集成 keepalived 部署
实验要求:关闭服务器的Selinux和防火墙
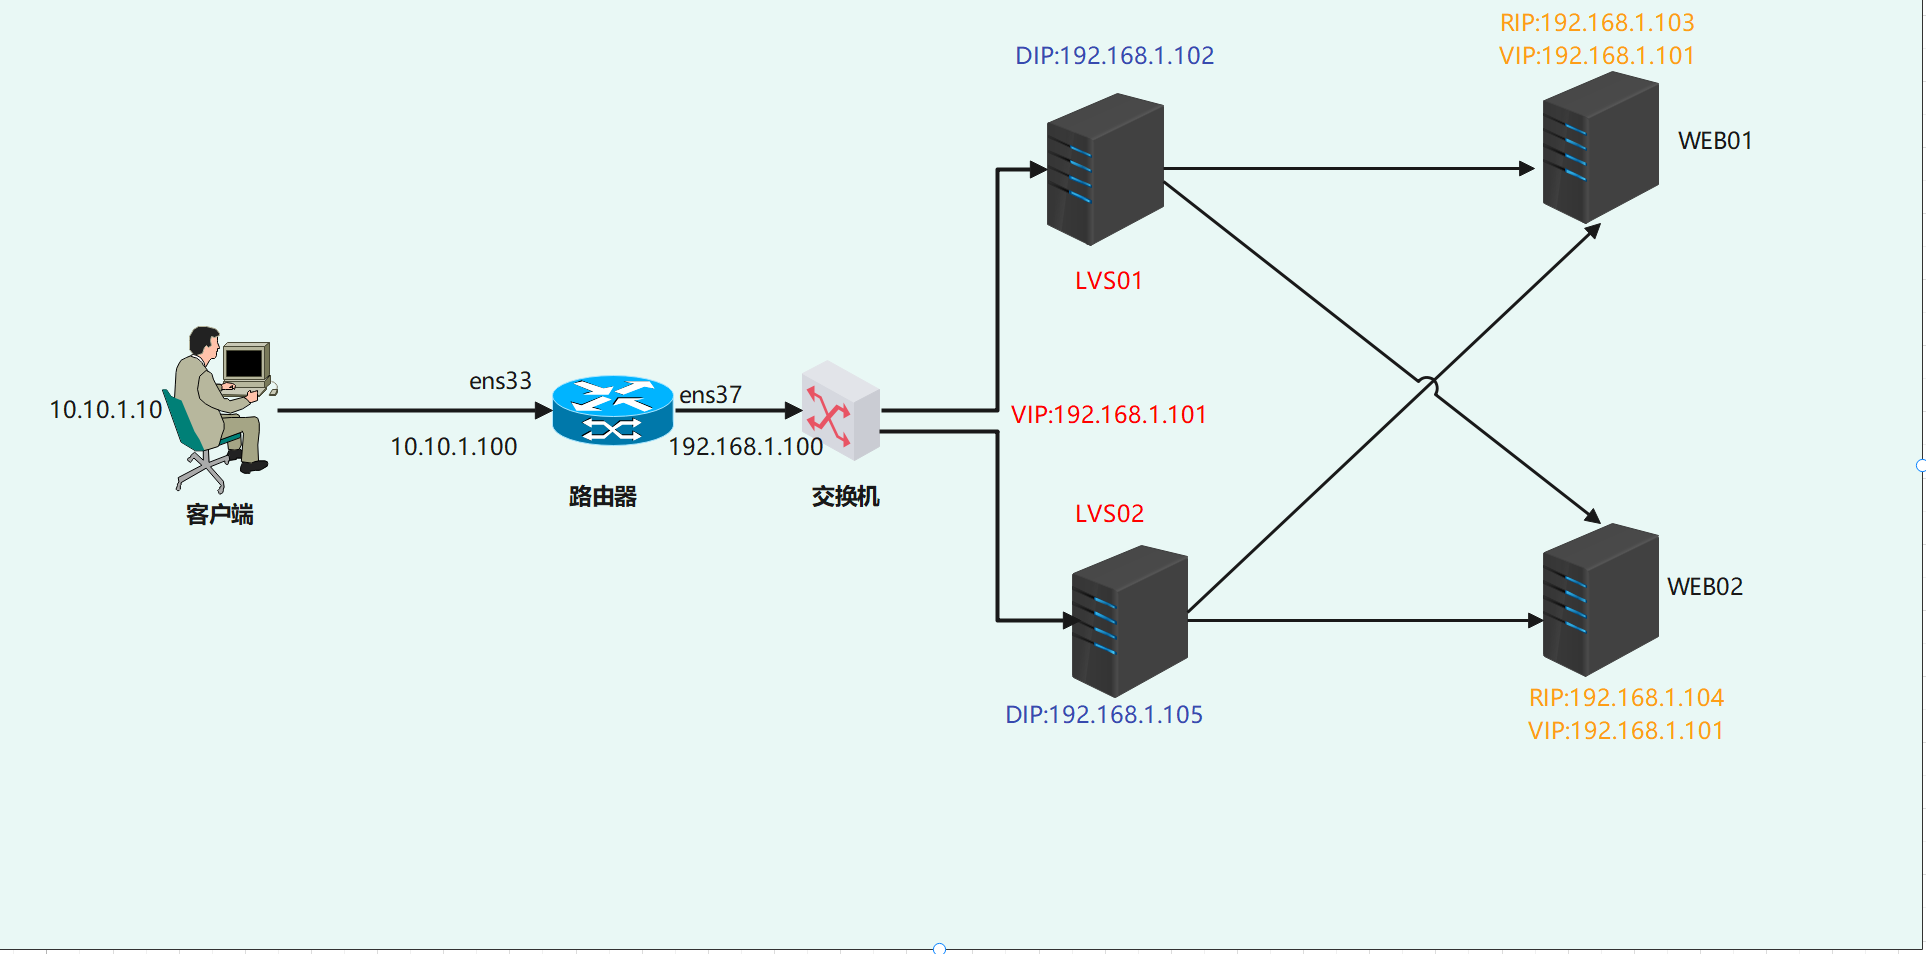
1、IP地址规划
角色 | 网络环境 | IP |
|---|---|---|
客户端 | CentOS7.9 | 10.10.1.10 |
路由器 | CentOS7.9 | 10.10.1.100;192.168.1.100 |
director-master+keepalived | CentOS7.9 | DIP:192.168.1.102;VIP:192.168.1.101 |
director-slave+keepalived | CentOS7.9 | DIP:192.168.1.105;VIP:192.168.1.101 |
RS1 | CentOS7.9 | RIP:192.168.1.103;vip:192.168.1.101 |
RS2 | CentOS7.9 | RIP:192.168.1.104;vip:192.168.1.101 |
2、实验拓扑
3、配置LVS
要求所有的机器将服务器的防火墙和selinux关闭。
1)客户端的网卡配置
注意:这里指定网关为router的入网接口

2)配置router
我们注意到,router有2个网卡,我们应该在新建一个网卡,进行配置
[root@router network-scripts]# cp ifcfg-ens33 ifcfg-ens37
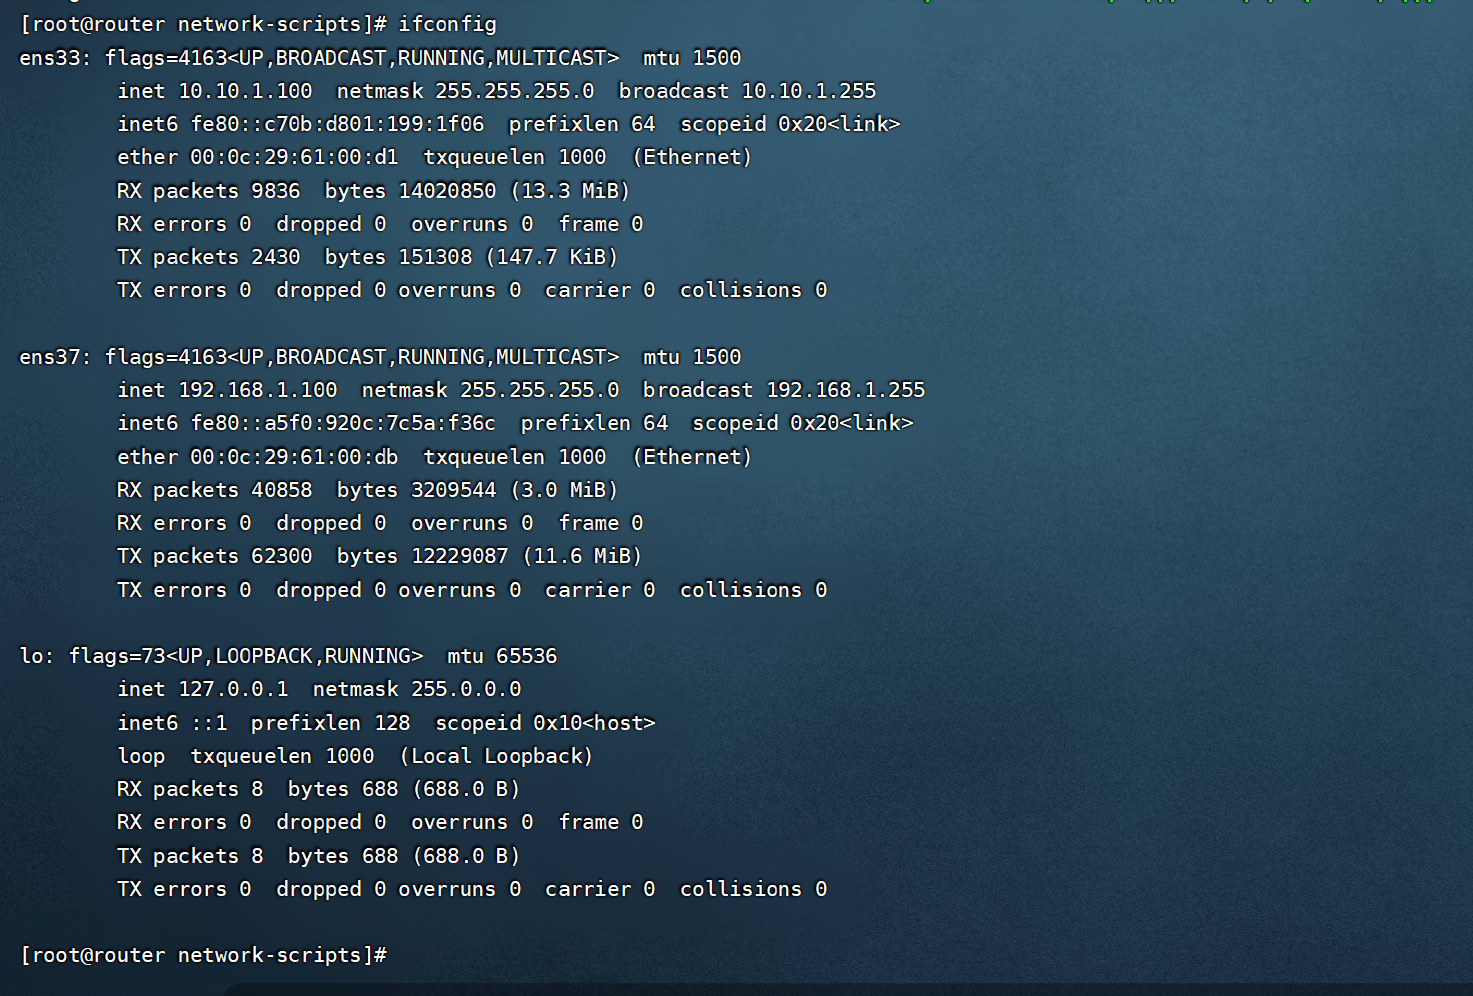
同是,由于路由器需要承担路由转发的功能,因此需要开启IP_forward的功能
[root@router ~]# vim /etc/sysctl.conf
[root@router ~]# cat /etc/sysctl.conf
# sysctl settings are defined through files in
# /usr/lib/sysctl.d/, /run/sysctl.d/, and /etc/sysctl.d/.
#
# Vendors settings live in /usr/lib/sysctl.d/.
# To override a whole file, create a new file with the same in
# /etc/sysctl.d/ and put new settings there. To override
# only specific settings, add a file with a lexically later
# name in /etc/sysctl.d/ and put new settings there.
#
# For more information, see sysctl.conf(5) and sysctl.d(5).
net.ipv4.ip_forward=1
[root@router ~]# sysctl -p      ##生效配置
net.ipv4.ip_forward = 1
[root@router ~]#
3)配置转发器
安装keepalived和ipvsadm
master:
[root@director-master ~]# yum -y install keepalived ipvsadm
slave:
[root@director-slave ~]# yum -y install keepalived ipvsadm转发器上有一个物理网卡,用于承担DIP的工作
##master配置:
[root@director-master keepalived]# ifconfig
ens33: flags=4163<UP,BROADCAST,RUNNING,MULTICAST> mtu 1500
inet 192.168.1.102 netmask 255.255.255.0 broadcast 192.168.1.255
inet6 fe80::efa7:e106:8c51:48aa prefixlen 64 scopeid 0x20<link>
ether 00:0c:29:c7:96:90 txqueuelen 1000 (Ethernet)
RX packets 2572 bytes 2099429 (2.0 MiB)
RX errors 0 dropped 0 overruns 0 frame 0
TX packets 1657 bytes 162022 (158.2 KiB)
TX errors 0 dropped 0 overruns 0 carrier 0 collisions 0
lo: flags=73<UP,LOOPBACK,RUNNING> mtu 65536
inet 127.0.0.1 netmask 255.0.0.0
inet6 ::1 prefixlen 128 scopeid 0x10<host>
loop txqueuelen 1000 (Local Loopback)
RX packets 48 bytes 3912 (3.8 KiB)
RX errors 0 dropped 0 overruns 0 frame 0
TX packets 48 bytes 3912 (3.8 KiB)
TX errors 0 dropped 0 overruns 0 carrier 0 collisions 0
##slave配置:
[root@director-slave keepalived]# ifconfig
ens33: flags=4163<UP,BROADCAST,RUNNING,MULTICAST> mtu 1500
inet 192.168.1.105 netmask 255.255.255.0 broadcast 192.168.1.255
inet6 fe80::455f:1125:fc9e:62b5 prefixlen 64 scopeid 0x20<link>
ether 00:0c:29:ea:98:55 txqueuelen 1000 (Ethernet)
RX packets 2708 bytes 2109439 (2.0 MiB)
RX errors 0 dropped 0 overruns 0 frame 0
TX packets 1424 bytes 165746 (161.8 KiB)
TX errors 0 dropped 0 overruns 0 carrier 0 collisions 0
lo: flags=73<UP,LOOPBACK,RUNNING> mtu 65536
inet 127.0.0.1 netmask 255.0.0.0
inet6 ::1 prefixlen 128 scopeid 0x10<host>
loop txqueuelen 1000 (Local Loopback)
RX packets 31 bytes 2720 (2.6 KiB)
RX errors 0 dropped 0 overruns 0 frame 0
TX packets 31 bytes 2720 (2.6 KiB)
TX errors 0 dropped 0 overruns 0 carrier 0 collisions 0
[root@director-slave keepalived]# 添加LVS规则
ipvsadm -A -t 192.168.1.101:80 -s rr persistent 50
ipvsadm -a -t 192.168.1.101:80 -r 192.168.1.103 -g
ipvsadm -a -t 192.168.1.101:80 -r 192.168.1.104 -g
4、配置2台RS服务器
1)分别安装http服务
[root@rs1 ~]# yum  -y install httpd
[root@rs2 ~]# yum -y install httpd
2)配置接口地址,从拓扑图可以看到,2个RS服务器分别有2个VIP的地址,这个VIP地址我们将配置在回环口上
RS1:
[root@rs1 network-scripts]# cp ifcfg-lo ifcfg-lo:0
[root@rs1 network-scripts]# vim ifcfg-lo:0
[root@rs1 network-scripts]# cat ifcfg-lo:0
DEVICE=lo:0
IPADDR=192.168.1.101
NETMASK=255.255.255.255
# If you're having problems with gated making 127.0.0.0/8 a martian,
# you can change this to something else (255.255.255.255, for example)
ONBOOT=yes
NAME=loopback
[root@rs1 network-scripts]# ifconfig ##查看IP
ens33: flags=4163<UP,BROADCAST,RUNNING,MULTICAST> mtu 1500
inet 192.168.1.103 netmask 255.255.255.0 broadcast 192.168.1.255
inet6 fe80::ba87:58a3:a30c:bf23 prefixlen 64 scopeid 0x20<link>
ether 00:0c:29:30:c4:28 txqueuelen 1000 (Ethernet)
RX packets 12227 bytes 17022680 (16.2 MiB)
RX errors 0 dropped 0 overruns 0 frame 0
TX packets 4759 bytes 345003 (336.9 KiB)
TX errors 0 dropped 0 overruns 0 carrier 0 collisions 0
lo: flags=73<UP,LOOPBACK,RUNNING> mtu 65536
inet 127.0.0.1 netmask 255.0.0.0
inet6 ::1 prefixlen 128 scopeid 0x10<host>
loop txqueuelen 1000 (Local Loopback)
RX packets 0 bytes 0 (0.0 B)
RX errors 0 dropped 0 overruns 0 frame 0
TX packets 0 bytes 0 (0.0 B)
TX errors 0 dropped 0 overruns 0 carrier 0 collisions 0
lo:0: flags=73<UP,LOOPBACK,RUNNING> mtu 65536
inet 192.168.1.101 netmask 255.255.255.255
loop txqueuelen 1000 (Local Loopback)
[root@rs1 network-scripts]#
RS2:
[root@rs2 network-scripts]# cp ifcfg-lo ifcfg-lo:0
[root@rs2 network-scripts]# vim ifcfg-lo:0
[root@rs2 network-scripts]# cat ifcfg-lo:0
DEVICE=lo:0
IPADDR=192.168.1.101
NETMASK=255.255.255.255
# If you're having problems with gated making 127.0.0.0/8 a martian,
# you can change this to something else (255.255.255.255, for example)
ONBOOT=yes
NAME=loopback
[root@rs2 network-scripts]# ifconfig ##查看IP
ens33: flags=4163<UP,BROADCAST,RUNNING,MULTICAST> mtu 1500
inet 192.168.1.104 netmask 255.255.255.0 broadcast 192.168.1.255
inet6 fe80::a22a:ccdd:74ee:1ba8 prefixlen 64 scopeid 0x20<link>
ether 00:0c:29:98:db:75 txqueuelen 1000 (Ethernet)
RX packets 3074 bytes 3361875 (3.2 MiB)
RX errors 0 dropped 0 overruns 0 frame 0
TX packets 1927 bytes 166993 (163.0 KiB)
TX errors 0 dropped 0 overruns 0 carrier 0 collisions 0
lo: flags=73<UP,LOOPBACK,RUNNING> mtu 65536
inet 127.0.0.1 netmask 255.0.0.0
inet6 ::1 prefixlen 128 scopeid 0x10<host>
loop txqueuelen 1000 (Local Loopback)
RX packets 0 bytes 0 (0.0 B)
RX errors 0 dropped 0 overruns 0 frame 0
TX packets 0 bytes 0 (0.0 B)
TX errors 0 dropped 0 overruns 0 carrier 0 collisions 0
lo:0: flags=73<UP,LOOPBACK,RUNNING> mtu 65536
inet 192.168.1.101 netmask 255.255.255.255
loop txqueuelen 1000 (Local Loopback)3)配置2台服务器的网关地址(和出网的路由器IP地址一致)
RS1:

RS2:

4)两台主机分别写入不同的内容进行测试
RS1:
[root@rs1 ~]# echo "192.168.1.103" >/var/www/html/index.html
[root@rs1 ~]# systemctl restart httpd
[root@rs1 ~]# systemctl enable httpd
Created symlink from /etc/systemd/system/multi-user.target.wants/httpd.service to /usr/lib/systemd/system/httpd.service.
RS2:
[root@rs2 ~]# echo "192.168.1.104" >/var/www/html/index.html
[root@rs2 ~]# systemctl restart httpd
[root@rs2 ~]# systemctl enable httpd
Created symlink from /etc/systemd/system/multi-user.target.wants/httpd.service to /usr/lib/systemd/system/httpd.service.
[root@rs2 ~]#
5)关闭ARP转发(在两台RS上都需要同样的操作)
同一个广播域: 配置了多个相同的VIP 是不允许的, 要想实现,就必须让外面的网络, 无法发现这个VIP的存在
因此 在Linux里面, 可以修改内核参数, 实现接口IP的广播不响应、不广播
arp_ignore = 1 表示只回答目标IP是访问本地网络对应接口的arp请求
arp_announce = 2 只宣告本机网卡直连网络所在的ip的arp广播
vim /etc/sysctl.conf,加入
RS1:
net.ipv4.conf.all.arp_ignore = 1
net.ipv4.conf.all.arp_announce = 2
net.ipv4.conf.lo.arp_ignore = 1
net.ipv4.conf.lo.arp_announce = 2
RS2:
net.ipv4.conf.all.arp_ignore = 1
net.ipv4.conf.all.arp_announce = 2
net.ipv4.conf.lo.arp_ignore = 1
net.ipv4.conf.lo.arp_announce = 2
sysctl -p ##生效6)测试访问

接下来,我们开始部署keepalived
5、部署keepalived
1)配置keepalived
master
! Configuration File for keepalived
global_defs {
notification_email {
acassen@firewall.loc
failover@firewall.loc
sysadmin@firewall.loc
}
notification_email_from Alexandre.Cassen@firewall.loc
smtp_server 192.168.1.102
smtp_connect_timeout 30
router_id LVS_DEVEL
vrrp_skip_check_adv_addr
}
vrrp_instance VI_1
{
state MASTER
interface ens33
virtual_router_id 66
priority 100
advert_int 1
authentication {
auth_type PASS
auth_pass 1111
}
virtual_ipaddress {
192.168.1.101
}
}
virtual_server 192.168.1.101 80 {
delay_loop 6
lb_algo wrr
lb_kind DR
persistence_timeout 50
protocol TCP
real_server 192.168.1.103 80 {
weight 1
TCP_CHECK {
connect_timeout 10
nb_get_retry 3
delay_before_retry 3
connect_port 80
}
}
real_server 192.168.1.104 80 {
weight 1
TCP_CHECK {
connect_timeout 10 #连接超时时间
nb_get_retry 3 #重连次数
delay_before_retry 3 #重连间隔时间
connect_port 80 #健康检查的端口
}
}
}slave:
! Configuration File for keepalived
global_defs {
notification_email {
acassen@firewall.loc
failover@firewall.loc
sysadmin@firewall.loc
}
notification_email_from Alexandre.Cassen@firewall.loc
smtp_server 192.168.1.105
smtp_connect_timeout 30
router_id LVS_DEVEL
vrrp_skip_check_adv_addr
}
vrrp_instance VI_1 {
state BACKUP
interface ens33
virtual_router_id 66
priority 90
advert_int 1
authentication {
auth_type PASS
auth_pass 1111
}
virtual_ipaddress {
192.168.1.101
}
}
virtual_server 192.168.1.101 80 {
delay_loop 6
lb_algo rr
lb_kind DR
persistence_timeout 50
protocol TCP
real_server 192.168.1.103 80 {
weight 1
TCP_CHECK{
connect_timeout 3
nb_get_retry 3
delay_before_retry 3
connect_port 80
}
}
real_server 192.168.1.104 80 {
weight 1
TCP_CHECK{
connect_timeout 3
nb_get_retry 3
delay_before_retry 3
connect_port 80
}
}
}3)启动keepalived(主备服务器均启动)
[root@director-master keepalived]# systemctl start keepalived
[root@director-master keepalived]# systemctl enable keepalived
[root@director-master keepalived]# systemctl status keepalived
● keepalived.service - LVS and VRRP High Availability Monitor
Loaded: loaded (/usr/lib/systemd/system/keepalived.service; disabled; vendor preset: disabled)
Active: active (running) since Thu 2021-12-09 21:00:58 CST; 6s ago
Process: 1781 ExecStart=/usr/sbin/keepalived $KEEPALIVED_OPTIONS (code=exited, status=0/SUCCESS)
Main PID: 1782 (keepalived)
CGroup: /system.slice/keepalived.service
├─1782 /usr/sbin/keepalived -D
├─1783 /usr/sbin/keepalived -D
└─1785 /usr/sbin/keepalived -D
Dec 09 21:01:02 director-master Keepalived_vrrp[1785]: VRRP_Instance(VI_1) Transition to MASTER STATE
Dec 09 21:01:03 director-master Keepalived_vrrp[1785]: VRRP_Instance(VI_1) Entering MASTER STATE
Dec 09 21:01:03 director-master Keepalived_vrrp[1785]: VRRP_Instance(VI_1) setting protocol iptable drop rule
Dec 09 21:01:03 director-master Keepalived_vrrp[1785]: VRRP_Instance(VI_1) setting protocol VIPs.
Dec 09 21:01:03 director-master Keepalived_vrrp[1785]: Sending gratuitous ARP on ens33 for 192.168.1.101
Dec 09 21:01:03 director-master Keepalived_vrrp[1785]: VRRP_Instance(VI_1) Sending/queueing gratuitous ARPs on ens33 for 192.168.1.101
Dec 09 21:01:03 director-master Keepalived_vrrp[1785]: Sending gratuitous ARP on ens33 for 192.168.1.101
Dec 09 21:01:03 director-master Keepalived_vrrp[1785]: Sending gratuitous ARP on ens33 for 192.168.1.101
Dec 09 21:01:03 director-master Keepalived_vrrp[1785]: Sending gratuitous ARP on ens33 for 192.168.1.101
Dec 09 21:01:03 director-master Keepalived_vrrp[1785]: Sending gratuitous ARP on ens33 for 192.168.1.101[root@director-master keepalived]# ip addr
1: lo: <LOOPBACK,UP,LOWER_UP> mtu 65536 qdisc noqueue state UNKNOWN group default qlen 1000
link/loopback 00:00:00:00:00:00 brd 00:00:00:00:00:00
inet 127.0.0.1/8 scope host lo
valid_lft forever preferred_lft forever
inet6 ::1/128 scope host
valid_lft forever preferred_lft forever
2: ens33: <BROADCAST,MULTICAST,UP,LOWER_UP> mtu 1500 qdisc pfifo_fast state UP group default qlen 1000
link/ether 00:0c:29:c7:96:90 brd ff:ff:ff:ff:ff:ff
inet 192.168.1.102/24 brd 192.168.1.255 scope global noprefixroute ens33
valid_lft forever preferred_lft forever
inet 192.168.1.101/32 scope global ens33
valid_lft forever preferred_lft forever
inet6 fe80::efa7:e106:8c51:48aa/64 scope link noprefixroute
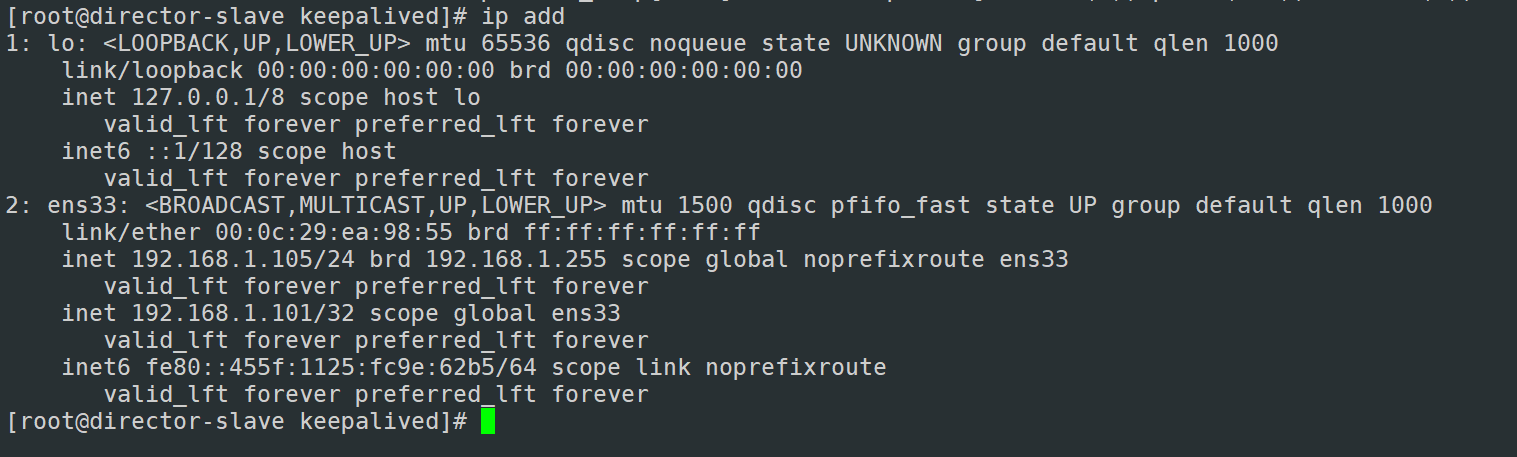
valid_lft forever preferred_lft forever可以看到VIP已经正常绑定了
4)查看一下LVS的规则
##master:
[root@director-master keepalived]# ipvsadm -L -n
IP Virtual Server version 1.2.1 (size=4096)
Prot LocalAddress:Port Scheduler Flags
-> RemoteAddress:Port Forward Weight ActiveConn InActConn
TCP 192.168.1.101:80 rr persistent 50
-> 192.168.1.103:80 Route 1 0 0
-> 192.168.1.104:80 Route 1 0 0
[root@director-master keepalived]#
##slave:
[root@director-slave keepalived]# ipvsadm -L -n
IP Virtual Server version 1.2.1 (size=4096)
Prot LocalAddress:Port Scheduler Flags
-> RemoteAddress:Port Forward Weight ActiveConn InActConn
TCP 192.168.1.101:80 rr persistent 50
-> 192.168.1.103:80 Route 1 0 0
-> 192.168.1.104:80 Route 1 0 0 可以看到也已经生效了。
5)客户端上测试访问(访问一直落在192.168.1.103,是因为LVS开启了持久化连接导致)

6)模拟master挂掉的情况
可以看到VIP已经漂移到了slave上了。
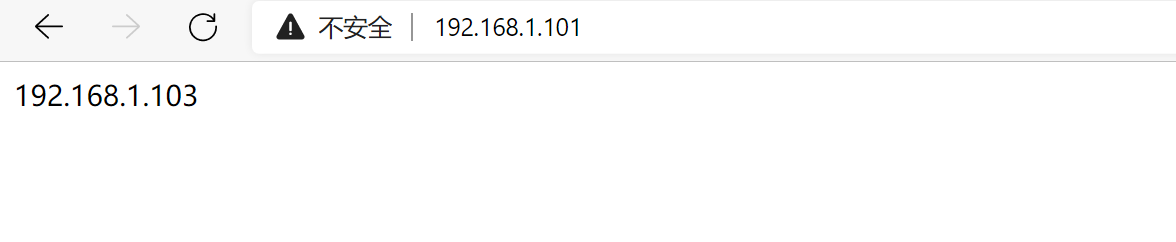
访问还是正常的,说明LVS高可用是正常的。
